Robot View
The Robot View provides a summarized view of the efficiency of the robot while running the automation process. The schedule at which the robot runs the process is displayed under current and next schedule. You can perform various activities in robot view as per requirement such as start the robot, stop the robot, release the robot and so on.
Following are the steps that must be followed to create a robot for automating the process in the Control Tower:
1. Get acquainted with the understanding of Robots, and types of Robot Agents
2. Check the prerequisites related to robot creation and deployment before starting with robot creation
· Process must be created and deployed in Automation Studio
· User must be mapped to particular profile in Admin Module
· Ensure that Manually Configured Robot Agents or Proctor Configured Robot Agents is connected and running
3. Understand the concepts before starting with robot creation else, you can directly move to Step 4
· Configuration related to appearance of panel on Control Tower Dashboard
· Robot Status explains about the various status of robots in the Robot View
· Robot Actions explains about the actions of robots in the Robot View
· Robot Action Mapping explains about the actions which you can perform while in particular status with relevant access.
· Robot Scheduling explains you about the robot schedule concept
· Listening Method explains you about the order in which process requests from various profiles are listened
4. With the relevant access, you can start creating robot(s)- Default Robot or Superbot.
· Once robot is created, it appears in Available status
· From the Available status, assign the robot to Self or Others
· Then, robot moves to Setup Status,
§ Take Ownership of the robots by providing valid credentials
§ Assign Profiles to the robots and you can also define the schedule to run the process
§ Provide the application sign in credentials used in various automation processes
5. After performing the above steps, robot setup is ready. Then, as per your preference you can run the robot immediately or save the settings for later use.
· Once robot starts running the automation request but receives any issues due to connectivity or restart of machine then robot moves to Error or Stopped State. If robot is released, it will move to Available State and so on.
· You can view the Robot Details View as well as Transactions View for further information about robot.
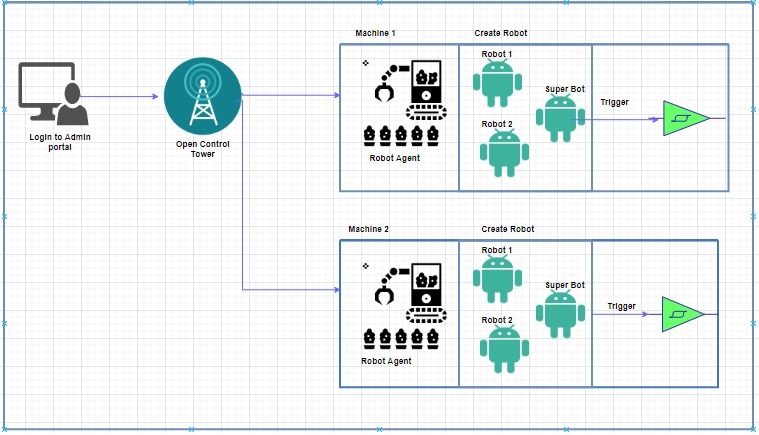
6. Create triggers for the robot to execute the automation request as per the schedule at regular intervals. Triggering the robot is covered in Trigger Manager section.
Following diagram represents the journey of robot from creating to triggering the robot.
Navigating to Robot View
To navigate to the robot view:
1. Click
the  (Robot
View) icon.
(Robot
View) icon.

2. The Robot View page is displayed which shows several tabs as following:
For more information about Robot Tabs, see Robot Status List View.
On This Page Hide
Related Topics