Before Starting with Robot View
Before starting with robot view, get acquainted with Robot Status, Robot Action, Robot Status Action Mapping, Agent Actions, Scheduling and Listening methods.
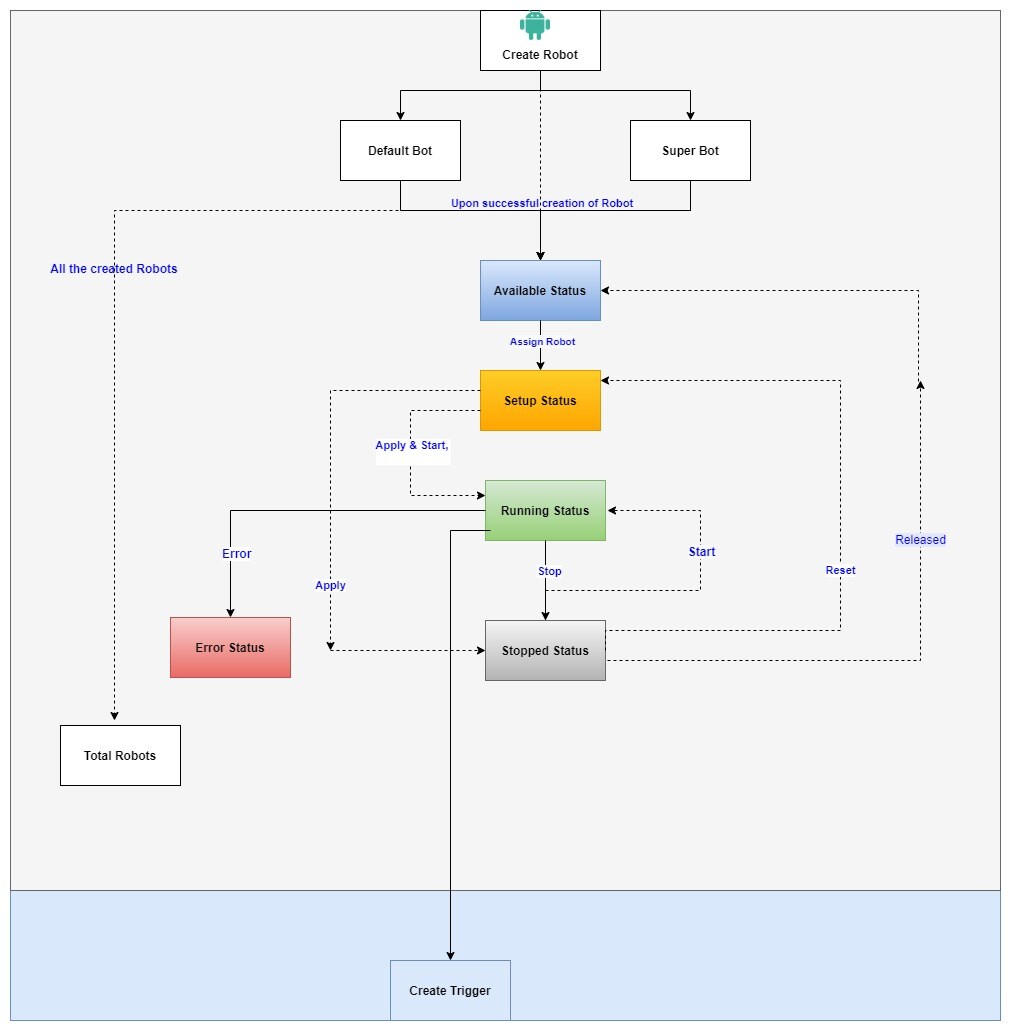
Following diagram explains you about the steps involved in creating bot and its various statuses in Robot View tab:
Robot Status
In Control Tower, the robot can be in any of the following status:
Status |
Description |
|
Indicates that robot is present in available status in the common pool from where it can be assigned to a Control Tower user with relevant access. |
|
Indicates that a robot assignee takes the ownership of the robot in setup status using valid credentials and sets it up to perform required processes. |
|
Indicates that a robot in running status is ready to execute the incoming process requests. |
|
Indicates that a robot in stopped state cannot execute the incoming requests. |
|
Indicates that a robot in error state is no longer able to pick up the requests for automation. Error state of a robot is due to the following reasons. If the robot farm machine on which it is deployed, is not responding. If ‘n’ consecutive request execution fails. |
Total Robots |
Indicates the total number of robots in the Control Tower. |
 Available
 Setup
Setup Running
 Stopped
 Error
Error
Robot Actions
Following table shows various actions of robots which the robots can perform.
Action |
Description |
|
A robot can be assigned to a control tower user. Only the robot assignee can take the ownership of the robot and schedule the robot. |
|
Release the robot to the available pool if the robot is not needed anymore. |
|
Start the robot to execute the incoming process automation robots. |
|
Stop the robots if execution of automation requests is not required. |
|
Upgrade the robot to download the latest executable and settings from the server. To upgrade the robots, see Update Management section. |
|
Disconnect the robots from the profile queues by using disconnect option. |
|
Connect the robot to the profile queues by using the connect option. |
|
Edit the robot to modify the robot name or the associated tags. |
|
Click User can reset the authentication credentials used to take the ownership of the robot. Only the robot assignee can reset the authentication credentials for taking the ownership of the robot. |
|
Click Delete to delete a robot. |
Robot Configuration |
Allows you to change the robot configurations such as robot’s log level mode. Select the preferred log level mode from following: · All · Critical · Error · Information · Off Click Save to save the robot configuration; or click Cancel to discard the changes. |
|
Allows you to reset the robot schedule. Click More > Reset to reset the robot schedule. |
|
Enables you to arrange the robot list view in ascending order. |
|
Enables you to arrange the robot list view in descending order. |
|
Enables you to view the robot list in a grid view. |
|
Enables you to filter and view the robot list as per your preference. |

 Release
 Start
Start Stop
Stop Upgrade
 Disconnect
 Connect
 Edit
Edit Reset
Reset Delete
 More
More Ascending
order
Ascending
order Descending
order
Descending
order Grid
View
Grid
View Filter
Robot Status – Action Mapping
Following table shows the actions that can be performed by the user with relevant access in the particular status of Robot View. For example, in the Available Status, logged-in user with valid access can assign the robot to self or other, edit or delete the robot details.

|
Assign |
Release |
Start |
Stop |
Connect |
Disconnect |
Edit |
Delete |
Reset |
Robot Configuration |
Available |
✓ |
x |
x |
x |
x |
x |
✓ |
✓ |
x |
x |
Set-up |
x |
✓ |
x |
x |
x |
x |
✓ |
x |
x |
x |
Running |
x |
x |
x |
✓ |
✓ |
✓ |
✓ |
x |
x |
x |
Error |
x |
x |
x |
✓ |
x |
x |
✓ |
x |
x |
x |
Stopped |
x |
✓ |
✓ |
x |
x |
x |
✓ |
x |
✓ |
✓ |

On This Page Hide
Related Topics