Manually Configured Robot Agent
Manually Configured Robot Agent is the component that enables your machine to host multiple Robots. It acts as a actual user interface to perform certain action related to robots such as to start a robot, to stop a robot and so on.
Following actions can be performed by manually configured robot agent:
· Actions – Manually Configured Robot Agent
· Configuration for Robot Agent Change Mode - Notification
Actions - Manually Configured Robot Agent
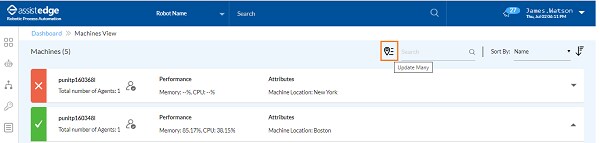
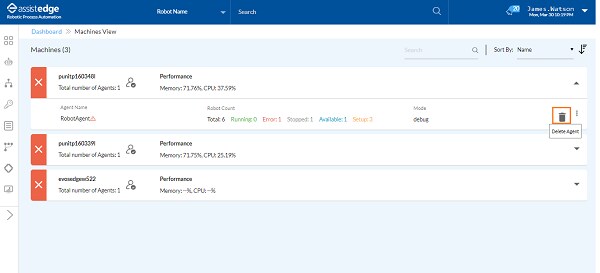
In the Machines View, manual robot agent displays the information such as Total number of Agents and performance percentage of CPU utilization and Memory usage.
Following actions can be performed at the level of manually configured robot agent:
· Updating location for a robot agent
· Changing the access mode of robot
To perform actions in the machine view:
1. Click
the  icon to expand
and view the details associated with the machine.
icon to expand
and view the details associated with the machine.

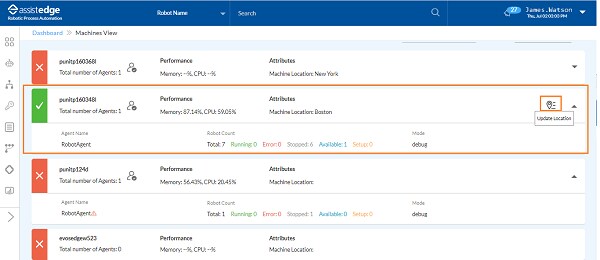
The expand view displays the information such as Agent Name, Robot Count (Total, Running, Error, Stopped, Available and Setup) , Performance percentage (Memory and CPU) and Mode.
For more information about machine panel details, see Machine view field description.
For more information about machine view page, see Machine view.
Following is field description of agent actions:
Action |
Description |
Change Mode |
Using this option, you can update the access mode. For more information about three types of access mode, see Access_Modes. |
|
Click Delete to delete an inactive robot agent. You can delete an robot agent only when an agent is inactive. A robot can go to inactive state when the robot is down. |
|
Click Update Location to update the machine location. |
|
Indicates that the corresponding robot agent is down. |

2. In the Machine View, you can do following:

· Update Many enables you to set the location for multiple machines (Robot Agent) at a time. This option will appear only if you have configured the machine specific attributes. For more information about configuration related to machine specific attribute, see Machine_Specific_Attribute.
a. Click
the  (Update
Many) icon corresponding to search field.
(Update
Many) icon corresponding to search field.
The UPDATE MANY ATTRIBUTE MACHINE window appears.
b. In the UPDATE MANY ATTRIBUTE MACHINE, select the location of machine as per preference.
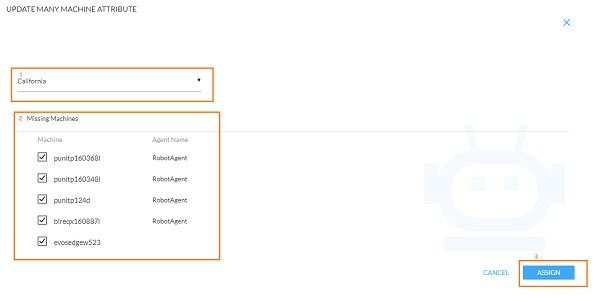
c. Select the check box corresponding to particular Machine -robot agent which must be updated with location.
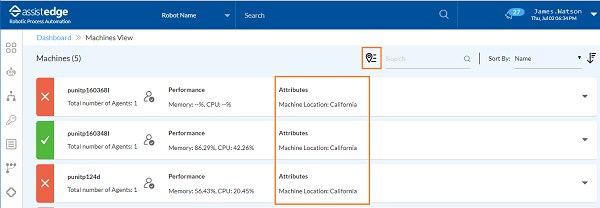
d. Click ASSIGN. The location of all the machines are updated as per the preference selected in the machine attribute.
· In
the Search field, enter
the name of machine and click the  (Search)
icon. You can search and sort the machines with the
following filters:
(Search)
icon. You can search and sort the machines with the
following filters:
§ Name
§ Status
· Additionally, you can arrange the machines in the ascending or descending order.
§ Click
the  (Ascending)
icon to arrange the machines in the ascending order.
(Ascending)
icon to arrange the machines in the ascending order.
§ Click
the  (Descending)
icon to arrange the machines in the descending order.
(Descending)
icon to arrange the machines in the descending order.
Updating Location of Machine
To update the location of machine:
1. Click the
icon to expand the
machine view.
2. Click
the (Update
Location) icon corresponding to particular machine
in order to update the machine attribute value.
· The Update Location icon will be visible only if, you have configured the machine specific attributes. For more information about configuration related to machine specific attribute, see Machine_Specific_Attribute.
· You can update the robot agent's location and also filter the robots as per your requirement. For more information about UPDATE_MANY_ATTRIBUTE_MACHINE.
The Update Machine Attribute window appears.
3. In the Update Machine Attribute list, select the preferred location for robot agent.
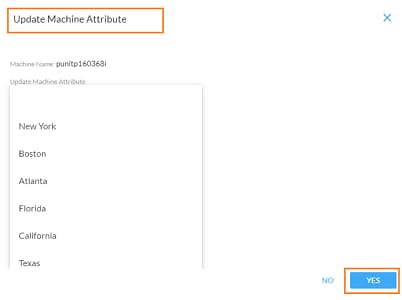
4. Click YES. The location of machine - robot agent is updated accordingly.
Deleting an Agent
To delete a manually configured agent:
1. Click
the  (Delete)
icon to remove the machines which are not running or not reachable.
Ensure
that you have stopped the agent and deleted all the robots running
under it, before deleting the agent.
(Delete)
icon to remove the machines which are not running or not reachable.
Ensure
that you have stopped the agent and deleted all the robots running
under it, before deleting the agent.
NOTE: |
If you want to delete the agent from machine then, you must delete all the associated robots. |
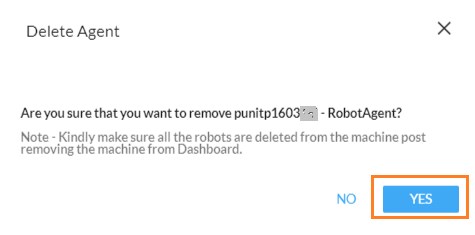
The Delete Agent window is displayed.
2. Click YES, to delete the selected agent from the machine dashboard.
Changing Access Mode of Robot Agent
Using the access mode, you can change the access mode of a robot agent. You must access the same user Id to launch the robot agent on VM.
To change the access mode of robot agent:
1. In the Machine View panel, click Change Mode.
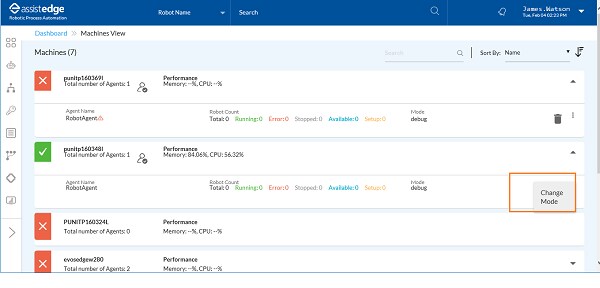
The Update Mode window appears.

2. In the Update Mode list, select the access mode. There are three access modes:
§ Debug Mode: In Debug mode, user with relevant access can access the robot agent running on a specific VM, view any data and perform any action. This is a Default mode wherein the user who started the robot agent has complete access to the machine.
§ Watch Mode: In Watch mode, user with relevant access can access the robot agent running on a specific VM and view any data but can’t perform any action. The only action allowed will be Alt+Tab to move from one window to another. Any other action performed by new user displays a message on the page . Then, the user will be logged out of the application.
§ Production Mode: In Production mode, even the user with relevant access can’t access or view the robot agent running on a specific VM while executing the transaction(s). It is recommended that, production mode must be switched on a specific production VM, so that no other user can access the machine while robot is executing the transaction(s). Any other action performed by new user displays a message on the page. Then, the user will be logged out of the application after few seconds.
3. Click CONFIRM to update the agent mode.
Configuration for Robot Agent Change Mode - Notification
Before proceeding, ensure that Vanguard component is in a running state. You can configure the Update Mode notification settings for specific users to send an email notification, whenever the robot agent mode is changed.
To configure the mode change - notification settings:
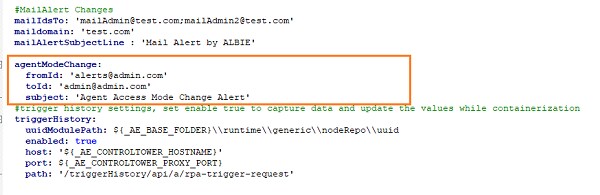
1. Navigate to $\RPA_18.1\app\ControlTower\config\config.yml
Following is field description of configuration for robot machine change mode -notifications:
Fields |
Description |
fromId |
Specify the ID from whom the alert should be sent. |
toId |
Specify the ID to whom the alert should be sent. Additionally, you can configure multiple e-mail ids separated by semi-colon. |
subject |
Specify the subject for the change notifications. |
message |
Specify the details of message which you want to get displayed after the change of machine mode. You can configure the message at $\app\ControlTower\config\mailAlertConstants.js |
2. Configure the mail ID of the admin users who should receive a notification when robot machine mode is changed. You can configure multiple e-mail ids in toId field separated by semi-colon.
a. In the maildomain, you can specify the preferred email domain to receive the alert. For example, XYZ.com
b. In the mailAlertSubjectLine, you can specify the preferred subject line with which admin users will recieve alerts. For example, Mail Alert by ALBIE.
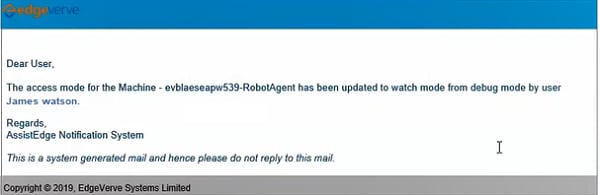
3. Once done, if the robot machine mode is changed by an authorized user, a notification email is sent to configured admin users.
NOTE: |
Ensure to restart the Control Tower after performing the above changes to reflect the changes. |
Following is a sample email notification which is sent to the configured admin user.
On This Page Hide
Related Topics