Machines View
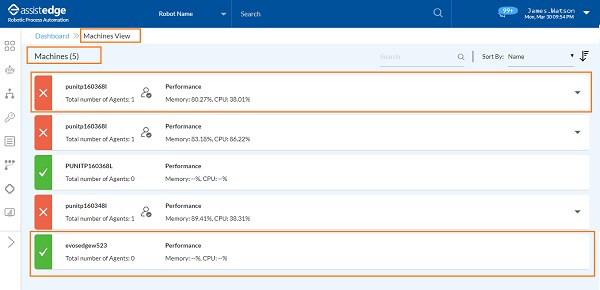
MACHINES VIEW provides view of the robot's distribution by machine on which they are hosted or deployed. If any machine is not running or not responding then, the machine details are highlighted in red, and the corresponding robots are not available in the Control Tower.
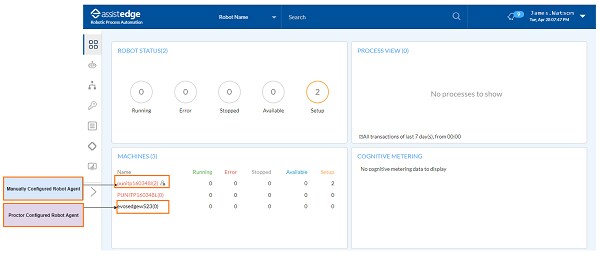
The Machine View panel as well as Machines View page displays two types of Robot agent:
· Manually Configured Robot Agent : Robot Agent is the component that enables your machine to host multiple Robots. It also helps in the management of Robots such as to start a robot, to stop a robot and so on.
§  (user) icon is displayed corresponding
to the machine on which the robot are hosted through Manually Configured Robot Agent
.
(user) icon is displayed corresponding
to the machine on which the robot are hosted through Manually Configured Robot Agent
.
· Proctor Configured Robot Agent : Proctor is a automatic mode of running the Robot Agent in the Control Tower. It is recommended to use Proctor Configured Robot Agent for creating the robots.
§ For Proctor Configured Robot Agent , no user icon is displayed corresponding to the machine.
This panel also displays the following information for a machine:
Machines |
Description |
Machines (Number) |
Click MACHINES to navigate directly to Machines view page. Indicates the number of machines and directs you to machines view page. |
Name |
Displays the name of machines on which the robots are created or installed. In case a machine is not running or not responding, the machine details are highlighted in red, and the corresponding robots are not available in the Control Tower. |
|
Indicates that the particular robot is Manually Configured Robot Agent machine. |
Running |
Indicates the number of robots in running state on a particular machine. |
Error |
Indicates the number of robots in error state on a particular machine. |
Stopped |
Indicates the number of robots in stopped state on a particular machine. |
Available |
Indicates the number of robots in available state on a particular machine. |
Setup |
Indicates the number of robots in Setup state on a particular machine. |
Click MACHINES or number to view the Machine View page.
The Machine View is displayed.
NOTE: |
In case of multiple machines are added in the Machines Panel then, the More option is visible. You can click More to view the complete list of machines in the Control Tower. |
This panel also displays the following information for a machine view:
Machines |
Description |
Machine Name |
Displays the name of machines on which the robots are created or installed. In case a machine is not running or not responding, the machine details are highlighted in red, and the corresponding robots are not available in the Control Tower. |
Total number of Agents |
Displays the count of total number of agents. |
Performance |
Displays the percentage information of Memory usage and CPU utilization. |
Attribute |
Displays the location of machine. This column appears only if you have configured the machine specific attributes. For more information about configuration related to machine specific attribute, see Machine_Specific_Attribute. |
Machine Specific Attribute
 Add a custom machine specific attribute, to
group robots, filter robots, or set the location of robots by
a custom criterion.
Add a custom machine specific attribute, to
group robots, filter robots, or set the location of robots by
a custom criterion.
To enable the custom machine specific attribute:
1. Navigate to $\RPA\RPA-ControlTower\public\js\config.js. Set the Attribute1 value as 0 to enable the Update Machine Attribute in the Machine View.

Following are the required configuration details:
Robot Status |
Description |
!1 |
Indicates that the logged in user cannot view the <Show_On_Dashboard> panel. In order to view the panel, user with <super_admin> role access should change the value from !1 to !0. |
!0 |
Indicates that the logged in user can view the particular panel on the Dashboard. |
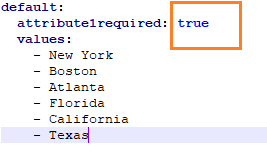
2. Then, navigate to $\RPA\RPA-ControlTower\config\attributes.yml. Set the Attribute1 value to true. Both can be either true or false at the same time.
3. Set the below flag to 0 to have a specific panel on the dashboard for this custom attribute.
§ Show_On_Dashboard flag is available at $\RPA\RPA-ControlTower\public\js\config.js
4. If the machine specific attribute is set to 0 then, it is mandatory to update its value (Update location) at the machine level. In case, the value is not updated, you can not create robots on that machine.
· Possible values for the attribute are updated in the attributes.yml file.
· The label for the attribute1 is updated from the resource bundle.
{ “key”: “Attribute1”, “value”: “Locations”, “description”: “” } |
5. After performing these changes, save the configuration setting. Then, restart the components to reflect the changes on the Dashboard.
On This Page Hide
Related Topics