Citrix Application Automation
Typically an end to end automation process workflow is created in the Automation Studio installed in the Citrix environment. This process is then imported in the Automation Studio installed in the non-Citrix environment where it can be executed using the AssistEdge RPA or triggered by AssistEdge RPA attended automation user or by AssistEdge Engage user.
AssistEdge RPA, AssistEdge Engage and AssistEdge Enterprise Personal Assistant connects with the Citrix environment to automate applications running in a secured Citrix environment. It support automation of the Citrix based applications in a codeless manner through out of the box adapter- CitrixApps.
This section covers addition of Citrix applications and steps to be followed to perform automation of a process which contains hybrid set of application with some applications present and accessible from local (non-Citrix) environment and some from Citrix applications. It is also applicable for supporting creation of automation process workflow where all applications are present in Citrix but automation is done from the non-Citrix or local environment.
|
NOTE: |
|
Prerequisite
Following are the prerequisites:
- Installation of AssitEdge RPA and Automation Studio on the local machine where the non-Citrix environment is available. For detailed instructions, refer Server Side Installation and Client Side Installation in the AE-RPA-Engage Installation Guide. All the components installed in the non-Citrix environment must be up and running.
- Installation of CitrixPackage and Automation Studio on the Citrix server. Only AESite must be up and running in the Citrix environment post installation. For detailed instructions, refer Citrix Installation in the AE-RPA-Engage Installation Guide.
- Publish Citrix Launcher to Citrix Studio. For detailed instructions, refer Citrix Installation section in the AE-RPA-Engage Installation Guide.
- Login credentials related to Citrix Host (Citrix Server).
- Login credentials related to Citric based applications.
|
NOTE: |
The automation process workflow must be designed using Automation Studio deployed in the Citrix environment. |
Create Automation Process Workflow in Citrix Environment
The steps to create, save, test, publish and deploy a process, remains exactly same as that of a process in a non-Citrix environment. You need to export the process to create a process package in the Citrix environment.
Creating a Process
- Login to the Citrix environment and launch the Automation Studio present in the Citrix environment.
- Create an end to end automation process workflow in the Studio menu of Automation Studio, as per your requirement.
- Save and test the process to see if the desired executions completes successfully.
- Publish and deploy the process as only a deployed process can be migrated.
Exporting a Process
- Export the process from the Migration tab of the Admin menu. The process package created for the exported process is internally marked as a Citrix automation package.
- Copy and save the exported process in the non-Citrix environment.
NOTE:
- In the Citrix environment we do not have an Admin module to create a Profile. You must create the required Profile in the Automation Studio of the Citrix environment itself.
- You must export the process created in the Citrix environment using the Export option available in the Migration tab only. Do not export the process as a processbot or as a process backup file; else, the corresponding applications does not get configured while importing it in the non-Citrix environment. This leads to process execution failure. See Import_Citrix_Process to know more about importing process into a non-Citrix environment.
Perform Citrix Automation from non-Citrix Environment
The Citrix automation in the non-Citrix environment involves:
- Configuring_Citrix_Server_Application_in_non-Citrix_Environment.
- Import_Citrix_Process.
- Creating_Sign_In_Process_for_Citrix_Host.
- Reusing_Imported_Process.
Configuring Citrix Server Application in non-Citrix Environment
Configure the Citrix Server application to establish connection between Automation Studio present in the non-Citrix environment and the Citrix server. There are two types of Citrix applications that gets added in Automation Studio:
- Citrix Host – A Citrix server on which application is hosted. You can configure a Citrix Host in Automation Studio (of non-Citrix environment) from the Admin menu or while creating the process itself.
- Citrix Applications – An application which is hosted on a Citrix Server and is accessible by login to the Citrix environment. A Citrix Application is typically configured when a process created in Automation Studio in the Citrix environment is imported to the Automation Studio of the local or non-Citrix environment from the Migration tab in Admin menu.
NOTE:
Automation Studio provides out of box support for addition of Citrix server application (CitrixHost) which provide logon. If a Citrix server application is launched using a thick client interface, product provides extensibility to achieve this. Refer AE-RPA-Administrator Guide.pdf/AE-Engage-Administrator Guide.pdf for more details.
Below are the minimum required properties for configuring the intended Citrix Server application. If you want to define remaining properties, refer CitrixApps in the Admin Menu.
- Launch Automation Studio present in the non-Citrix environment.
- In the Admin menu, add an application of Application Type- CitrixApps.

- In the Application Properties panel:
- In the Display Name, enter a desired name of the web application.
- In the CitrixApp Type list, select CitrixHost to configure the Citrix Server application. Available options are- CitrixApps and CitrixHost. You can only configure a Citrix Host while a Citrix application of CitrixApps type- Citrix Apps, gets automatically configured once a process created in Citrix environment is imported.
- In the Store Front URL field, enter the URL of the Citrix server.
- In the Misc1 field, enter the name of the Citrix Launcher that is published in the delivery group. It is the target VM where the automation must happen.
- Click the
 (Save Properties) icon to save the application.
The Citrix Host is configured.
Import Citrix Process
Import the process package exported from the Citrix environment into the non-Citrix environment, from the Migration tab of Admin menu. The application that gets imported along with the process is configuredas the Citrix application of CitrixApp Type, CitrixApp.
When a process, that has been modified in the Citrix environment, is being imported to the non-Citrix environment, and you select the Rename the imported process or Re-map process to different profile option, the imported process fails while performing the Test Run in Automation Studio. Hence, you must select the Overwrite in the existing profile option if any modification is done; else, you need to delete the existing version of the process from the non-Citrix environment before you import the process package.
Creating Sign In Process for Citrix Host
Create a Sign-In Process for the Citrix Host configured in Automation Studio of non-Citrix environment. Authentication is required every time you want to access a Citrix Host due to high security reasons. Creating a Sign-In process enables you to automate the process of logging in to the Citrix environment. Once the automation is completed, the sign-in session ends.
To create the Sign-In process:
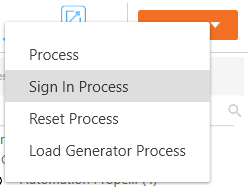
- In the Tool bar, click Create and then click Sign In Process. The Flowchart designer opens.
- In the Studio menu, from the Canvas Tools pane, drag Application activity and drop on to the Flowchart designer, below the Start element.
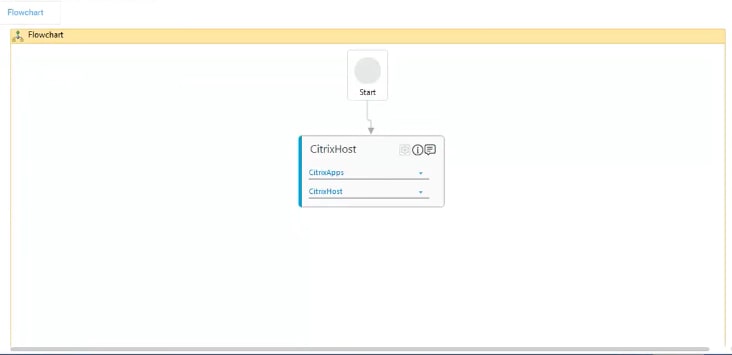
- In the Application Type list, select CitrixApps.
- In the Select an Application list, select the name of the Citrix Host configured in the Admin menu.
- Save the process. The Sign In Process for the intended Citrix Host is created and saved with the name of the application.
- Publish and deploy the Sign In Process as only deployed process can be reused.
The sign in process for the intended Citrix Host is created. The User Id and the password would be required at the time of setting up the environment.
|
NOTE: |
Explicitly configuring the user Id and password related to the Citrix Host is not required. These two fields are implicitly configured for the Citrix Host configured in Automation Studio. |
Reusing Imported Process
The imported process from the Citrix environment is reused in the non-Citrix environment. Parameters of the Citrix process must be rightly mapped with the parameters of the process reusing the imported process. To reuse the imported process:
- Create a process in Studio menu of the non-Citrix environment.
- In the Canvas Tools pane, click Process Components to expand the tool and view the associated activities.
- Drag the Application activity and drop on to the Flowchart designer area on the Canvas.

- In the Application Type list, select CitrixApps. You must have at least one application added for it to appears in the list.
- In the Select An Application list, select the Citrix Host for which the Sign In process is created. Alternatively, you can add a new Citrix Host at this point of time but if you do so, create a Creating_Sign_In_Process_for_Citrix_Host first before moving ahead. To add Citrix Host:
- In the Select An Application list, click Add New Application. The Add New Application dialog box appears.
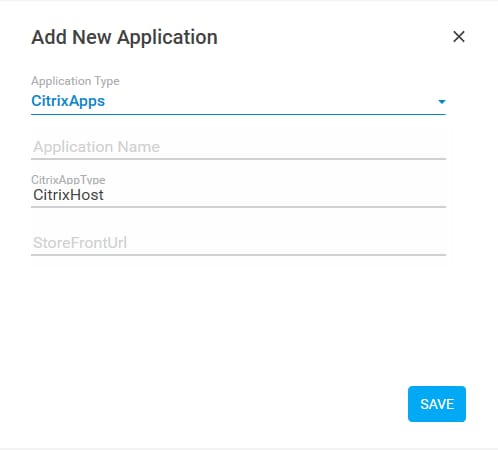
- In the Application Name field, enter a desired name of the application.
- In the StoreFrontURL field, enter the URL of the Citrix server.
- Click SAVE. The Citrix Host is added.
- In the Select An Application list, click Add New Application. The Add New Application dialog box appears.
- Double click the Application activity to open the activity container.
- Drag the Reuse Process activity and drop inside the Application activity container.
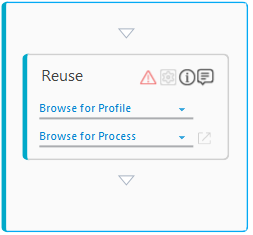
- In the Browse for Profile list, select the profile of the imported process . The profile that gets automatically created once you import the exported process and the associated application, from the Citrix environment.
- In the Browse for Process list, select the process imported from the Citrix environment.
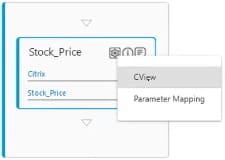
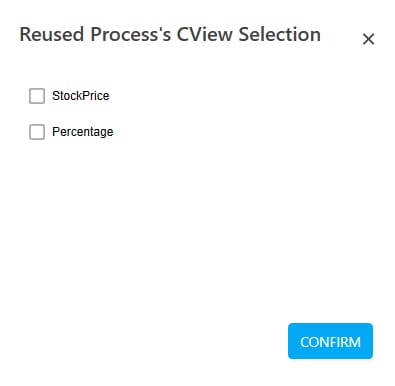
- Click the
 (Settings) icon, and then click CView to select the configurations that have been marked for customer view (available in the CView tab of Engage and AEAttended applications) in the reused process. The Reused Process's CView Selection dialog box appears.
 - Select the filed configurations and then click CONFIRM.
- Click the (Settings) icon once again, and then click Parameter Mapping to align the parameters of the reused process with the parameters of the process where it is being used (also called as Parent process). The ReUsed Process's Arguments Mapping dialog box appears. See the sample mapping in the following screen shot:
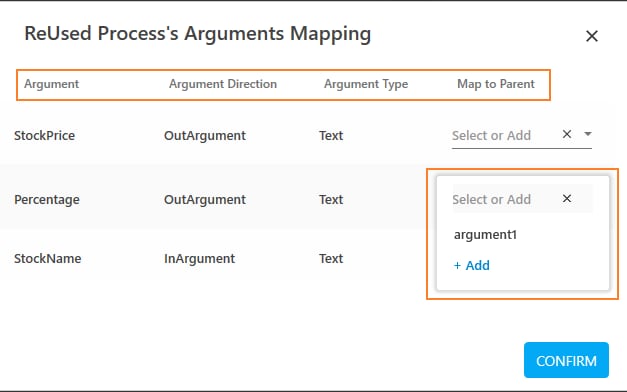
The Argument, Argument Direction and Argument Type lists the details related to the parameters of the reused process.
- In the Map to Parent list, select the parameter that you want to assign to the parent process parameter. Repeat this step for each of the parameter you want to map. If there is no parameter available in the parent process matching the direction or type of the current parameter, you can add a parameter. Follow the mentioned to steps to add the parameter:
- Click Select or Add to select an existing parameter from the available list or create a new parameter. The Add new Argument dialog box appears.
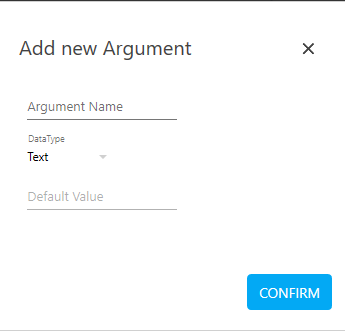
- In the Argument Name field, enter a desired name.
- The DataType is set as the data type of the corresponding reused process parameter.
- In the Default Value field is enabled only when the Argument Direction of the corresponding reused process parameter is In. For Out or InOut direction, providing default value is not supported. Once the field is enabled for In parameter, enter a default value of the argument added, if required.
- Click CONFIRM to save the mapping.
- Click Select or Add to select an existing parameter from the available list or create a new parameter. The Add new Argument dialog box appears.
- Save the process.
The Citrix automation is completed.
|
NOTE: |
Once you setup the environment, you need to provide login credentials to the Citrix Host. Setting up the environment established connection with the Citrix Host and launched it post login. |
You can perform test run to view the output. Process execution starts and the automation that is actually happening in the Citrix environment is viewable in the non-Citrix environment.
Citrix Application Properties
The properties of a Citrix Application activity are listed in the following table and can be edited in the Properties grid on the right panel.
|
Property Name |
Usage |
|
Control Execution |
|
|
Ignore Error |
When this option is set to Yes, the application ignores any error while executing the activity. If set to NA, it bypasses the exception (if any) to let the automation flow continue; however, it marks the automation status as failure, in case of an exception. By default, this option is set to No. |
|
Delay |
|
|
Wait After |
Specify the time delay that must occur after the activity is executed. The value must be in milliseconds. |
|
Wait Before |
Specify the time delay that must occur before the activity is executed. The value must be in milliseconds. |
|
Misc |
|
|
Breakpoint |
Select this option to mark this activity as the pause point while debugging the process. At this point, the process freezes during execution allowing you to examine if the process is functioning as expected. In large or complex processes, breakpoints help in identifying the error, if any. |
|
Commented |
Select this option to mark this activity as inactive in the entire process. When an activity is commented, it is ignored during the process execution. |
|
DisplayName |
The display name of the activity in the flowchart designer. By default, the name is set as the name of the selected application. You can change the name as required. |