Step-by-Step Guide to Use Delay to Fetch the Weather Information
Let's create an example to automate the weather process with Delay activity. This activity helps you to delay the search results by few seconds, so that, the automation process is not timed out.
Prerequisite:
1. In the Admin menu, add an application of Application type - WebApps.
2. In the Application Properties panel:
· In the Login URL and Search URL field, enter https://www.google.com/.
· In the Display Name field, enter Google.
· In the Preferred Browser list, select Internet Explorer.
3. Click the  (Save Properties) icon to save
the application details.
(Save Properties) icon to save
the application details.
The web application is created.
To create a process with Delay activity:
1. Create a process.
2. In the Parameter bar, create an Out argument TodaysWeather of Argument type - String.

3. From the Canvas Tools panel, add the Application activity to the Flowchart designer on the Canvas.
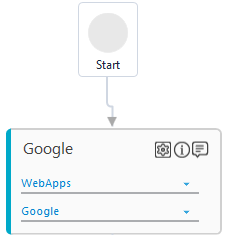
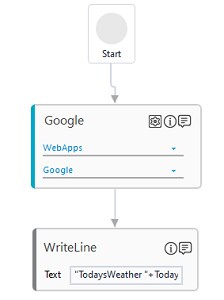
4. In the Application Type list, select WebApps.
5. In the Select An Application list, select Google.
6. Click
the  (Settings)
icon to launch the WEB MODE of
the Multimodal interface.
The configured Webex application page appears.
(Settings)
icon to launch the WEB MODE of
the Multimodal interface.
The configured Webex application page appears.
7. Click the  (Play) icon to capture the
search field for entering Input Source.
(Play) icon to capture the
search field for entering Input Source.
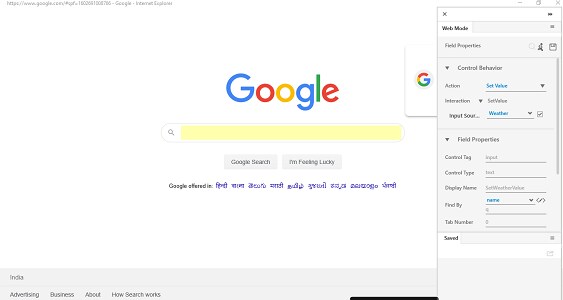
8. In the Action list, select Set Value.
9. In the Input Source field, enter Weather and select the check box.
10. Enter
a Display Name,
and click the  (Run Now)
icon to run the step.
(Run Now)
icon to run the step.
11. Click
the  (Save)
icon to configure the details captured. The saved details start
appearing in the Saved
tab of Field Properties
bar.
(Save)
icon to configure the details captured. The saved details start
appearing in the Saved
tab of Field Properties
bar.
12. Click the
(Play) icon to capture the
Google Search button.
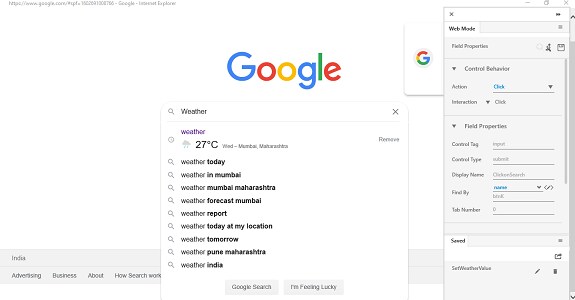
13. In the Action list, select Click.
14. Enter
a Display Name,
and click the (Run Now)
icon to run the step.
15. Click
the (Save)
icon to configure the details captured. The saved details start
appearing in the Saved
tab of Field Properties
bar.
16. Click the
(Play) icon to capture the
current weather.

17. In the Action list, select Get Text.
18. In the Variable Name field, enter TodaysWeather.
19. In the Variable Type list, select Text.
20. Enter
a Display Name, and click
the (Save)
icon to configure the details captured. The saved details start
appearing in the Saved
tab of Field Properties
bar.
21. Click
the  (Save
Configured field and return to studio) icon to export the
configured steps to studio.
(Save
Configured field and return to studio) icon to export the
configured steps to studio.
22. Double click the Application activity box.
23. From the Canvas Tools panel, add the Delay activity after the Click - ClickonSearch interaction to the Flowchart designer on the Canvas.
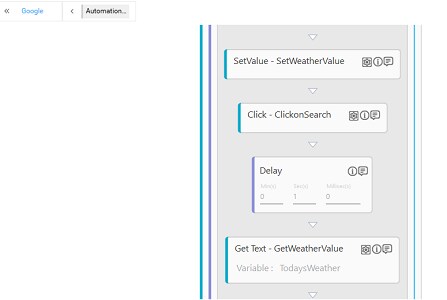
24. In the Sec(s) field, enter value 1 and click << Flowchart.
25. From the Canvas Tools panel, add the WriteLine activity to the Flowchart designer on the Canvas.
26. In the Text field, enter "TodaysWeather " +TodaysWeather.
27. Save the process.
28. Setup the environment and then perform test run.
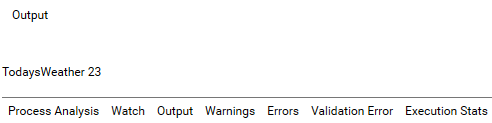
The console display the output with the defined delayed time.
Related Topics