Installation of Server-Side Components
Once configuration files are updated, start installation using the ae install command.
|
NOTE: |
Before you proceed with the installation, make sure to have below mentioned information available with you:
|
Flow for installing server-side components:
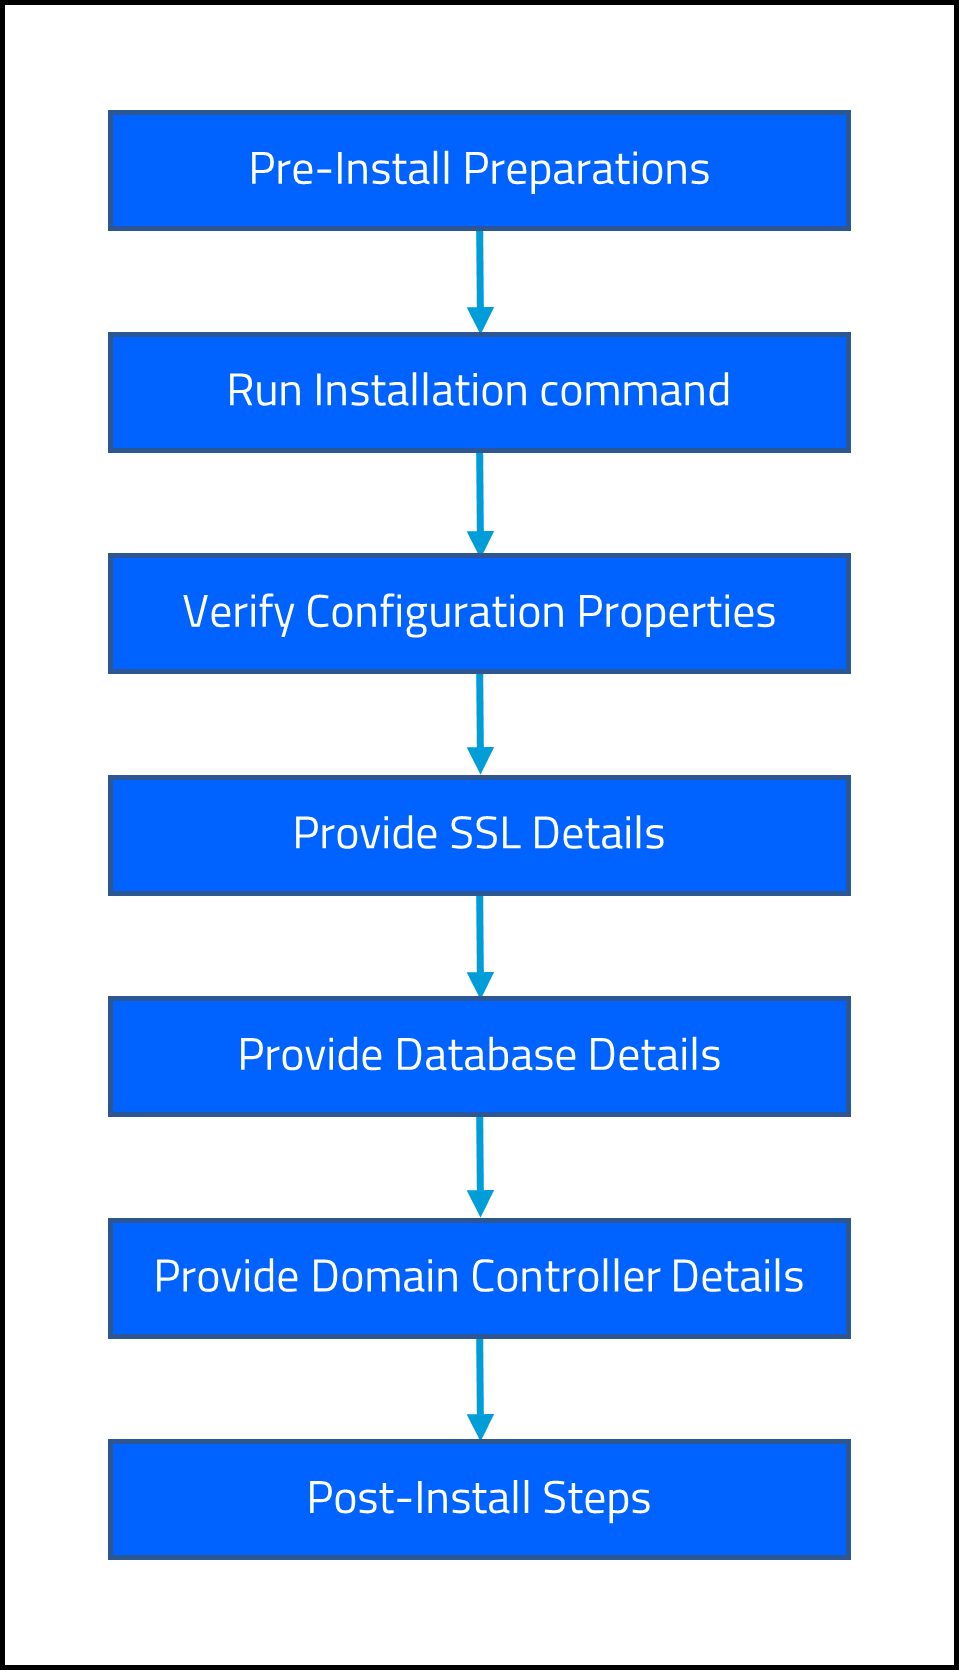
To install server-side components:
As part of installation process of server-side components, perform below steps:
- Run Installation Command
- Verifying Configuration Properties
- Provide SSL Details
- Provide Database Details
- Provide Domain Controller Details
Run Installation Command
To perform the installation:
- For Windows: Open the command prompt with administrator rights and change the directory to <Installation Directory>/AssistEdgeAutomation > scripts folder.
- For Linux: Connect with the Linux server using Putty and change the directory to the <Installation Directory>/AssistEdgeAutomation > scripts folder.
- Run the ae install command to proceed with the installation. The details such as name of the components, their respective ports and other details of the server are displayed.
|
<Installation Directory>\AssistEdgeAutomation\scripts>ae install
|
|
NOTE: |
|
Verifying Configuration Properties
This section enables you to verify the deployment properties, server properties and component properties that you have set in the configuration files above. If you wish to change any of the property you can exit installation and make relevant changes in the respective configuration files.
- Once you run the ae install command,
Do you want to continue with Installation? (Y/N): appears. Validate the details displayed.
************************************************************************************************
AssistEdge Installation
************************************************************************************************Following components are marked for installation on this system.
Please validate component and Port Numbers.
-----------------------------------------------------------------------------------------
Web server: Port: 8443
Messaging Port: 5672
Reporting Port: 5601
ControlTower Port: 3860
LowCode Port: 8001App server: Port: 8443
TxnStore Port: 9200
ETL Port: 9600
ML Port: 8000Following configurations have been taken from 'server.properties' and will be used for installation.
Please validate the configurations:
-----------------------------------------------------------------------------------------
_AE_MESSAGING_WEB_PORT : 15672
_AE_MESSAGING_EPMD_PORT : 4369
_AE_MESSAGING_DIST_PORT : 25672
ERLANG_COOKIE_VALUE : ZVIJOUEQVPCRXLMYJWAFJFVDFHTYFDSFFYHHJMNKLPOJIJNMGVXSZQAZCVBNMGDSRYGJNIKPOKLJHFEDSXCFHNMKKLHSQWDXGOLKHNCFDFZXVEDKLOJTGDSCVHMSWQQADFJKOIJJNGFDWSSSFIIKHE
_AE_TXNSTORE_TCP_PORT : 9300_AE_CLUSTER_PORT : 8445
_AE_CLUSTER_NAME : aedev
_AE_ML_PREDICTOR : true
_AE_ML_MODEL_GENERATOR : true
_AE_ML_QUEUE_FORECAST : true
_AE_LOWCODE_SERVER_PORT : 8002
-----------------------------------------------------------------------------------------
Do you want to continue with Installation? (Y/N):
- Do one of the following:
- Enter Y to continue with the installation.
- Enter N to exit the installation if you wish to change the properties in the respective files at this stage.
The verification is done to move to the next step below.
Provide SSL Details
You can choose to continue with SSL enablement at the time of installation. If you do not have the SSL certificates ready, you can continue without enabling SSL. If required, update the certificates post installation.
Flow for Providing SSL Details:
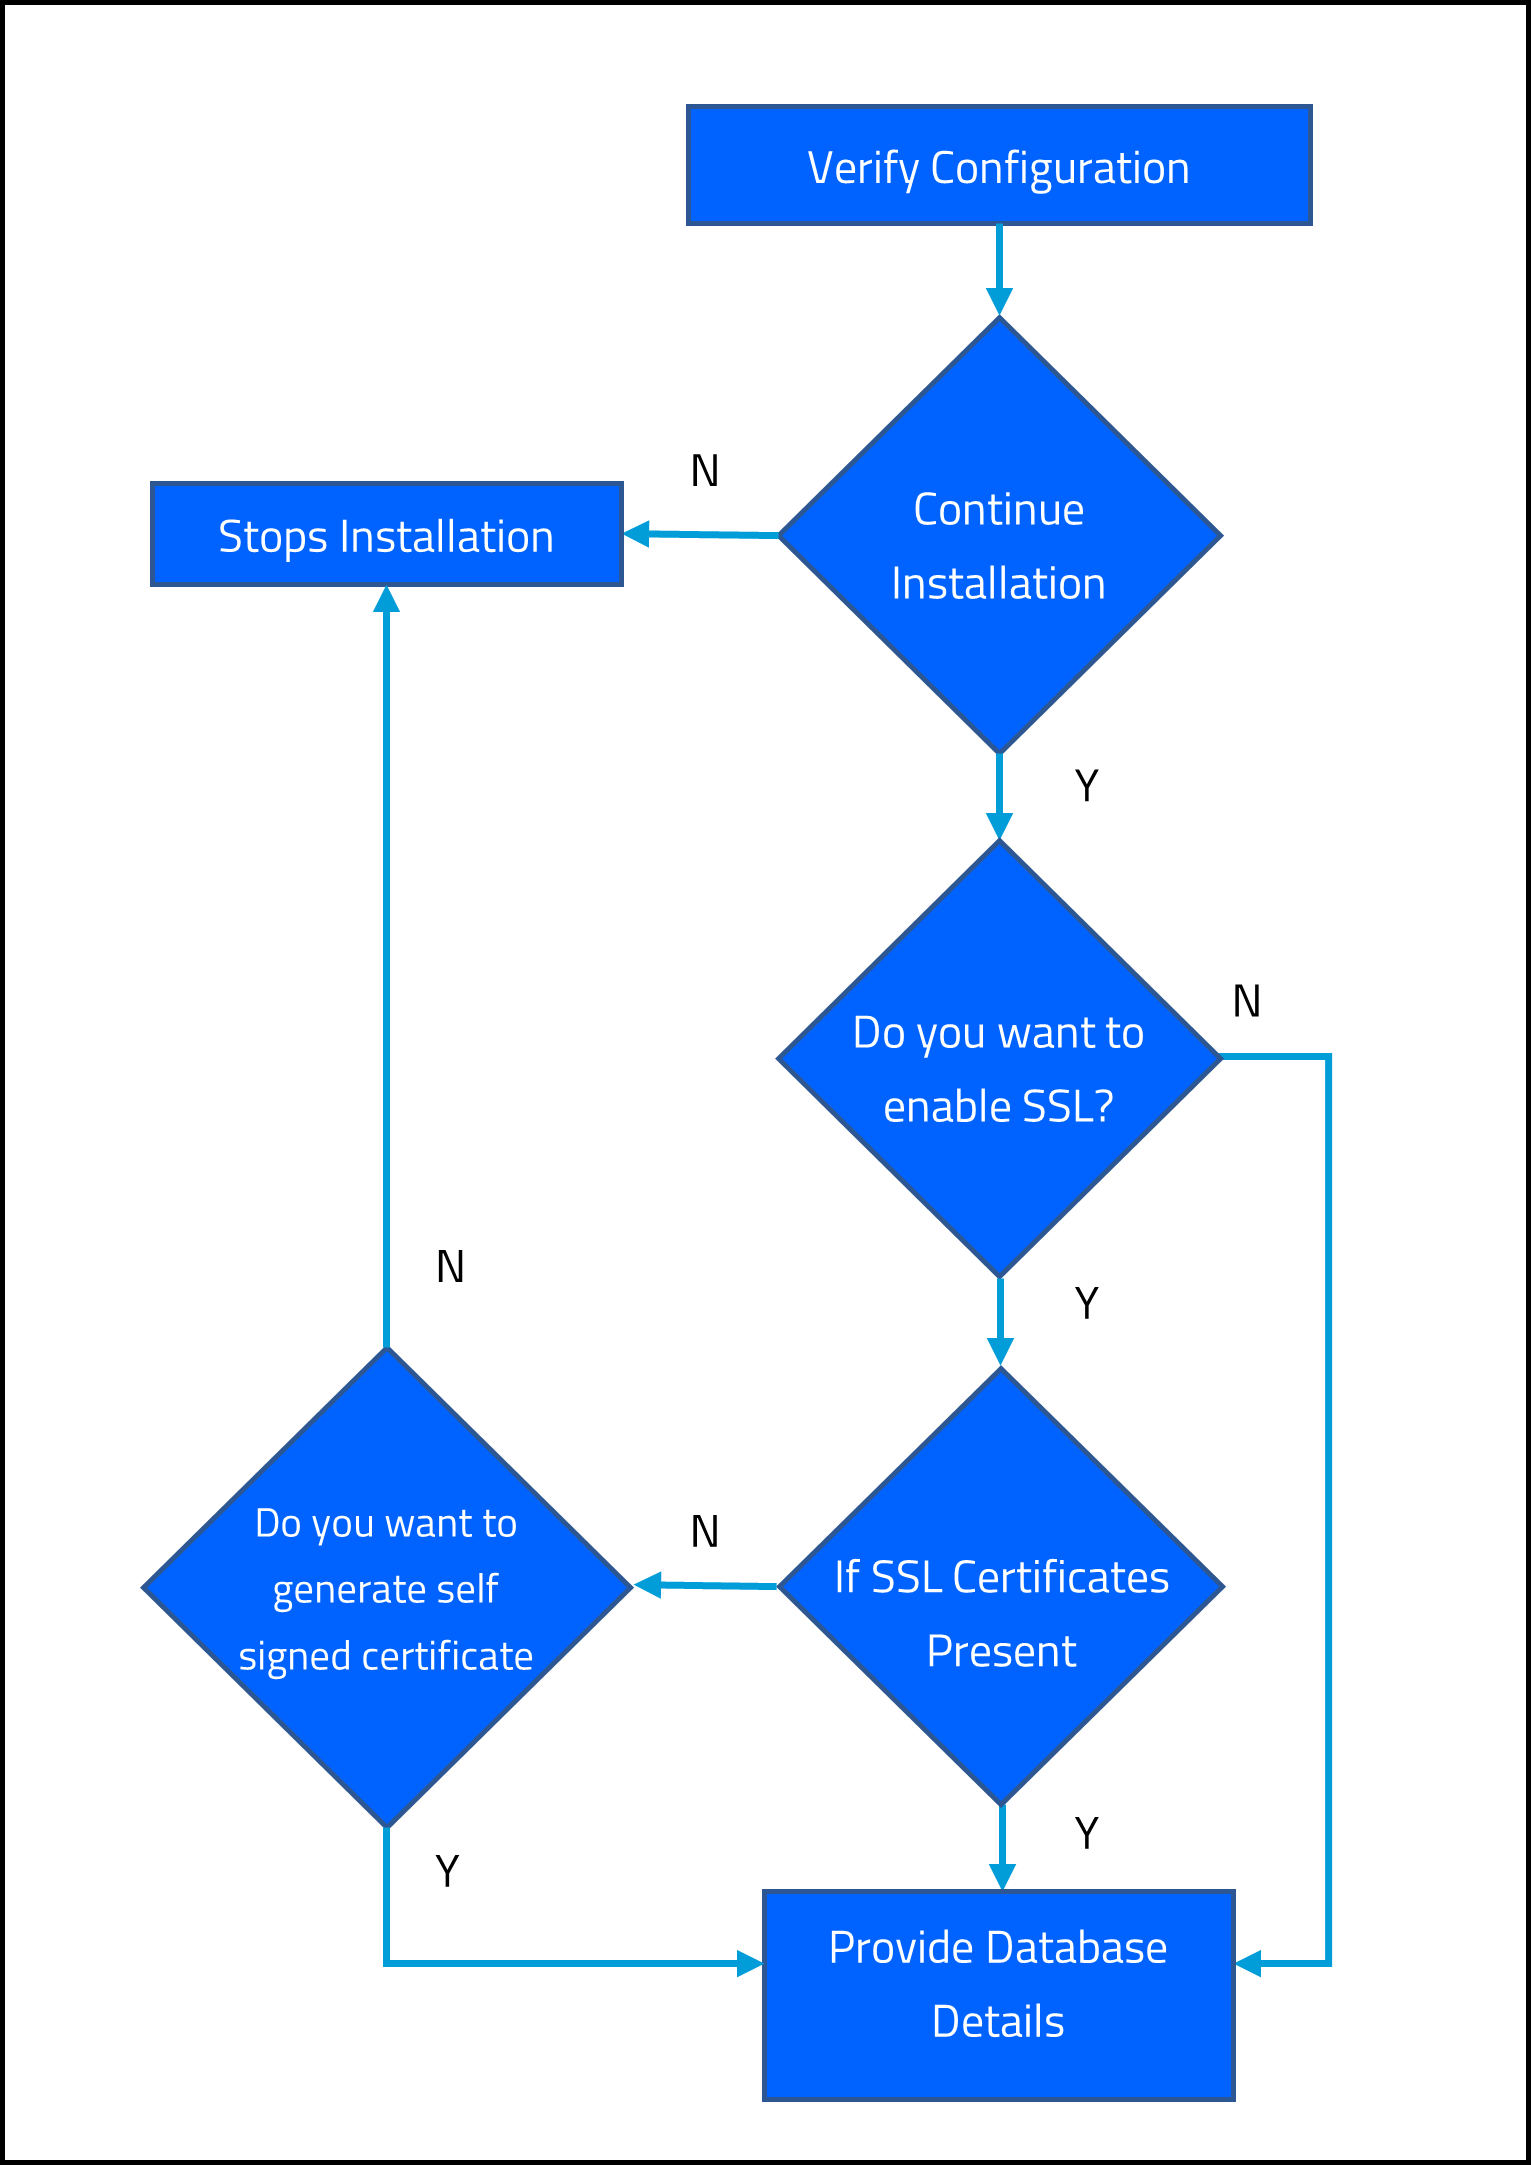
- Once you enter Y in the above section,
Do you want to enable SSL?(Y/N): appears.*************************************************************************************************
Installing AssistEdge
*************************************************************************************************Do you want to enable SSL?(Y/N):
- Do one of the following:
- Enter Y to continue the installation with SSL enablement. You can enable SSL by:
- Enabling commercial certificates
OR - Generating self-signed certificate
- Enabling commercial certificates
- Enter N to continue the installation without SSL enablement. You can enable the SSL once the installation is done.
- Enter Y to continue the installation with SSL enablement. You can enable SSL by:
|
NOTE: |
For more information, see SSL Certificates: Post Installation section to know how to update certificates post installation. |
Enabling Commercial Certificates
To enable SSL, save the commercial certificates in <Installation Directory>/AssistEdgeAutomation > data > Certificates folder and enter Y.
The SSL is enabled.
|
NOTE: |
|
Generating Self Signed Certificate
- If you do not have commercial SSL certificates saved in the installation folder, you can proceed with the SSL enablement by generating a self-signed certificate.
Do you want to generate self-signed certificate. (Y/N): appears.
*************************************************************************************************
Installing AssistEdge
*************************************************************************************************Do you want to enable SSL?(Y/N): Y
Required certificate files are missing.
Do you want to generate self signed certificate. (Y/N)
- Do one of the following:
- Enter Y to generate a self-signed certificate. Self-signed certificate gets generated and is saved in the Windows Trust Store.
- Enter N to stop the installation.
The SSL is enabled.
|
NOTE: |
|
Provide Database Details
This section enables you to create database for the installation.
|
NOTE: |
|
Flow for Providing Database Details:
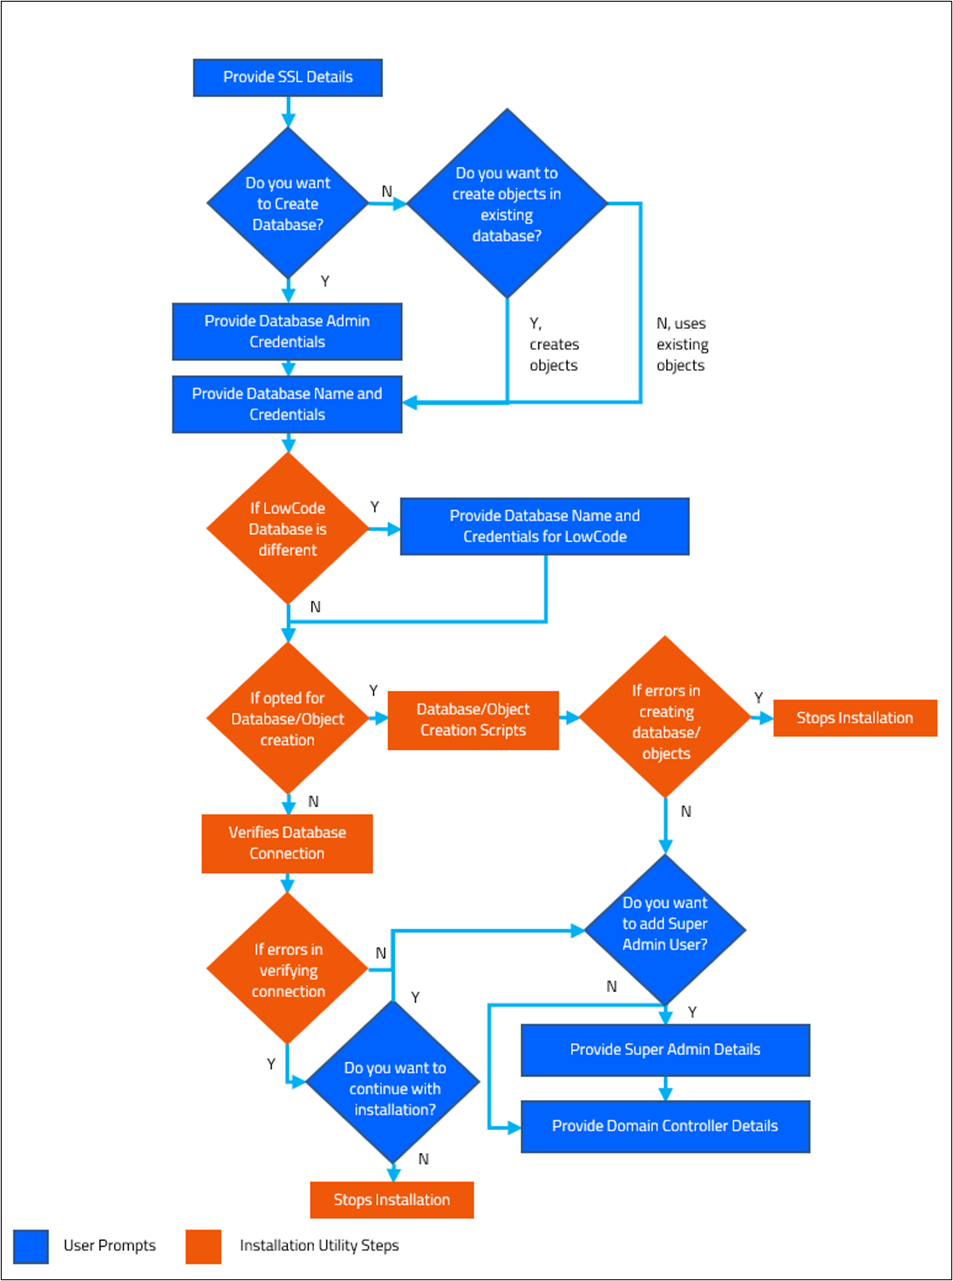
- Enter details related to database as mentioned below:
- Do you want to create database? (Y/N): appears
If you want to create database, then you will have to provide Database Admin user credentials.- Enter Y, if you want to create database.
Do you want to create database? (Y/N): y - For SQL:
If Database admin user is a Windows User, then provide username in format domainame\username
Please provide database admin username : dbadmin
Please provide database admin password (HIDDEN):NOTE:
If database admin user is a windows user ensure to add Set NODE_OPTIONS=--openssl-legacy-provider after Setlocal EnableDelayedExpansion in the ae.bat file present in the <Installation Directory>/AssistEdgeAutomation > script folder and re-start the installation. In case, this is not added then, database connection will not occur.
Perform below modification in the ae.bat file:
Setlocal EnableDelayedExpansion
Set NODE_OPTIONS=--openssl-legacy-provider
cd ..
- Please provide database admin username: appears; provide the name of the System Admin user (or username having database creation privileges) then press <Enter>8 .
- Please provide database admin password: appears; provide the password for the above database server Admin user and then press <Enter>8 .
- For Oracle:
Please provide database admin username : dbadmin
Please provide database admin password (HIDDEN):
Please provide database tablespace name:- Please provide database admin username: appears; provide the name of the Oracle Admin user (or username having database creation privileges) then press <Enter>8 .
- Please provide database admin password: appears; provide the password for the above Oracle Admin user and then press <Enter>8 .
- Please provide database tablespace name: appears; provide the name for the above Oracle tablespace and then press <Enter>8 .
- For Postgres:
Please provide database admin username : dbadmin
Please provide database admin password (HIDDEN):- Please provide database admin username: appears; provide the name of the postgres Admin user (or username having database creation privileges) then press <Enter>8 .
- Please provide database admin password: appears; provide the password for the above postgres Admin user and then press <Enter>8 .
- Enter N, if you don’t want to create the database.
NOTE:
For Azure SQL System-Assigned Managed Identity: The database is already created using SSMS portal and hence the user is directly prompted to the existing database. For more information, about creation of Azure SQL System-Assigned Managed Identity Database, see the Azure SQL Server. - Do you want to create objects in existing database? (Y/N): appears,
• Enter Y, if you want to create objects in existing database and then provide AssistEdge RPA Database details.
• Enter N, if you don’t want to create objects in the existing database.
- Do you want to create objects in existing database? (Y/N): appears,
- Enter N, if you don’t want to create the database.
- For SQL:
- Enter Y, if you want to create database.
- Do you want to create database? (Y/N): appears
- Enter details related to database for either database creation or for using the existing data table as specified:
- For SQL: If you are using SQL database, enter the below details:
Enter Database Username: aerpa.dbuser
Enter Database Password (HIDDEN):
Enter Database Name: db nameNOTE:
For SQL with windows authentication, ensure that the provided username does not possess sysadmin role. Ensure to adhere it or database authentication might fail. - Enter Database Username: appears; provide the username of the database for AssistEdge and then press <Enter>8 .
- Enter Database Password <HIDDEN>: appears; provide password of the above database user and then press<Enter>8 .
- Enter Database Name: appears; provide name of the database for AssistEdge and then press<Enter>8 .
NOTE:
- SQL server with Windows authentication is not supported for the Linux based installation.
- For SQL server only, TCP/IP network protocol is supported.
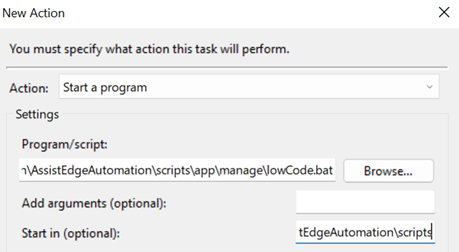
- If the LowCode database user is a Windows Authenticated user, then follow the steps below to start LowCode:
- Create a schedule task on the Windows to execute scripts > app > manage > lowCode.bat file. Task should be executed with a user Id that has access to the database. This task should be configured to run even if the user is not logged in to the system. The current working directory while executing the lowCode.bat should be scripts folder. While creating a action for schedular, enter the directory path upto lowcode.bat in the Program/script field and upto scripts in Start in (optional) field as shown below:
- The execution of batch file requires sql jdbc driver. For more information about downloading and placing the sql jdbc driver, see Client Downloadable Software.
- For all other components use the ae start command.
- Create a schedule task on the Windows to execute scripts > app > manage > lowCode.bat file. Task should be executed with a user Id that has access to the database. This task should be configured to run even if the user is not logged in to the system. The current working directory while executing the lowCode.bat should be scripts folder. While creating a action for schedular, enter the directory path upto lowcode.bat in the Program/script field and upto scripts in Start in (optional) field as shown below:
- For Azure SQL System-Assigned Managed Identity: If you are using Azure SQL System-Assigned Managed Identity database, enter the below details:
Enter Database Username: aerpa.dbuser
- Enter Database Name: appears; provide name of the database for AssistEdge and then press <Enter>8 .
All task scripts are executed.NOTE:
For more information on how to configure Azure SQL, see the Azure SQL Server section.
- Enter Database Name: appears; provide name of the database for AssistEdge and then press <Enter>8 .
- For Oracle: If you are using Oracle database, enter the below details:
-
Enter Domain Username: aerpa.dbuser
Enter Domain Password (HIDDEN):
Enter Oracle Database Service Name: db.ServiceName.com- Enter Database Username: appears; provide the username of the database for AssistEdge and then press <Enter>8
- Enter Database Password <HIDDEN>: appears; provide password of the above database user and then press <Enter>8 .
- Enter Oracle Database Service Name: appears; provide service name of the Oracle database and then press <Enter>8 .
- For Postgres: If you are using postgres database, enter the below details:
Enter Domain Username: aerpa.dbuser
Enter Domain Password (HIDDEN):
Enter Oracle Database Service Name: db name- Enter Database Username: appears; provide the username of the postgres database for AssistEdge and then press <Enter>8
- Enter Database Password <HIDDEN>: appears; provide password of the above database user and then press <Enter>8 .
- Enter Database Name: appears; provide service name of the postgres database for AssistEdge and then press <Enter>8 .
Database connection created.
- For SQL: If you are using SQL database, enter the below details:
|
NOTE: |
The below script execution message will appear only when the user has opted for creating the database or creating the objects in the existing database. |
Database Connection Verification
|
Executing script: dropTable.sql |
- Database connection created and Database connection success. appears: If the database connection is successfully created, a success message is displayed.
- Error connecting DB. appears: If the database connection is not created, a message with error details is displayed and a confirmation message also gets displayed whether you want to continue with the installation or not.
NOTE:
- If required, the database user password can be updated after the installation by running the ae updatepassword command. For more information, see AE Commands.
- If you have opted to create the database after the installation, the connection will fail. You can continue with the installation and create the database after installation.
Providing Super Admin Details
You can add a user as super admin. This user will be able to access the AssistEdge Admin Module post installation and subsequently add other users.
- Enter details related to user as mentioned below:
- Do you want to add Super Admin user? (Y/N): appears
- Enter Y, if you want the user to be super Admin.Please provide First name : aerpa
Please provide Last name : user
Please provide Email id : aerpa.user@ev.com
Please provide Unique id : aerpa.user- Please provide First name: appears; provide the first name for the AssistEdge Admin user and then press <Enter>8 .
- Please provide Last name: appears; provide the second name for the AssistEdge Admin user and then press <Enter>8 .
- Please provide Email id: appears; provide the Email ID for the AssistEdge Admin user and then press <Enter>8 .
- Please provide Unique id: appears; provide the Unique ID for the AssistEdge Admin user and then press <Enter>8 .
User added to database: appears.
- Enter N, if you don’t want the user to be super Admin.
NOTE:
The Super Admin user can also be added after the installation by running ae addsuperadmin command. For more information, see AE Commands.
- Enter Y, if you want the user to be super Admin.Please provide First name : aerpa
- Do you want to add Super Admin user? (Y/N): appears
Providing Domain Controller Details
This section enables you to provide the details related to the enterprise domain controller.
- Once you provide the relevant information above, Please provide domain name: appears. Enter the domain name of your enterprise.
NOTE:
If you do not know your domain name, execute the following command on the Windows system which is part of the intended domain:
set | findstr USERDOMAIN=
- Please make sure the hostname is resolvable from the machine: appears. Enter ldap://<hostname along with the enterprise domain>. For example, ldap://hostname.ad.xyz.com.
NOTE:
You can run the for /F "skip=1 tokens=1" %i in ('nltest /dclist:ITLINFOSYS') do @echo %ido @echo %i command in the command line utility from another command prompt as an administrator to view the list of the domain controllers. Perform the same steps for Linux based installation and note the domain controller name that you want to use.
Domain Configuration - Default values (when available) are prefilled, press enter to accept default values.
HINT:
Domain Name -
1. Use the value from below command to find your current domain name
set | findstr USERDOMAIN= Domain Controller -
1. You can use following command (Windows command) to get domain controller details:
for /F "skip=1 tokens=1" %i in ('nltest /dclist:ITLINFOSYS') do @echo %i
2. You can use any name from the output of above command execution.
3. Please make sure the domain controller name is resolvable from the machine (use ping to validate).
-----------------------------------------------------------------------------
Please provide domain name (Default: ITLINFOSYS) :
Please provide domain controller name (Default: ldap://BLRKECGDC09) :NOTE:
Post installation, you can overwrite these values in the auth.yml file available in the scripts folder.
- Do you want to continue with Installation? (Y/N): appears.
- Enter Y, if you wish to proceed with the same details as entered above and continue with the installation else enter N.
|
Do you want to continue with Installation? (Y/N): Y |
|
NOTE: |
In case of Azure SQL System-Assigned Managed Identity setup, you should ignore the error Error while updating LowCode DB configs, which is displayed.
|
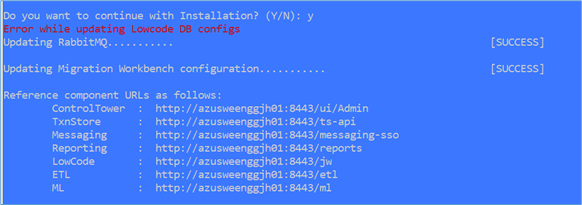
- All the components are configured and installed. SUCCESS message is displayed. The list of URLs of all the components is also displayed.
If you receive failure for any of the components, access <Installation Directory>/AssistEdgeAutomation > scripts > install.log file. Check the errors and take appropriate action. See Troubleshooting to know about the frequently received errors. - Enter N if you wish to change the details that you entered above.
NOTE:
You can update the desired properties file(s) located in the <Installation Directory>\AssistEdgeAutomation\scripts\app\install\config folder and run the ae repair command to update the port numbers, machine names, proxy server hostnames, and so on of the installed build. For more information, see see AE Commands.