SSL Certificates
When SSL certificate is used, the information becomes unreadable to everyone except for the server you are sending the information to. In addition to encryption, a proper SSL certificate also provides authentication. HTTPS also protects against phishing attacks.
Obtain Certificates
Below are the SSL certificates required for AssistEdge RPA:
- rootCert.crt (CA/Root certificate)
- server.key (Server key)
- server.crt (Server certificate)
- inter.crt (Intermediate certificate, if any)
The .crt file signifies the signed certificate that is obtained by a Certificate Authority (CA). The .key file contains private key.
To Obtain Certificate
- Contact a Certificate Authority (CA) with a CSR (Certificate Signing Request) generated. The CA uses this CSR to provide the SSL certificates. For more information on how to generate the CSR, see To Generate Certificate Signing Request.
OR
• Generate a self-signed certificate during AssistEdge RPA installation
To generate certificate signing request:
- For Windows: Open the command prompt with administrator rights and change the directory to <Installation Directory>/AssistEdgeAutomation > scripts folder.
- For Linux: Connect with the Linux system using Putty and change the directory to the <Installation Directory>/AssistEdgeAutomation > scripts folder.
- Run ae cert csr command to generate the certificate signing request.
The certificate signing request is generated.
Enable SSL Post Installation
If you have done installation in http and wish to use https protocol, then you can enable SSL post installation as well. Follow below steps to enable SSL post installation:
- Refer SSL Certificates section for required files.
- For Windows: Open the command prompt with administrator rights and change the directory to <Installation Directory>/AssistEdgeAutomation > scripts folder.
- For Linux: Connect with the Linux system using Putty and change the directory to the <Installation Directory>/AssistEdgeAutomation > scripts folder.
- Run ae enableSSL command to enable the SSL certificates. For more information, see AE Commands.
The SSL certificates are saved and enabled.
|
NOTE: |
If you do not have SSL certificates saved in your system, you can create a self-signed certificate during installation. |
Update SSL Post Certification Expiry
The certificates come with an expiry date and can be easily replaced with new certificates using ae commands. Follow below steps to replace expired certificates and update the SSL:
- Save the new certificate files at <Installation Directory>/AssistEdgeAutomation > data > Certificates folder. Refer SSL Certificates section for required files.
- Run Command Prompt as Administrator and then change the directory (as well as drive location, if applicable) to the location of scripts folder (<Installation Directory>/AssistEdgeAutomation > scripts).
- Run ae cert update command to update the expired SSL certificates. For more information, see AE Commands.
The expired certificates are replaced.
Verify/ Save Certificates in PEM/ Base64 Format
Certificates must be in PEM/Base64 format to use https protocol. Follow below steps to verify the format of certificates:
To verify/ save certificates in EM/Base64 format:
- Access <Installation Directory>/AssistEdgeAutomation > data > Certificates.
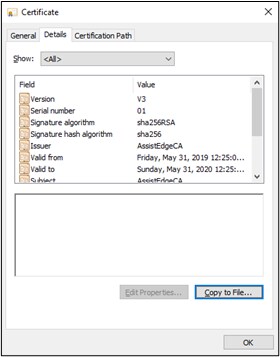
- Double click the .crt file. The Certificate dialog box opens.
- Click Details tab and then click Copy to File…. The Certificate Export Wizard opens.

- Click Next.
- Select Base-64 encoded X.509 (.CER) and then click Next.
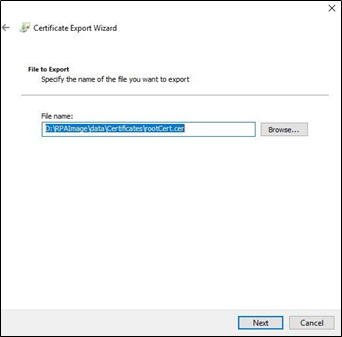
- Browse the file you want to export to Base-64 format and then click Next.
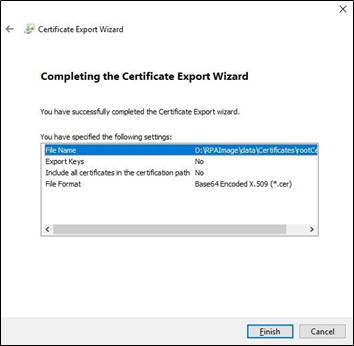
- Click Finish.

Message for successful export of the certificate into Base 64 format is received as shown above.