Installing – Server-side files
Before proceeding with the Server-side installation, ensure that all the required prerequisites are met. Then, perform the following steps in the sequence listed.
- Ensure to configure the server side files
- Start with the Installation of Server-side components
- Once you are done with server-side installation, perform the post installation steps
- Verifying Server-side Installation
Configuring Server-side files
In this section, update the configuration files stored within the extracted AssistEdgeAutomation folder as per the deployment requirement. For more information about the port see, Verifying Port Numbers.
- Deployment Properties – The deployment.properties file is used for storing and retrieving deployment runtime behavior. Access < AssistEdgeAutomation > scripts > app > install > config > deployment.properties file and update the WEB, APP and DATABASE properties with the preferred hostnames, machine name and port numbers. For information about Deployment Properties, see Pre-Install Preparations section in AE-RPA-Engage-Installation Guide
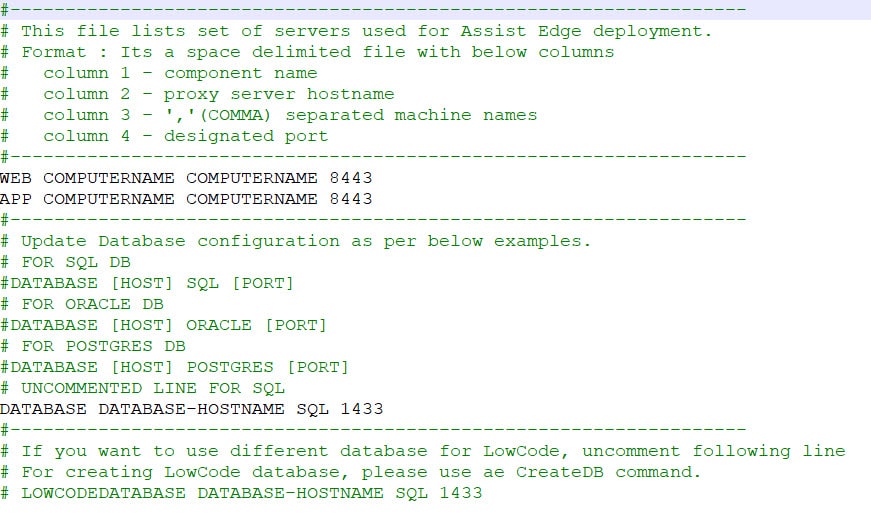
Sample:
WEB localhost COMPUTERNAME 8443 → WEB BLREQX167077A BLREQX167077A 8443
APP localhost COMPUTERNAME 8443 → APP BLREQX167077A BLREQX167077A 8443
DATABASE DATABASE-HOSTNAME SQL 1433 → DATABASE VEVAEBASE-07 SQL 1433
NOTE:
On Linux, if you wish to deploy on port 443 (any port number with value less than 1000) then, deploy it on the default port 8443 and use the TCP routing to route traffic from 443 to 8443.
The sample command is:
sudo iptables -t nat -A PREROUTING -p tcp --dport 443 -j REDIRECT --to-port 8443
- Server Properties – The server.properties file defines several server properties such as domain, cluster, SMTP and so on. Access < AssistEdgeAutomation > scripts > app > install > config > server.properties file and update as per your requirement. It is important to maintain the default structure while updating the values. For information about Server Properties, see Pre-Install Preparations section in AE-RPA-Engage-Installation Guide
Installing Server-side components
Ensure that the configuration of Server-side files is performed before starting with Server-side installation.
To perform server-side installation:
For Windows (open the command prompt with administrator rights) OR for Linux (connect with the Linux system using Putty) change the directory to < AssistEdgeAutomation > scripts folder.
- Run the ae install command to proceed with the installation. The details such as name of the components, respective ports and details of the server appears on the screen.
- Do you want to continue with Installation? (Y/N): appears.
- Enter Y to continue with the installation.
- Do you want to enable SSL? (Y/N): appears.
- Enter Y to continue the installation with SSL enablement.
- SSL Enablement:
- If the SSL certificates are present at the location, then SSL will be enabled.
In case the certificates are not present at location, then the subsequent prompt of: - Do you want to generate self-signed certificate. (Y/N): appears. Enter Y to generate a self-signed certificate, if you do not have commercial SSL certificates saved in the installation folder. Self-signed certificate gets generated and is saved in the Windows Trust Store.
NOTE:
You can also enable the SSL once the installation is done. For more information about SSL Certificate, commercial certificates, and self-signed certificate, see AE-RPA-Engage-Installation Guide.
- If the SSL certificates are present at the location, then SSL will be enabled.
- SSL Enablement:
- Enter N to continue the installation without SSL enablement.
- Enter Y to continue the installation with SSL enablement.
- Enter details related to database as mentioned below:
- Do you want to create database? (Y/N): appears
- Enter Y to create database and provide relevant inputs for the Database Admin Username and Database Admin Password
- Enter N, if you don’t want to create database.
- Do you want to create objects in existing database? (Y/N): appears
- Enter Y, if you want to create objects in existing database and then provide AssistEdge database credentials.
- Enter N, if you don’t want to create objects in the existing database
- Do you want to create objects in existing database? (Y/N): appears
- Do you want to create database? (Y/N): appears
- Enter details related to database creation as mentioned below:
- For SQL: If you are using SQL database, enter the below details:
- Provide relevant inputs for the Database Username, Database Password, and Database Name fields.
NOTE:
SQL server with Windows authentication is not supported for the Linux based installation.
- Provide relevant inputs for the Database Username, Database Password, and Database Name fields.
- For Oracle: If you are using Oracle database, enter the below details:
- Provide relevant inputs for the Database Username, Database Password, and Oracle Database Service Name fields.
Database connection created.
NOTE:
The below script execution message will appear only when the user has opted for creating the database or creating the objects in the existing database. Executing script: dropTable.sql
Executing script: createTable.sql
Executing script: createIndex.sql
Executing script: seedData.sql
Executing script: insertDateDimData.sql
Executing script: createConstraint.sql
Executing script: trigger.sql
Executing script: lowcode.sql
Executing script: quartz.sql
Database connection success.- Database Connection Verification
- Database connection created and Database connection success. appears: If the database connection is successfully created, a success message is displayed.
- Error connecting DB. appears: If the database connection is not created, a message with error details is displayed and a confirmation message also gets displayed whether you want to continue with the installation or not.
NOTE:
The Database details can also be added after the installation by running ae updatepassword command.
- Database Connection Verification
- Provide relevant inputs for the Database Username, Database Password, and Oracle Database Service Name fields.
- For SQL: If you are using SQL database, enter the below details:
- Do you want to add Super Admin user? (Y/N): appears
- Enter Y, if you want to add a Super Admin user, provide relevant inputs for First Name, Last Name, Email id and Unique id.
- Enter N, if you don’t want the user to be Super Admin.
NOTE:
The Super Admin user can also be added after the installation by running ae addsuperadmin command.
- Provide Domain Controller Details:
- Provide domain name: appears. Enter the domain name of your enterprise. The domain name can be fetched by executing the command mentioned above in the Step 1 of the Domain Name message.
- Provide domain controller name: appears. Enter domain controller name of your enterprise. The domain controller name can be fetched by executing the command mentioned above in the Step 1 of the Domain Controller message.
- Do you want to continue with Installation? (Y/N): appears.
- Enter Y if you wish to proceed with the same details as entered above and continue with the installation else enter N.
- All the components are configured and installed. SUCCESS message is displayed. The list of URLs of all the components are also displayed.
The installation of server-side components is successfully completed. For more information or any issues during installation about Server-side installation, see AE-RPA-Engage-Installation Guide.
Upon successful completion of RPA server-side installation, you must start the server-side components. For more information, see Post Install Setups.
Post Install Setups
Once the installation is done, you need to perform the post installation setups which includes:
Starting Components (Server)
In the Command Prompt, run ae startall command with Administrator rights to start all the components at once. For more
information see the Start Server-Side Components section in the AE-RPA-Engage Installation Guide.
Placing Server License
Ensure all the components are up and running before you start validating the server-side components.
To verify server-side installation:
- Copy the server license file provided by EdgeVerve at < AssistEdgeAutomation > data > License folder to enable the product usage.
- Visit the URL of the Control Tower that got created at the end of the installation, for example, https://<proxy_server_hostname>:8443/ui/Admin.
- Enter Username and Password of the Super Admin that was created during the creation of database on the landing page of the Admin Module.
|
NOTE: |
If you have any issues while logging into Control Tower, see AE-RPA-Engage-Installation Guide. |
Verifying Server-side Installation
Ensure all the components are up and running before you start validating the server-side components.
Run ae status to check the status of all the components.
Upload License in License Management
Ensure the installation is successful.
To upload the license:
- Access the Admin Module URL https://<proxy_server_hostname>:8443/ui/Admin
- Enter Username and Password of the Super Admin and then click Login.
- Open the License Manager from the side bar menu.
- Click LICENSE UPLOAD to upload the license provided by EdgeVerve.
- Either drag and drop or browse file to find the license file saved on your system and then, click UPLOAD.
|
NOTE: |
For more information, see the License Manager section in the AE-RPA-Engage Installation Guide. |
Client-side components
For downloading and launching the client-side components, see The User Interface section in AE-RPA-Administrator Guide.
The client-side components are:
- AutomationRuntime:
- Robot
- Engage
- EnterprisePersonalAssistant
- AutomationStudio
Proctor
This section is applicable only if you want automated Robot Farm management via Control Tower. Before proceeding, verify the required prerequisites over your system.
To install proctor:
- Access < Robot > Proctor > EV.AE.Proctor.exe.config file to set configurations that are specific to your system, double click and open the file. The EV.AE.Proctor.exe.config file opens.
- Update the parameters as per the requirements, save and close the file. Then, for Windows (open the command prompt with administrator rights) change the directory to Robot folder.
- Run ae install to install Proctor. Then, run ae status to check the status of Proctor.
The Proctor is installed.
|
NOTE: |
For more information, see the Installing Proctor section in the AE-RPA-Engage Installation Guide. |