Decision Workbench
This activity allows to successfully end the flow of an automated process where human inputs are required to complete the task.
Once the Decision Workbench activity is encountered in the process workflow (also referred as parent process), a task gets created in the Decision Workbench application. The Subject Matter Expert (SME) then reviews the information available in the task to submit the required inputs to complete the task. Submission of the required inputs in the Decision Workbench application triggers the subsequent process as configured in the parent process workflow using Decision Workbench activity.
|
NOTE: |
Decision Workbench activity should only be used in the processes to be executed by the unattended robots. |
Prerequisite
- The subsequent process should have already been created and deployed.
- In case the processes have been imported from a different environment, the subsequent process should be deployed before executing the parent process.
Using Decision Workbench Activity
- In the Canvas Tools pane, click Contextual Intelligence to expand the tool and view the associated activities.
- Drag the Decision Workbench activity and drop on to the Flowchart designer on the Canvas.
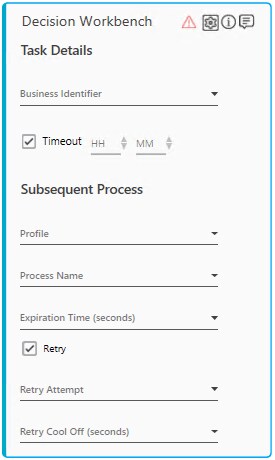
- Under the Task Details section:
- In the Business Identifier list, select the parameter that holds the identifier of the business task that you want to execute. This identifier helps you to identify the required task in the Decision Workbench application. You must define the parameter in the Parameter bar to use this option. The value of the identifier displayed the Decision Workbench application is limited to 50 characters and it ignores any inline characters. However, the defined value can be of any length.
- Select the Time Out check box, and enter the time in HH:MM format that signifies the duration after which the task in Decision Workbench application must be moved from InProgress to Open state. It is recommended to set the Time Out time for processes that have longer execution time.
NOTE:
If you have migrated a process from a previous version of AssistEdge, the Time Out check box in the Configuration screen is available on the Decision Workbench activity block under the Task Details section.
- Under the Subsequent Process section:
- In the Profile list, select the Profile that is assigned to the subsequent process.
- In the Process Name list, select the process you want to trigger after the input is submitted by the process SME in the Decision Workbench application. The subsequent process must be in the deployed state to be available for selection in the list.
- In the Expiration Time (seconds) list, select the parameter that holds the value of the expiration time of the subsequent process transaction. You must define the parameter in the Parameter bar to use this option. This value lets the parent process wait for the specified time to complete the subsequent process transaction before the next action in the process workflow is executed.
- Select the Retry check box, if you want the subsequent process to be retried in case the process execution did not execute successfully. The Retry Attempt and Retry Cool Off (Seconds) fields are enabled if the Retry check box is selected.
- In the Retry Attempt list, select the parameter holding the value of the number of attempts to be made to retry the subsequent process transaction if it is not executed by the robot successfully.
- In the Retry Cool Off (seconds) list, select the parameter holding the value of the time after which retry must be attempted.
Following configurations can be done for Decision Workbench and the subsequent process:
Configure Inputs for Decision Workbench
This lets you configure the relevant information that is presented in Decision Workbench to enable the SME to provide the required inputs. You can also configure the inputs that are required from the SME here itself.
- Click the
 (Settings) icon and then click Configuration. The Configuration dialog box appears.
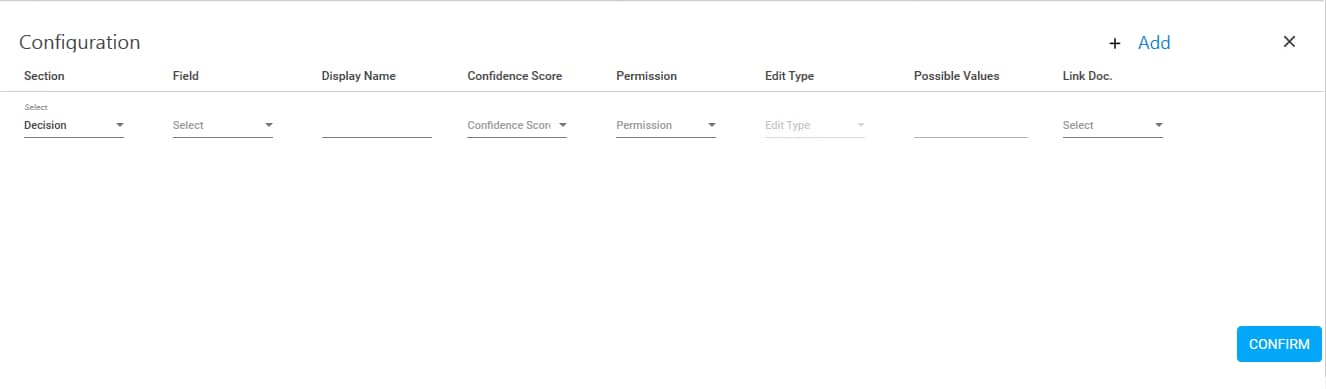
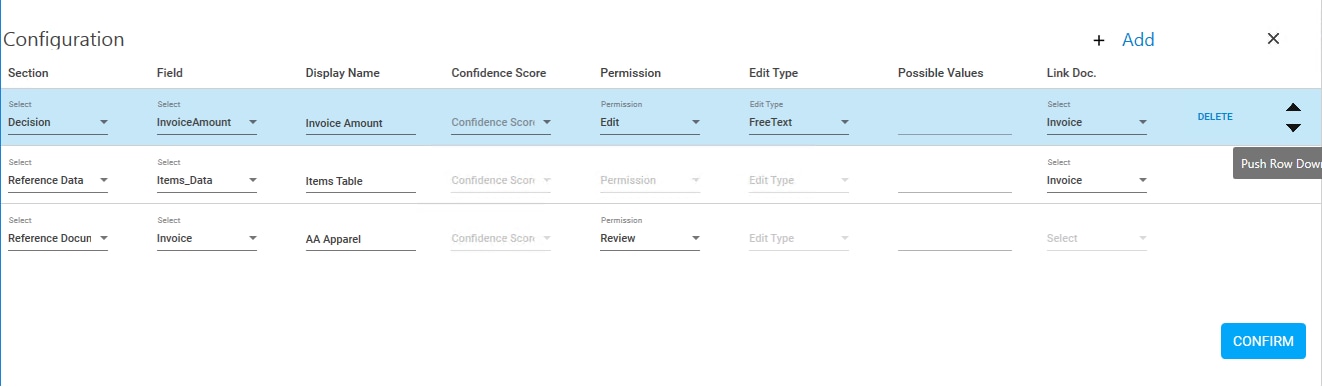
- By default, in the Section column, Decision is available. Click Add to add a new row entry. You can point to a particular row entry and click Delete to delete the added details. Use the Push Row Down and Push Row Up options to change the sequence of the configuration entries.
- Select the relevant information that can be configured to be sent to the Decision Workbench application based on the following descriptions:
|
Column Header |
Description |
|
Section |
There are three sections under which the information is displayed on Decision Workbench:
|
|
Field |
The field (or parameter) whose whole value needs to be displayed in Decision Workbench application. Note: At least one field under Decision section must be configured. |
|
Display Name |
Desired label of the configured field that needs to be displayed in Decision Workbench application. |
|
Confidence Score |
This field is enabled only when Section is set as Decision. It is relevant only when a decision is made by a machine learning model and corresponding confidence score needs to be displayed on Decision Workbench application along with the decision field. |
|
Permission |
This field is enabled only when Section is set as Decision or Reference Document. This indicates if the configured field can be edited, viewed or reviewed. Available options are:
|
|
Edit Type |
This field is enabled only when Section is set as Decision and Permission is selected as Edit. Indicates that the inputs for process SME can either be a free text or an option selected from a list of pre-configured values. Available options are:
|
|
Possible Values |
This field is enabled only when Section is set as Decision and Permission selected is Edit where the input can be selected from a list. Provide the values to be shown in the list separated by comma. |
|
Link Doc |
This field is enabled only for Reference Data and Decision fields .The list includes only those reference documents whose Permission is set as Review in the Reference Document section. It allows to select and link the relevant reference document with corresponding Reference Data or Decision fields. Once SME clicks a specific document (PDF or image), it filters the Reference Data or Decision fields as per the linking done in Decision Workbench activity. |
- Click CONFIRM.
The fields and information to be displayed in the Decision Workbench application is configured.
Map Subsequent Process Inputs
You can align the process input data of the subsequent process with the parameters of the parent process.
- Click the (Settings) icon and then click Subsequent Process Input. The Subsequent Process's Arguments Mapping dialog box appears. It displays the list of process inputs of the selected subsequent process.
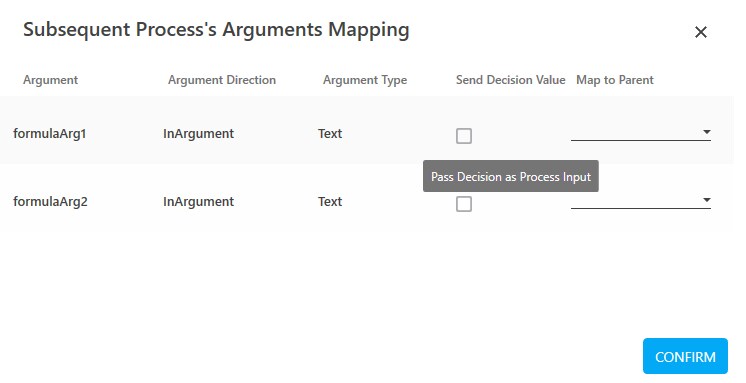
The Argument column displays the parameter name of the subsequent process input. The Argument Direction column specifies the direction of the data flow. The Argument Type defines the type of the input data.
- In the Send Decision Value column, select the Pass Decision as Process Input check box of the required Argument to indicate if the decision taken by the SME in the Decision Workbench application must be sent as a process input to the subsequent process. It filters the parameters’ list and only displays the parameters that are selected in the Decision section and have Permission as Edit. If you mark a Data Table data type to be sent to the subsequent process, the decision is passed as a JSON to the subsequent process from the Decision Workbench application. See Passing DataTable as Input to Subsequent Process section to know the details.
- In the Map to Parent column, select the parameter of the required Argument from the list. You must define the parameter in the Parameter bar to use this option. It filters the parameters based on the type of input data type of the parent process.
NOTE:
- For Text data type input, the Data Table data type are also available for selection.
- If you have migrated a process from a previous version of AssistEdge, the process input data defined in the Configuration screen is available in the Subsequent Process’s Arguments Mapping screen.
- The subsequent process input data from the previous version of AssistEdge is displayed in the Subsequent Process’s Arguments Mapping screen only after the migrated process is opened in the Edit mode for the first time after migration.
- Click CONFIRM.
The subsequent process inputs are configured.
Configure Sections Labels for Decision Workbench Inputs
It lets you configure labels for then section names as per the business scenarios. If the labels are not configured, default labels are displayed on Decision Workbench for section headings.
- Click the (Settings) icon and then click Section Labels. The Label of Sections dialog box appears.
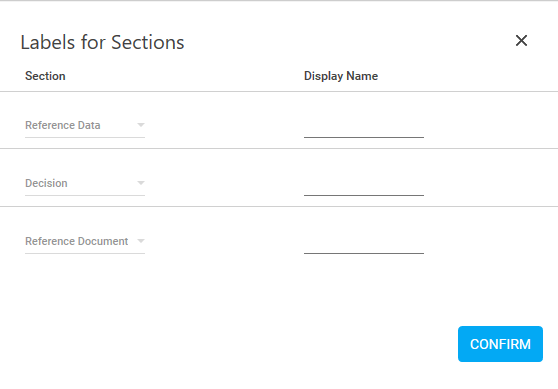
- Enter desired names in the Reference Data, Decision and Reference Document sections as their respective labels.
- Click CONFIRM.
The Decision Workbench activity is configured.
Setup Environment and perform test run to test the activity.
The following sample displays the console output upon successful execution of the Decision Workbench activity during test run.

Passing DataTable as Input to Subsequent Process
The data of type Data Table marked to be sent as a process input to the subsequent process is passed as a JSON to the subsequent process after the inputs in Decision Workbench application are submitted by the process SME. The JSON must be converted to a DataTable in the subsequent process to retrieve the values for further processing. In Automation Studio, you can easily do the conversion using out of box activities JSON Activity and Create Data Table activity.
DataTable that is reviewed and edited by the process SME in Decision Workbench application and the existing data of the edited fields are both passed in the JSON to the subsequent process. This helps to retain the older and the edited values passed.
Edited data can be retrieved with the same headers as defined in the DataTable input. But the data prior to edit is always passed with default headers in Automation Studio defined as CIndex, RIndex and Value. Here CIndex represents column number, RIndex represents row number and Value signifies the value before editing was done.
Following is the sample of converting JSON into a DataTable:
- In the subsequent process workflow, create two DataTables using Create Data Table activity. You must provide unique names to the DataTables. This lets you store the input received from the process SME after the table is edited and the non-edited older values. Add at-least one column while creating the DataTables. The DataTable that stores the values of the edited table, one of the original column names can be used as the column name and configure CIndex as a column header for the DataTable that stores the values of the cells before editing. This sets the header from the original table and the default headers defined in Automation Studio respectively.
- Create a parameter of string type with the exact name as the name of the DataTable that is set as Process Input for the subsequent process in the Decision Workbench activity. This parameter is used to store the JSON passed to the subsequent process. Following is a sample JSON printed in the console of Automation Studio, where the old data and the DataTable edited by the SME is printed with details related to laptop inventory:

- In the subsequent process workflow, drag the JSON Activity and drop on the Flowchart designer are of the Canvas. This activity is used to retrieve the values from the process input that is passed as a JSON to the subsequent process.
- In the JSON Action list, select Getter to fetch data from the JSON input,
- In the JSON Input list, select the parameter created to store the JSON passed to the subsequent process.

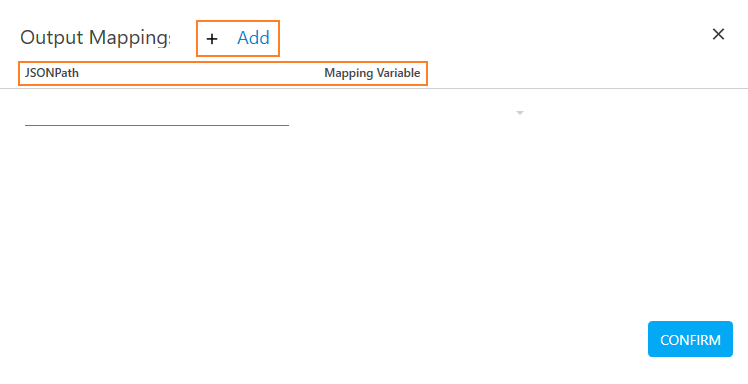
- Click the (Settings) icon, and then click Output Mapping to assign the fetched data to the DataTable for further processing. The Output Mapping dialog box appears.
- Click Add to assign the data present in the JSON to the DataTable created for storing edited values.
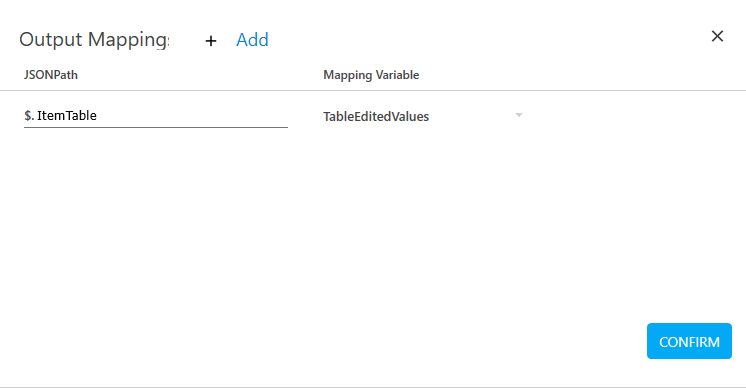
- In the JSONPath field, enter the JSON path expression as $.<parametername> (for example, $.ItemTable)to retrieve the edited DataTable. Here <parametername> is the name of the parameter created, that stores the JSON passed to the subsequent process.
- In the Mapping Variable list, select the DataTable created for storing the edited values.
- Click Add once again to assign the data present in the JSON to the DataTable created for storing the non-edited, original values.
- In the JSONPath field, enter the JSON path expression as $.<parametername>.Old (for example, $ItemTable.Old) to retrieve the data before it was edited. Here <parametername> is the name of the parameter created, that stores the JSON passed to the subsequent process.
- In the Mapping Variable list, select the DataTable created for storing the data before it was edited.
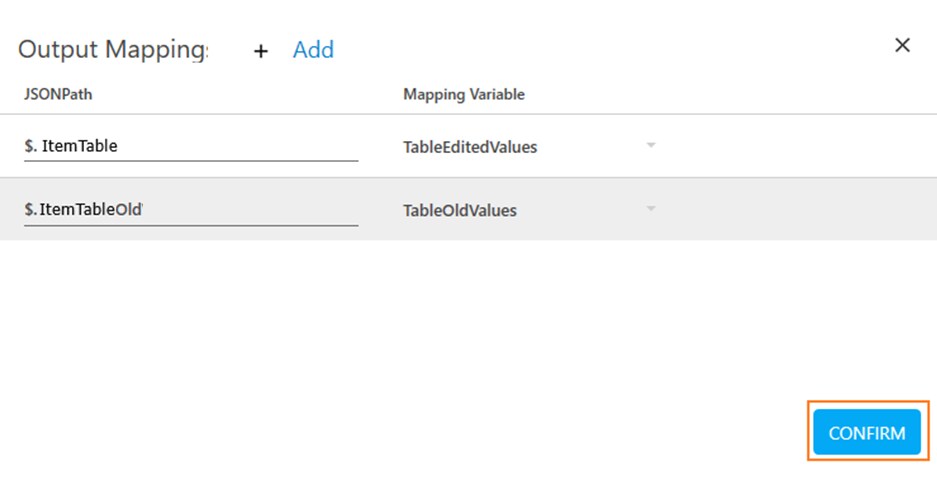
- Click CONFIRM to save the output mapping configuration. Following is the sample flow of converting JSON to a DataTable type:
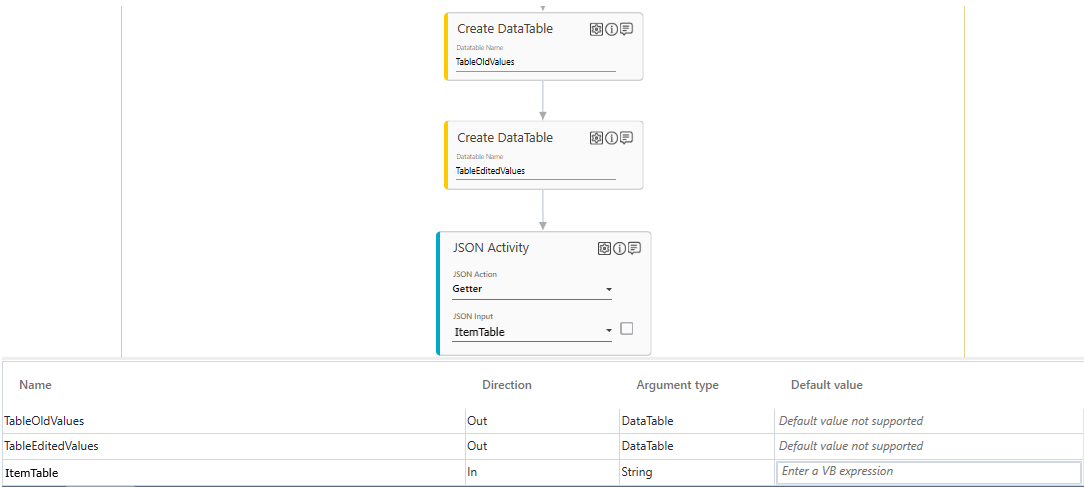
The JSON is converted into DataTables.
Use the DataTable as per the requirement in the automation process workflow.
Decision Workbench Properties
The properties of a Decision Workbench activity are listed in the following table and can be edited in the Properties grid on the right panel.
|
Property Name |
Usage |
|
Control Execution |
|
|
Ignore Error |
When this option is set to Yes, the application ignores any error while executing the activity. If set to NA, it bypasses the exception (if any) to let the automation flow continue; however, it marks the automation status as failure, in case of an exception. By default, this option is set to No. |
|
Delay |
|
|
Wait After |
Specify the time delay that must occur after the activity is executed. The value must be in milliseconds. |
|
Wait Before |
Specify the time delay that must occur before the activity is executed. The value must be in milliseconds. |
|
Misc |
|
|
Breakpoint |
Select this option to mark this activity as the pause point while debugging the process. At this point, the process freezes during execution allowing you to examine if the process is functioning as expected. In large or complex processes, breakpoints help in identifying the error, if any. |
|
Commented |
Select this option to mark this activity as inactive in the entire process. When an activity is commented, it is ignored during the process execution. |
|
DisplayName |
The display name of the activity in the flowchart designer. By default, the name is set as Decision Workbench. You can change the name as required. |