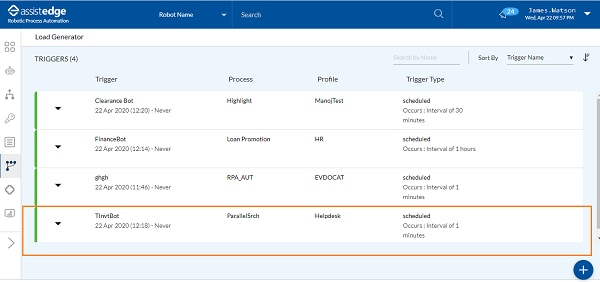
Creating Triggers
To create the triggers:
1. Click
the  (Trigger
Managers) icon to view the list of existing triggers.
(Trigger
Managers) icon to view the list of existing triggers.
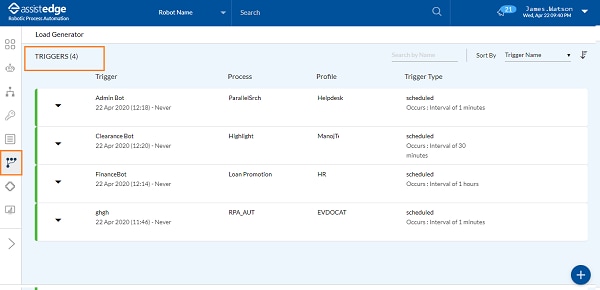
Following table contains the field description of triggers:
Triggers details |
Description |
|
Click the |
Trigger |
Displays the name, start date and end date for the trigger. |
Process |
Displays the name of process for which the trigger is created. |
Profile |
Displays the name of profile for which trigger is created. |
Trigger Type |
Displays the type of trigger whether it is schedule based or continuous monitoring. |

![]()
§ In the Search Name, you can search for the available triggers, process, profile and trigger type. For more information about Search, see Field description of Triggers.
§ In the Sort By list, select the preferred option to view the trigger list accordingly. You can sort the available list as per the available sorting criteria, which includes:
o Trigger Name
o Process
o Profile
o Trigger Type
o Request Status
§  (Ascending) or
  (Descending) order:
Click the or
icon to arrange the triggers in a order which it is created.
(Descending) order:
Click the or
icon to arrange the triggers in a order which it is created.
2. Click
the  (Add
Trigger) icon to create a new trigger.
(Add
Trigger) icon to create a new trigger.
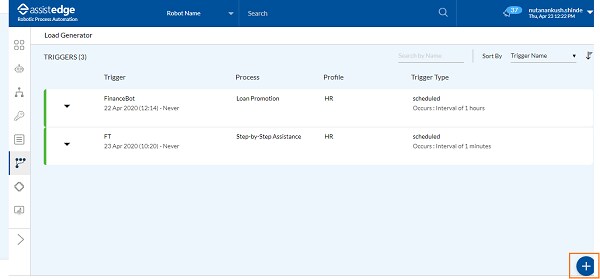
The CREATE TRIGGER page is displayed.
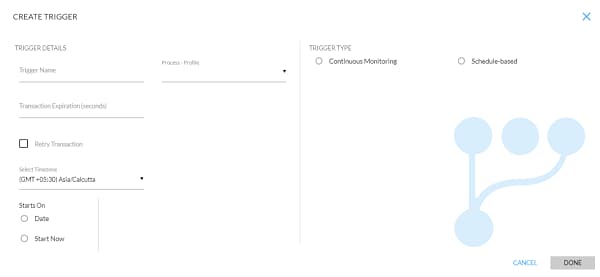
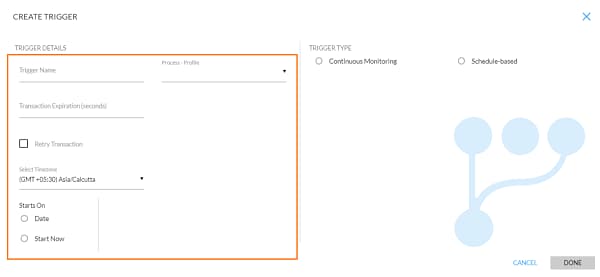
3. In the TRIGGER DETAILS, enter the following details:
· In the Trigger Name field, enter unique name to identify a trigger.
· In the Process-Profile list, select the unique process-profile combination for which the request is triggered.
· In the Transaction Expiration (seconds) field, enter the transaction expiration seconds.
· Select Retry Transaction check box to enable the retry capability for the request in case it gets timed out, or process execution gets an exception in a certain step while executing.
§ In the Number of Retries field, enter the number of times the request is retried.
§ In the Retry Interval field, enter the cool-off interval after which the request is retried.
· In the Select Time-zone, select the time zone according to which the trigger request is created and sent to RPA-Listener. Triggers can be adjusted as per preferred time zone.
· From the Start on, select the preferred option:
§ Select the Date and Time for request execution.
§ Select the Start Now option, if you want to start executing the request immediately.
· From the End by, select the preferred option:
§ Select the Date and Time when the request should be stopped.
§ Select the Never option, if you do not want the trigger to stop at all.
4. From the TRIGGER TYPE, select the preferred option for configuring the further fields. Following are the options:
· Continuous Monitoring: Continuous monitoring triggers are that which continuously monitors a source location and sends an automation requests to the robot based on any changes that may happen at the source location. Following are the source location options:
§ FTP
§ SFTP
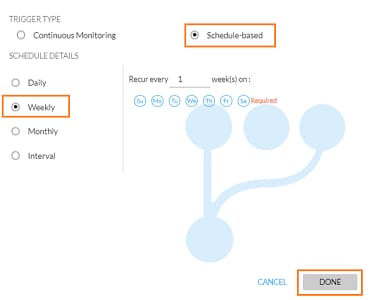
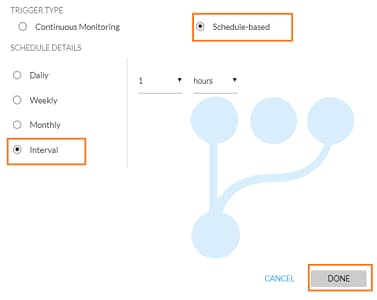
· Schedule-based: Schedule-based triggers allows you to chose the process that has to be executed in regular intervals basis. Following are the schedule based options:
§ Daily
§ Weekly
§ Monthly
§ Interval
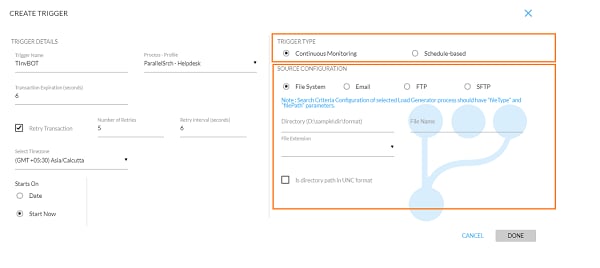
5. In Continuous Monitoring, select the source type from the available options, such as:
a. File System: Select the File System option to monitor incoming file. The trigger request from a file system has two process inputs.
§ FileType
§ FilePath
Define the corresponding process inputs in the process inputs section of the Automation Studio.
If you have selected the shared folder monitoring as the trigger type, enter the following details:
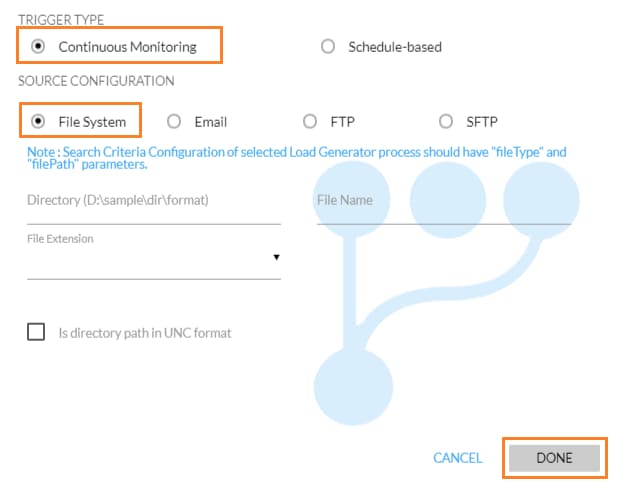
§ In the Directory field, specify the shared folder path which should be continuously monitored.
§ In the File Name field, enter the name of the file to be monitored. If you want to monitor all files of certain type, enter “.*” in the file name. Following are the examples of File Names:
o Any name with a specific format → “.*”
o Any specific text in between the file name → “.*(<text>).*”
o Any specific text at the end of the file name →“.*(<text>)”
o Any specific text at the start of file name →“^(<text>).*” or “(<text>).*”
o Two keywords anywhere in the file name → “.*(<char1><char2>).*”
§ In the File Extension list, select the extension of the file to be monitored such as xls, xlsx, pdf, txt and csv.
§ If the shared folder is not in UNC (Universal Naming Convention) format, select the Is directory path in UNC format check box.
o In the File System User ID field, enter the user ID for the file system.
o In the File System User Password field, enter the user password for the file system to open.
o In the Domain field, enter the domain details.
b. Email: Select the Email option. If you have selected emailTriggerId parameter monitoring as the trigger type, enter the following details:
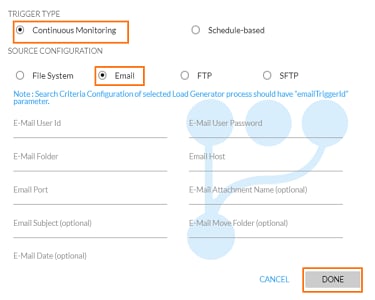
§ In the E-Mail User Id field, enter the e-mail Id of the user whose folder has to be monitored.
§ In the E-Mail User Password field, enter the password to access the folder of mail box.
§ In the E-Mail Folder field, enter the folder to be monitored for an incoming e-mail.
§ In the Email Host, enter the email server IP address of the Enterprise E-mail server. You can configure the email host from <Container_Home>\app\RPA-ControlTower\config\ config.yml.
§ In the Email Port, enter the email server port number for IMAP. You can configure the email port from <Container_Home>\app\RPA-ControlTower\config\config.yml.
Trigger request from an E-mail system has emailTriggerId as the only process input. Define the corresponding process inputs in the process inputs section of the Automation Studio.
§ In the E-Mail Attachment Name field, enter the name of e-mail attachment that needs to be monitored. This is an optional field.
§ In the E-Mail Subject field, enter the subject of emails that needs to be monitored. This is an optional field.
§ In the E-Mail move folder field, enter the destination folder where the emails should be moved after processing. This is an optional field.
§ In the E-Mail Date field, select the date post which the emails are considered for processing. This is an optional field.
c. FTP: Select the FTP option.
Trigger request from a file system has two process inputs:
§ ftpFileType
§ ftpFilePath
Define the corresponding process inputs in the process inputs section of the Automation Studio.
If you have selected the ftpFilePath monitoring as the trigger type, enter the following details:
d. Select  For
FTP, provide the following inputs:
For
FTP, provide the following inputs:
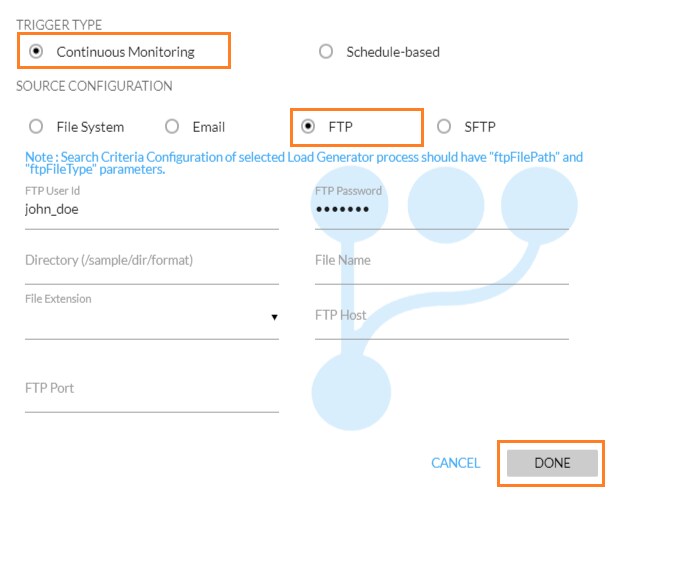
§ In the FTP User ID field, enter the ID to connect to the remote machine.
§ In the FTP Password field, enter the password corresponding to FTP User ID.
§ In the Directory field, specify the shared folder Path to be monitored continuously.
§ In the File Name field, enter the name of the file to be monitored. If you want to monitor all files of certain type, enter “.*” in the file name. Following are the examples of File Names:
o Any name with a specific format → “.*”
o Any specific text in between the file name → “.*(<text>).*”
o Any specific text at the end of the file name → “.*(<text>)”
o Any specific text at the start of file name → “^(<text>).*” or “(<text>).*”
o Two keywords anywhere in the file name → “.*(<char1><char2>).*”
§ In the File Extension field, enter the extension/type of file to be monitored.
§ In the FTP Host field, enter the IP address of the remote machine.
§ In the FTP Port field, enter the port allocated for FTP operations on the remote machine.
e. SFTP: Select the SFTP option. Trigger request from a file system has two process inputs:
§ ftpFileType
§ ftpFilePath
Define the corresponding process inputs in the process inputs section of the Automation Studio.
If you have selected the sftpFilePath monitoring as the trigger type, enter the following details:
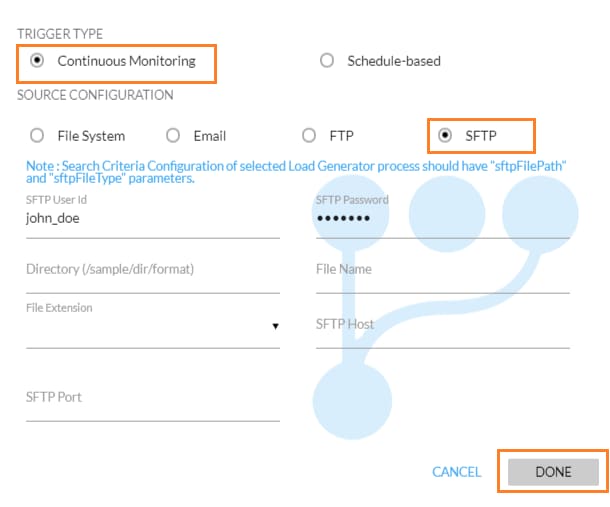
§ In the SFTP User Id field, enter the Id used to make a connection with the remote machine.
§ In the SFTP Password field, enter the password corresponding to SFTP User Id.
§ In the Directory field, enter the shared folder path to be monitored continuously.
§ In the File Name field, enter the name of the file to be monitored. If you want to monitor all files of certain type, enter “.*” in the file name. Following are the examples of File Names:
o Any name with a specific format → “.*”
o Any specific text in between the file name → “.*(<text>).*”
o Any specific text at the end of the file name → “.*(<text>)”
o Any specific text at the start of file name → “^(<text>).*” or “(<text>).*”
o Two keywords anywhere in the file name → “.*(<char1><char2>).*”
§ In the File Extension field, select the extension or type of file to be monitored from the available list such as xls, pdf, csv and so on.
§ In the SFTP Host field, enter the IP address of the remote machine.
§ In the SFTP Port field, enter port allocated for SFTP operations on the remote machine.
6. In the Schedule-based trigger type, select the preferred schedule details from the available options:
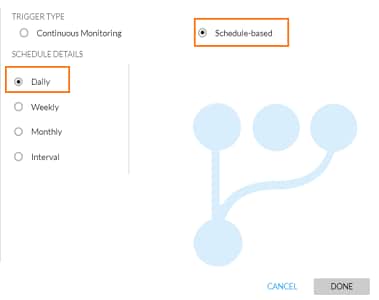
a. Daily Trigger:The request is triggered daily at the specified Start time till the End by date.
b. Weekly Trigger: The request is triggered based on the selected days of the week. Additionally, you can specify the recurrence of the trigger.
c. Monthly Trigger: The request is triggered based on the specified day of every month or a specified day of the week every month, before the configured End Date.

d. Interval-based Trigger: This trigger enables you to update the trigger based on the specified interval in hours and minutes.
7. Click DONE.
The trigger is created successfully. The robots will start executing the process as per the schedule type.
Deleting Existing Triggers
To delete the existing triggers:
1. Select
the  (Delete)
icon corresponding to trigger you want to delete. For more information
about trigger view or search and sort by, see trigger
details field description.
(Delete)
icon corresponding to trigger you want to delete. For more information
about trigger view or search and sort by, see trigger
details field description.
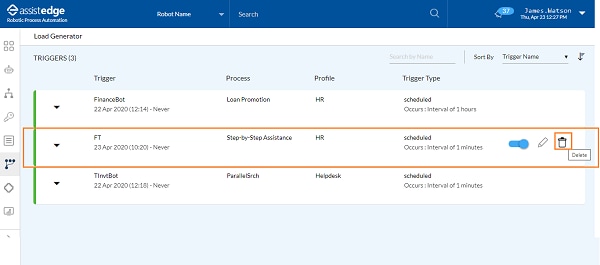
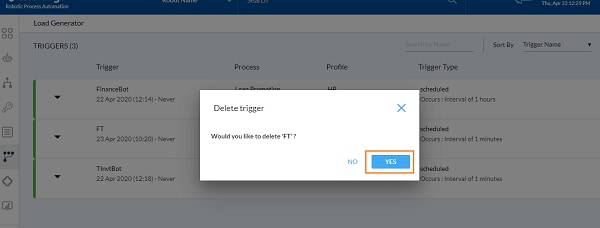
The delete trigger message appears as Would you like to delete <EmailTrigger>?
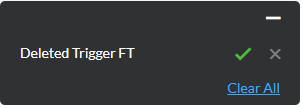
2. Click YES to delete the trigger, else click NO to cancel the trigger deletion. Once the trigger is deleted, a message appears as Deleted Trigger <Trigger Name> on the page.
Enabling or Disabling Existing Triggers
To
enable or disable the existing triggers:
1. Click the Enable/Disable Toggle button to enable or disable an existing trigger. For more information about trigger view or search and sort by capabilities, see trigger details field description.
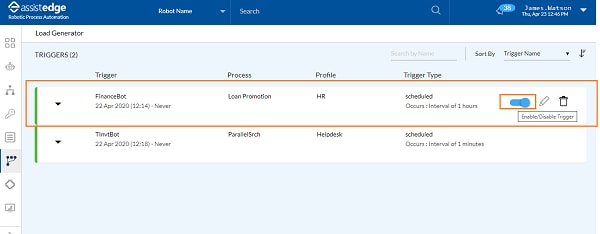
The Update Trigger pop-up appears with a message as Would you like to Disable <ExcelTrigger>?
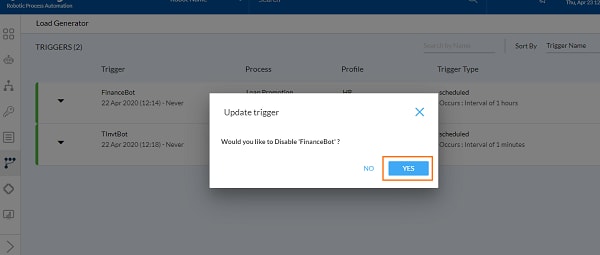
2. Click YES to disable the trigger or else click NO to cancel the action.
NOTE: |
The triggers can be enabled or disabled at any time. However, the triggers whose end date and time have passed cannot be enabled directly. You must edit the trigger to increase the end time, and then enable the trigger. |
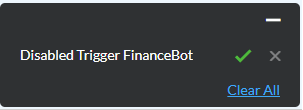
Once the trigger is disabled, a message appears as Disabled Trigger <Trigger Name> on the page.
Editing Triggers
The triggers can be edited only after it is disabled.
To
edit the disabled triggers:
1. Click
the  (Edit)
icon to corresponding trigger which you want to edit the triggers.
For more information about trigger view or search and sort by
capabilities, see trigger details field
description.
(Edit)
icon to corresponding trigger which you want to edit the triggers.
For more information about trigger view or search and sort by
capabilities, see trigger details field
description.
NOTE: |
The edit option is enabled only for the disabled triggers. |
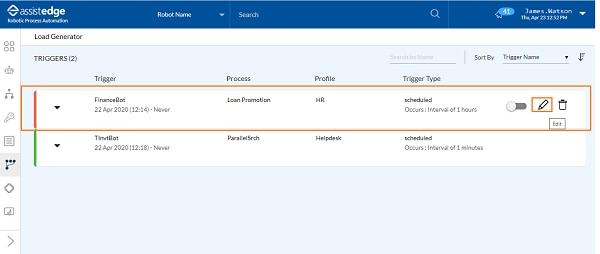
The EDIT TRIGGER window appears.
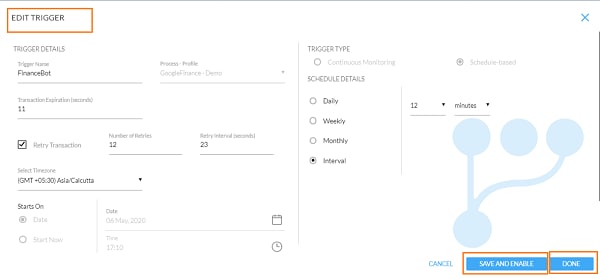
2. You can edit all the fields before the configured start time. However, once the trigger is executed or passed the start time, only some fields can be edited such as Trigger Name, End by time, Transaction Expirations, Retry Trigger, Select Time-Zone, and Trigger Type.
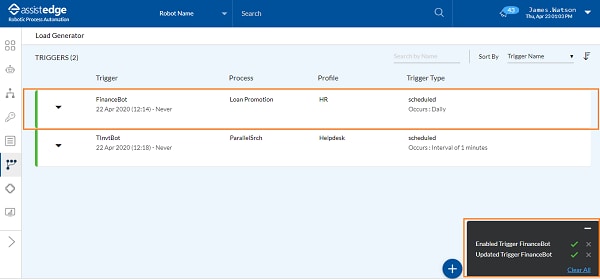
3. Once you have edited the required fields, click SAVE AND ENABLE. All changes are saved and trigger will be enabled. Whereas, if you click DONE, the changes are saved, but the trigger is still disabled. A message appears as Enabled or Updated Trigger <Trigger Name> on the page.
On This Page Hide
Related Topics