Step-By-Step Guide to Use Siebel to Search for Service Request on the Oracle Siebel CRM HI Application
Let's automate navigating to All Service Request link of the Service Request tab of the Oracle Siebel CRM HI application and search for the specified service request using Query. We should be able to click Go to view the details of the specified service request and then extract its summary details. We are going to drilldown the service request, fetch grid data of some of the fields of displayed Activities and view the extracted data in an excel file.
NOTE: |
The Siebel activity stores the extracted grid data in a data table. You must export the data table in to a viewable format, such as excel. |
Prerequisite:
1. In the Admin menu, add an application of Application Type - WebApps.
2. In the Application Properties panel:
· Enter the Login URL of the Siebel CRM application.
· Enter the Search URL of the Siebel CRM application.
· Enter the Display Name. In this example, SiebelHI is entered.
3. Click
the  (Save
Properties) icon to save the application details.
(Save
Properties) icon to save the application details.
4. Enter other details as per your requirement.
The Siebel CRM application is configured.
To automate steps as per the scenario:
1. Create a SignIn Process for the configured Siebel CRM application. Publish and Deploy the Sign In process to use it in the relevant automation process workflow created for the configured Siebel CRM application.
2. Create a data table argument, ActivityDetails to store the extracted grid data.
3. Create the string arguments:
· Summary, to store the field value extracted from the Summary field.
· FilePath, to store the exported data table values. Specify the file location along with the file name and file extension.

4. From the Canvas Tools panel, add Application activity to the Flowchart designer on the Canvas.
5. In the Application Type list, select WebApps.
6. In the Select an Application list, select the configured Siebel application.
7. Double click the Application activity and add the Navigation activity inside the Application activity.
8. In the View Name field, enter All Service Request List View view name to navigate to the All Service Request link of the Service Request tab.
9. Set up the environment and test run the process. This launches the Siebel application and automatically navigates to the desired screen. This step helps you to auto retrieve the required information such as the applet name using the docked application in Automation Studio.
10. Add the Siebel Operations activity below the Navigation activity.
11. Click
the  (Get Applet Name) button
to auto fill the applet name.
(Get Applet Name) button
to auto fill the applet name.
12. In the Select Operation list, select Query to initiate searching the desired service request.
13. Add the Set Field Value activity below the Siebel Operations activity.
14. Click
the
(Get Applet Name) button
to auto fill the applet name.
15. Click
the  (Get Field Name) button.
The Available Fields dialog
box appears with the list of available field names.
(Get Field Name) button.
The Available Fields dialog
box appears with the list of available field names.
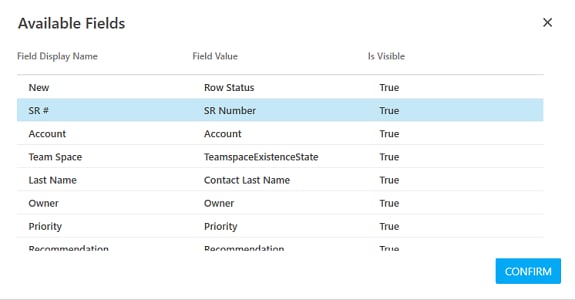
16. Select SR # and then click CONFIRM. You are taken back to the Studio menu.
17. In the Field Value field, enter a service request and select Is Default Value to set the service request number as the default value.
18. Add Siebel Operations activity below the Set Field Value activity.
19. Click
the
(Get Applet Name) button
to auto fill the applet name.
20. In the Select Operation list, select Go to perform the Go operation that displays the details related to the specified service request.
21. Add Get Field Value activity below the Siebel Operations activity.
22. Click
the
(Get Applet Name) button
to auto fill the applet name.
23. Click
the
(Get Field Name) button.
The Available Fields dialog
box appears with the list of available field names.
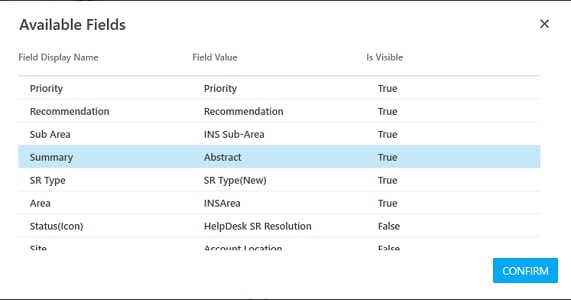
24. Select Summary and then click CONFIRM. You are taken back to the Studio menu.
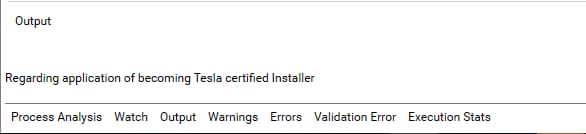
25. In the Argument list, select the Summary argument created above. To view the extracted Summary details in Automation Studio, let's add WriteLine activity.
26. Add a WriteLine activity below the Get Field Value activity.
27. Add Drilldown activity below the Writeline activity to drilldown the displayed service request.
28. Click
the
(Get View Name) button
to auto-fill the view name.
29. Click
the
(Get Applet Name) button
to auto-fill the applet name.
30. Click
the
(Get Field Name) button.
The Available Fields dialog
box appears with the list of available field names.
31. Select SR # and then click CONFIRM. You are taken back to the Studio menu.
32. Add Fetch Grid Data activity below the Drilldown activity.
33. Click
the
(Get Applet Name) button
to auto-fill the applet name.
34. Click
the
(Get Field Name) button.
The Available Fields dialog
box appears with the list of available field names.
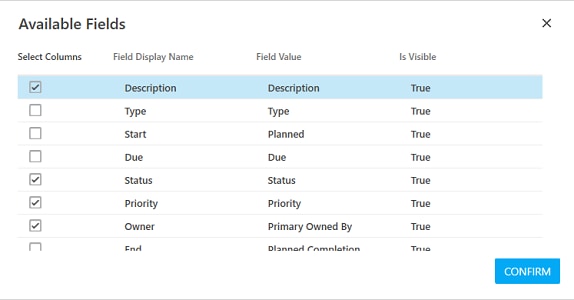
35. Select Description, Status, Priority and Owner field names to extract their respective grid data and then click CONFIRM. You are taken back to the Studio menu.
36. In the Row field, enter 2. This indicates the tool to extract the specified grid data from two rows.
37. In the Argument list, enter the ArgumentDetails argument to store the extracted grid data.
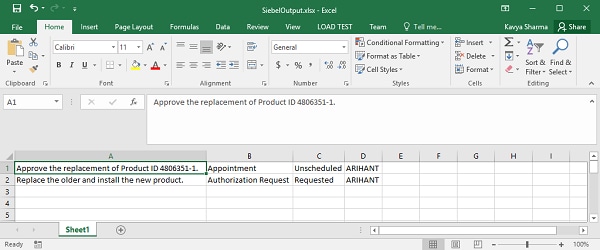
38. Add Export DataTable activity to store and view the extracted grid data in an excel.
39. In the Datatable Name list, select the ActivityDetails argument.
40. In the Export File Path list, select the FilePath argument created above.
41. In the File Type list, select Excel.
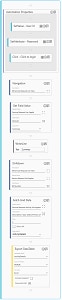
42. Save the process. Below is the screen shot of how the process workflow looks:
To view the output in Automation Studio, reset and then set up the environment. Perform the test run. You can assign this process to a robot, if you want to execute this process outside Automation Studio.
The extracted Summary field value is displayed in the Output console of Automation Studio.
The data table with the extracted grid data is exported into an Excel file and is saved at the specified location.
Related Topics