Trigger
It helps to trigger the robots to execute the automation requests for a specific automation processes type.
This activity is relevant to only the Load Generator Process type.
The Load Generator Process in Automation Studio can be used to configure pre-massaging of data, create automation requests with relevant search criteria and for sending automation requests to AssistEdge Listener. See Load Generator Process section to know the related details.
NOTE: |
· A trigger is created in Control Tower while generating the automation request or through the Trigger activity in the load generator process. · This activity can not be used for automation process workflow related to Guided Scripting activity. |
Prerequisite
Requirement |
Description |
Create Robot in Control Tower |
You must create robot in the Control Tower for the automation process workflow whose trigger needs to be created and the robot must be in the Start state. |
Configure the Listener REST API in Automation Studio |
Before you start creating the process, configure the Listener REST API in Automation Studio where you want to send the automation requests. Below are the minimum required properties for configuring the intended API. Remaining fields are auto populated with the default values already configured in Automation Studio . If you want to change the default values, refer WebAPI in Admin Capabilities. 1. In the Admin menu, add an application of Application Type- WebAPI.
2. In the Search Properties panel: · In the Login URL field, enter the login URL of the Listener REST API of AssistEdge RPA. this URL is available at the time of installation. For example, http://hostname:8080/listener/rpa/api/message. Contact your administrator if you don not have the URL. · Select the Signin checkbox as signning in to the Listener API is required. Contact your administrator for the login credentials if you do not have it. · In the Type list, select REST. By default, the value set is BAPI. · In the Display Name, enter a desired name of the Listener REST API application. 3. Click
the The Listener API is configured. |

 (
(
Using Trigger Activity
1. In the Canvas Tools pane, click Process Components to expand the tool and view the associated activities.
2. Drag the Trigger activity and drop on to the Flowchart designer on the Canvas.
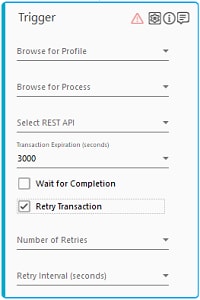
3. In the Browse for Profile list, select the profile to which the required automation process workflow is mapped. Only those profiles are listed to which the mapped automation process workflows are deployed.
4. In the Browse for Process list, select the automation process workflow for which you want to create the trigger or automation request.
5. In the Select REST API list, select the available listener application to which the automation requests must be sent.
6. In the Transaction Expiration (seconds) list, select the available parameter holding the expiry time of the automation requests specified in seconds. You must define the parameter in the Parameter bar use this option. Alternatively, you can manually enter the expiry time in the Transaction Expiration (seconds) field.
7. Select the Wait for Completion check box to create a synchronous automation request. A synchronous request signifies that only one request gets executed at a given point of time and the robot returns the JSON output. If this check box is not selected, an asynchronous request gets created and the JSON output of the Listener API is received. You can map the JSON output in the Output Parameter dialog box to receive either of the JSON outputs. Additionally, you can define a JSON query of the Listener API or the robot to receive data of a particular JSON query in the Output Parameter dialog box.
8. Select the Retry Transaction check box to retry execution of the created automation requests, that have timed out or faced an exception during execution. If the check box is not selected, the retry is not attempted.
9. In the No. of Retries list, select the parameter holding the value of the number of times the automation request must be retried for execution. The automation request is retried until it gets successfully executed or for the configured number of times.
10. In the Retry Intervals (second) list, select the parameter holding the value of interval at which the retry of the execution of the automation request must be done. The time interval must be specified in seconds.
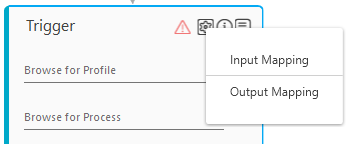
11. Click
the  (Settings)
icon, and then click Input Mapping
to align the parameters of the automation process workflow with
the parameters of the Load Generator Process workflow. The
Process's Arguments Mapping
dialog box appears. The parameters that can be mapped with the
Load Generator Process are available for selection. You
must define the parameter and the value that must be mapped, in
the Parameter bar to use this option.
See the sample mapping in the following screen shot:
(Settings)
icon, and then click Input Mapping
to align the parameters of the automation process workflow with
the parameters of the Load Generator Process workflow. The
Process's Arguments Mapping
dialog box appears. The parameters that can be mapped with the
Load Generator Process are available for selection. You
must define the parameter and the value that must be mapped, in
the Parameter bar to use this option.
See the sample mapping in the following screen shot:
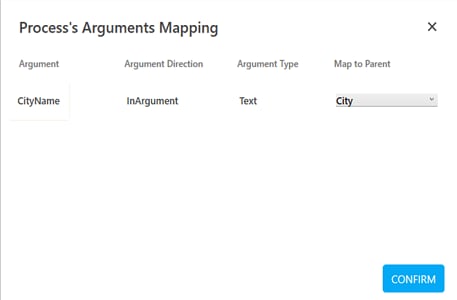
The Argument, Argument Direction and Argument Type lists the details related to the parameters of the automation process for which you want to create the automation request.
12. In the Map to Parent list, select the load generator parameter that you want to assign to the automation process parameter. Repeat this step for each of the parameter you want to map.
13. Click CONFIRM. You are directed back to the Trigger activity in the Canvas.
14. Click
the (Settings)
icon, and then click Output Mapping.
The Output Parameters
dialog box appears. This lets you verify the output and other
properties of the Listener API or the robot as per the configuration
done.
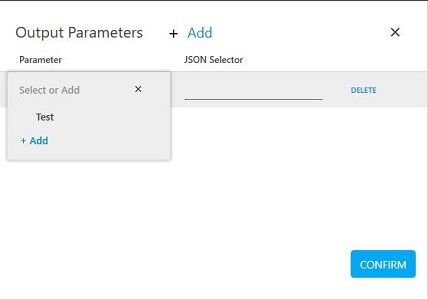
15. Click Add to align the JSON output received either from the Listener API or from the robot after the automation request of the selected process is executed.
16. In the Parameter column, click Select or Add to select an existing parameter from the available list or create a new parameter. The Add new Argument dialog box appears.
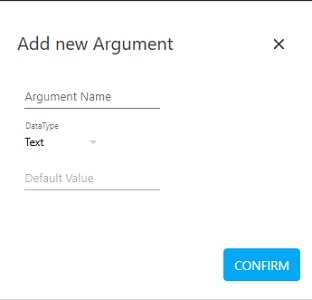
a. In the Argument Name field, enter a desired name.
b. The DataType list, select the type of data. Available options are:
o Text - A sequence of character, either as a constant or a variable.
o Numeric - An integer type that range from negative through positive.
o Decimal - An exact numeric value defined by its precision and scale.
o Boolean - A data type used for making decision. Can have only two values- true or false.
o DataTime – A data type used for values that contain date and time both.
c. Click CONFIRM to save the argument details.
17. In the JSON Selector field, enter the JSON query of the information that you want to retrieve from the JSON output of the Listener API or the robot, depending on the status of the Wait for Completion check box.
· If a parameter is mapped but the JSON Selector is left blank, either the complete JSON output of the Listener API or the robot is received, depending on the status of the Wait for Completion check box.
18. Click CONFIRM to save the mapping.
The Trigger activity with the name of the process selected, is created.
Trigger Properties
The properties of a Trigger activity are listed in the following table and can be edited in the Property grid on the right panel.
Property Name |
Usage |
Control Execution |
|
Ignore Error |
When this option is set to Yes, the application ignores any error while executing the activity. If set to NA, it bypasses the exception (if any) to let the automation flow continue; however, it marks the automation status as failure, in case of an exception. By default, this option is set to No. |
Delay |
|
Wait After |
Specify the time delay that must occur after the activity is executed. The value must be in milliseconds. |
Wait Before |
Specify the time delay that must occur before the activity is executed. The value must be in milliseconds. |
Misc |
|
Breakpoint |
Select this option to mark this activity as the pause point while debugging the process. At this point, the process freezes during execution allowing you to examine if the process is functioning as expected. In large or complex processes, breakpoints help in identifying the error, if any. |
Commented |
Select this option to mark this activity as inactive in the entire process. When an activity is commented, it is ignored during the process execution. |
DisplayName |
The display name of the activity in the flowchart designer. By default, the name is set as the name of the selected process. You can change the name as required. |
JsonSearchInput |
Signifies if the an input mapping needs to provided from a JSON. |
UserName |
By default, is set to the ID of the person creating the process from Automation Studio. You can change the user name as required. |
On This Page Hide
Related Topics