Guided Scripting
This activity allows you to configure step by step navigation enabling a guidance to complete the task independently in the Engage application. The guidance is configured in the Guided Scripting! feature of Engage application. See Engage User guide to know more about this feature.
You can use the Switch on Text activity to connect different Guided Scripting workflows to define the navigation based on the selected option and action.
NOTE: |
Do not add any other activity in the Guided Scripting process workflow as this generates error while saving the process. |
Using Guided Scripting
1. In the Canvas Tools pane, click Guided Intelligence to expand the tool and view the associated activities.
2. Drag the Guided Scripting activity and drop on to the Flowchart designer on the Canvas.
3. In the Title field, enter the text to display as the task title in the Engage application.
4. Click the (Settings) icon. The Configuration dialog box appears. It helps you to configure:
· Options – Signifies different options which is configured in Automation Studio and is available in Engage application. For example, Update Address, Update Coupon and so on. There is no limit on the number of Options that can be configured.
· Actions – Signifies the action to be performed based on the selected option, which is configured in Automation Studio and is available in Engage application. For example, Next, Skip and so on. Maximum five Actions can be configured.
· Show – Signifies the Show button available in Engage application. It lets you configure the required section that gets highlighted in the Engage application to help user identify the area for taking any specific action.
NOTE: |
The highlight functionality can be customized as per your requirement. See Engage Customization guide for more details. |

5. Expand Options, and then click Add to configure the options and their respective values in Automation Studio for defining navigations.
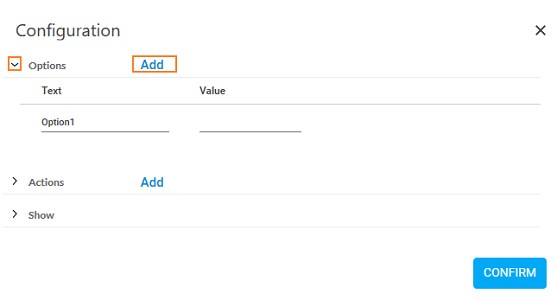
a. In the Text field, enter the name of the option you want to configure and make it appear in the Engage application.
b. In the Value field, enter the text with which you want to map the configured Option. The text of Value field must be unique as the navigation depends on the Value and not on the text field entered.
6. Expand Actions, and then click Add to configure the action and their respective values in Automation Studio for defining the navigation. By default, Next is available.

a. In the Text field, enter the name of the action that you want to configure and make it appear in the Engage application.
b. In the Value field, enter the text with which you want to map the configured Action. The text of Value field must be unique as the navigation depends on the Value and not on the text field entered.
c. Select Is Option Mandatory check box if you want make selection of any one of the options, in the Engage application, mandatory to enable the configured action.
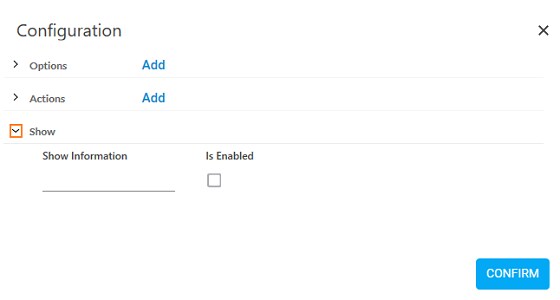
7. Expand Show and then select the Is Enabled check box to enable the Show button in Engage application.
a. In the Show Information field, enter the text of the Value field of any of the configured Options that you want to highlight in Engage application.
8. Click CONFIRM to save the configurations.
NOTE: |
Even if you have not configured any Options in the Configuration dialog box, you need to open the Configuration dialog box and click CONFIRM. This is a mandatory step to configure the default action and Next; else, an error is displayed. |
9. In the Options list, select a parameter to store the selected option. You must define an Out parameter in the Parameter bar to make it available for the selection.
10. In the Actions list, select a parameter to populate the action based on the option selected above. You must define an Out parameter in the Parameter bar to make it available for the selection.
11. Use different Guided Scripting blocks to define all the subsequent options and actions as per the requirement. See the example of Guided Scripting activity to understand in detail.
12. If required, use the Switch on Text activity to connect the Guided Scripting activities for configuring the navigation.
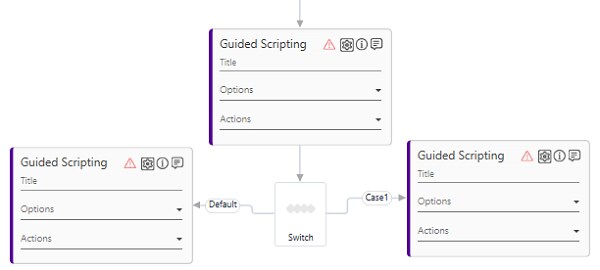
13. In the Case button, enter the pair of values of the Options and Actions fields configured in the Configurations dialog box. Create this pair as per the navigation you want to define for the process flow in the Engage application.
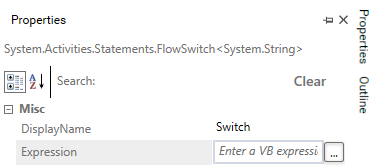
14. In the Properties pane of the Switch on Text activity, enter an expression in the Expression field based on which the relevant Guided Scripting activity is executed.
The Guided Scripting activity is created.
You can save the guided scripting process and perform a test run to view the output in Automation Studio itself.
You must publish and deploy the Guided Scripting to make it available in the Engage application. You must re-launch Engage application, if already open, to view the newly deployed processes in the Engage application.
Guided Scripting Properties
The properties of Guided Scripting activity are listed in the following table and can be edited in the Properties grid on the right pane.
Property Name |
Usage |
Control Execution |
|
Ignore Error |
When this option is set to Yes, the application ignores any error while executing the activity. If set to NA, it bypasses the exception (if any) to let the automation flow continue; however, it marks the automation status as failure, in case of an exception. By default, this option is set to No. |
Delay |
|
Wait After |
Specify the time delay that must occur after the activity is executed. The value must be in milliseconds. |
Wait Before |
Specify the time delay that must occur before the activity is executed. The value must be in milliseconds. |
Misc |
|
Breakpoint |
Select this option to mark this activity as the pause point while debugging the process. At this point, the process freezes during execution allowing you to examine if the process is functioning as expected. In large or complex processes, breakpoints help in identifying the error, if any. |
Commented |
Select this option to mark this activity as inactive in the entire process. When an activity is commented, it is ignored during the process execution. |
DisplayName |
The display name of the activity in the flowchart designer area. By default, the name is set as Guided Scripting. You can change the name as required. |
On This Page Hide
Related Topics