Navigate To
It helps to navigate from existing URL of a web application to a different URL in the process workflow.
NOTE: |
This activity must be used inside an Application activity or the system displays an error. This lets you establish a connection between Automation Studio and the URls. |
Using Navigate To Activity
1. In the Canvas Tools pane, click Process Components to expand the tool and view the associated activities.
2. Drag the Application activity and drop on to the Flowchart designer on the Canvas.
3. In the Application Type, select Webapps.
4. In the Select an Application list, select the indented application. The validation error symbol disappears when required inputs are provided.
5. Double click the Application activity, drag the Navigate To activity and drop inside the Application activity. The URLs are configured either as part of the application properties or as a parameter in the process workflow. Click any of the following link to see the different ways of configuring the navigation URLS:
· Configure URL as application properties
Configuring URL as Application Properties
1. In the Admin menu, expand the WebApps list and select the application configured above. The Search Properties pane of the configured application opens.
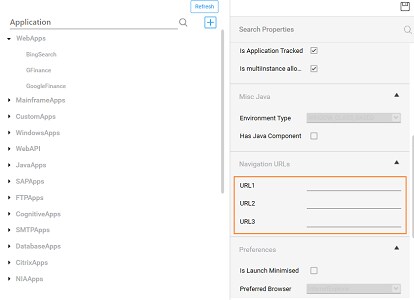
2. In the URL1, URL2 and URL 3 fields, enter the different URLs you want to navigate to in the process workflow. You can enter URL in any one field or multiple fields as per your requirement.
3. Click
the  (Save
Properties) icon to save the application. The URLs are
configured and starts appearing in the Url list of Navigate
To activity.
(Save
Properties) icon to save the application. The URLs are
configured and starts appearing in the Url list of Navigate
To activity.
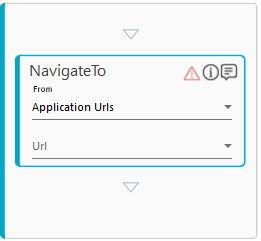
4. In the Studio menu, select Application Urls in the From list and the configured URL in the Url list of the Navigate To activity.

Configure URL as Parameter
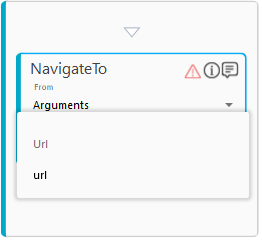
1. In the From list, select Arguments.
2. In the Url list, select the parameter holding the URL link you want to navigate to in the process workflow. You must define the parameter in the Parameter bar with the folder path to let it appear for the selection.
The navigation to the desired URL is created.
Navigate To Properties
The properties of the Navigate To activity are listed in the following table and can be edited in the Properties grid on the right pane.
Property Name |
Usage |
Control Execution |
|
Ignore Error |
When this option is set to Yes, the application ignores any error while executing the activity. If set to NA, it bypasses the exception (if any) to let the automation flow continue; however, it marks the automation status as failure, in case of an exception. By default, this option is set to No. |
Delay |
|
Wait After |
Specify the time delay that must occur after the activity is executed. The value must be in milliseconds. |
Wait Before |
Specify the time delay that must occur before the activity is executed. The value must be in milliseconds. |
Misc |
|
Breakpoint |
Select this option to mark this activity as the pause point while debugging the process. At this point, the process freezes during execution allowing you to examine if the process is functioning as expected. In large or complex processes, breakpoints help in identifying the error, if any. |
Commented |
Select this option to mark this activity as inactive in the entire process. When an activity is commented, it is ignored during the process execution. |
DisplayName |
The display name of the activity in the flowchart designer. By default, the name is set as Navigate To. You can change the name as required. You can change the name as required. |
On This Page Hide
Related Topics