Web Applications
This activity allows you to automate the redundant and tedious task performed on a web application like log in to the website and validate information, monitoring a website to prevent downtime, web data extraction to consolidate information or update entries on online form and so on.
Web application using browsers- Google Chrome, Internet Explorer, Firefox and Microsoft Edge can be automated using this activity. Compatible driver version must be present on the system where automation is performed to avoid potential errors.
Prerequisite: Configuring Web Application
NOTE: |
Internet Explorer (IE) applications with document mode 5/7/8 are supported from the IE plugin. Selenium based plugin InternetExplorerSelenium uses the IE web driver to automate the web applications running in IE. |
You must configure the web application in Automation Studio before you start configuring the steps of automation process workflow. This establishes the connection between the web application and Automation Studio to perform the automation.
Below are the minimum required properties for configuring the intended web application. If you want to define remaining properties, refer WebApps in the Admin Menu.
1. In the Admin menu, add an application of Application Type- WebApps. The mandatory fields are highlighted with red box.
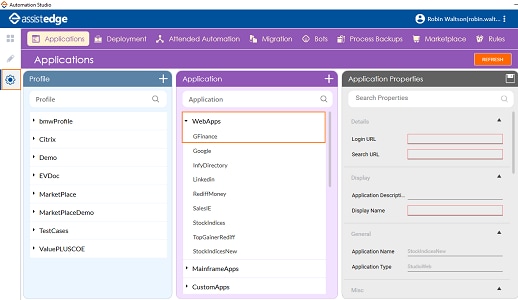
2. In the Application Properties panel:
· In the Login URL field, enter the login URL of the web application you want to access.
· In the Search URL field, enter the URL of the page where you want to perform the automation post login.
· In the Display Name, enter a desired name of the web application.
3. Click
the  (Save Properties) icon
to save the application.
(Save Properties) icon
to save the application.
The WebApps application is configured.
Using Web Application Activity
1. In the Canvas Tools pane, click Process Components to expand the tool and view the associated activities.
2. Drag the Application activity and drop on to the Flowchart designer on the Canvas. The validation error symbol disappears when required inputs are provided.
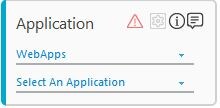
3. In the Application Type list, select WebApps. You must have at least one application added for it to appear in the list.
4. In the Select An Application list, select the application where you want to perform automation. Alternatively, you can add a new web application at this point of time. To add web application:
a. In the Select An Application list, click Add New Application. The Add New Application dialog box appears.
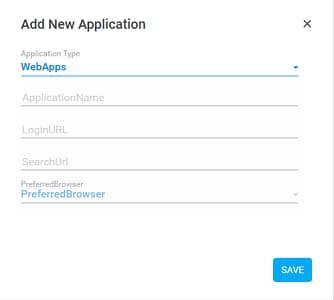
b. In the Application Name field, enter a desired name of the web application.
c. In the LoginURL field, enter the login URL of the web application you want to access.
d. In the SearchURL field, enter the URL of the page that appears immediately post login.
e. In the PreferredBrowser list, select the browser you prefer to launch the web application. By default, preference is set to InternetExplorer. Available options are:
§ InternetExplorer
§ FireFox
§ Chrome
§ InternetExplorerSelenuim
§ MicrosoftEdge
f. Click SAVE. The web application is added.
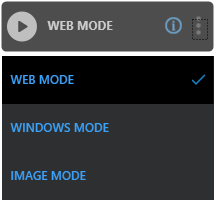
5. Click
the  (Settings) icon to launch
the WEB MODE of
the Multimodal panel. The configured
application appears along with the WEB
MODE interface.
(Settings) icon to launch
the WEB MODE of
the Multimodal panel. The configured
application appears along with the WEB
MODE interface.
6. Click
the  (Play) button to capture
the steps that you want to perform within the web application. The Play
button changes to the
(Play) button to capture
the steps that you want to perform within the web application. The Play
button changes to the  (Recording)
button.
(Recording)
button.
7. Hover over the field that you want to capture. The field gets highlighted with red box. Click the highlighted area. The Field Properties panel of the Web Mode appears. The fields that are mandatory are highlighted with red box.
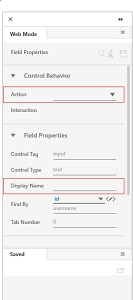
8. In the Action list, select the action that you want to perform on the captured area. Other mandatory fields change depending on your selection from the drop down list. Enter the required details. Refer Field Properties table to know more about the available fields and their respective properties.
9. Click
the (Save) icon to configure
the fields.
(Save) icon to configure
the fields.
10. Repeat steps 6 through 9 to capture all the steps involved in the process. The configured field is saved and starts appearing in the Saved pane of the Field Properties panel. You can edit or delete these steps in the Saved pane, if required.
11. Click
the (Save configured field and return to
studio) icon to save the field that you configured
and return to the Studio menu.
(Save configured field and return to
studio) icon to save the field that you configured
and return to the Studio menu.
The fields are configured and the Application activity for Application Type- WebApps is created.
NOTE: |
In case the field configuration does not work due to any security constraints in system, change the value of AutomationWay key to JAVA_OPTION in the AutomationStudio.exe.config file. You must update the same value in the Engage.exe.config and RoboSE.exe.config file as well. |
Web Table Extraction
A web table in Automation Studio can be extracted based on the type of cells present in the table or the grid- heterogenous cells (rows and columns with same html tagging) and non-heterogenous cells (rows and columns with different html tagging).
· Extracting Nonhomogeneous cells- This method supports extraction of the entire table as well as specific rows or columns. It uses loop to extract data from the table. See the example to understand in detail.
· Extracting Homogenous Cells- This method supports extraction of an entire table . It cannot extract specific row or column and does not use loop to extract data. See the example to understand in detail.
Web Mode Control Behavior and Field Descriptions
The properties of Web Mode are listed in the following table:
Property Name |
Usage |
Control Behavior |
|
Action |
It is the action or the interaction that can be performed on a web based application depending on the type of UI element as per the requirement. Available options are: · Control Exists- Checks if the UI element exists at the specified area. It is useful when working with dynamics controls. · Wait Until Exists- Waits until the UI element is found. You can use this to avoid any delay in the page loading time. This interaction returns a Boolean value of true or false (on success or failure respectively) on finding the image. The Boolean value can be set to a variable and checked in a conditional statement to perform an appropriate action after finding the web element. · Click- Allows to left click the selected UI element. · Open Context Menu - Opens the context menu that appears on an interaction such as a right-click. · Double Click- Performs double click on the selected UI element. · Get Value- Extracts the current value of the selected UI element such as, value of an input field , text box or selected area. · Get Attribute- Extracts the attribute's value of the selected UI element. · Get Text- Retrieves text from the selected UI element. · MouseOver- Hovers the mouse over the selected UI element. · Scroll By- Scrolls to particular section of the web page horizontally or vertically. · Scroll Into View- Scrolls to bring the application area viewable on screen of the web browser. · Set Value- Sets the user provided value of the UI element attribute and stores it as the value of the parameter. You must define the parameter in the Parameter bar before you start capturing the element. · Set Attribute- Sets the user provided attribute for the specified UI element and stores the provided value of the attribute into a parameter. You must define the parameter in the Parameter bar before you start capturing the element. · Click NoWait- Allows to click the selected UI element and move to the next activity without waiting for the page to load. · SendKeys- Captures input of the selected UI element from the keyboard. The input can be a combination of keys or text input from the keyboard. Use this option when a keystroke needs to be automated on a specific web element and not on the overall application. · Shift Click- It appears only when you want to capture action on a button or a link. This interaction opens the URL associated with the selected link or the button, in a new window. |
Interaction |
The corresponding interaction set against the selected action. |
Appears if Action selected is SendKeys. |
|
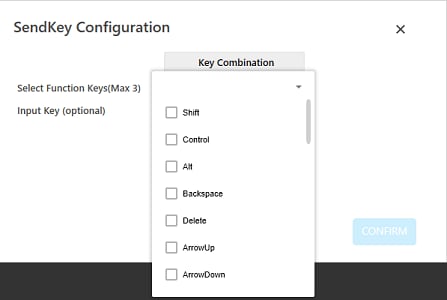
Keys |
The key sent as input from the keyboard. It can be a combination of keys or a text. To configure the keys: 1. Once
Action selected
is SendKeys, click
the
2. In the Select Function Keys(Max 3) list, select the keys from the keyboard to create the key combination. You can select upto maximum of three keys. 3. In the Input Key(optional) filed, enter an alphabetical or a numeric key to create the combination. This is an optional field. 4. Click CONFIRM. The configuration for SendKeys action is done. |
Appears if Action selected is Get Attribute and Set Attribute. |
|
Attribute |
Sub attributes or the properties of the html attribute selected. |
Appears if Action selected is Set Value, Set Attribute. |
|
Input Source |
The input value that must be provided. You must define a parameter in the Parameter bar to use this option. Select the check-box beside Input Source, and enter the input value, if you want to set a default value. |
Appears if Action selected is Scroll By. |
|
XAxis |
Vertical scroll on the web page. The value must be entered in pixels. |
YAxis |
Horizontal scroll on the web page. The value must be entered in pixels. |
Appears if Action selected is Scroll Into View. |
|
Scroll To |
Determines the area till where the scroll must be done. Available options are: · Start · Center · End Note: Internet Explorer does not support Centre option, so configuring center for ScrollTo displays exception at runtime. |
Dock Window This section appears only when Action selected is Shift Click. |
|
Dock Action |
When a link or button on the web page is opened in a new browser window, the Dock Action button enables the new window listed in the Multimodal UI. You can select one of the windows in the Multimodal UI to configure controls on the intended window. |
Interaction Attributes This section appears only when Action selected is Shift Click. |
|
Tab Name |
Name of the new window when it is docked in Engage application. |
Target Url |
URL of the new window that opens when Shift Click is selected in Action. |
Use Mouse |
Performs left click of the mouse on the link or the button to open in the new browser window. |
Field Properties |
|
Control Tag |
User specified identifier of the selected UI element. |
Control Type |
Control type of the UI element as defined by the developer. |
Display Name |
User specified display name of the action configured. |
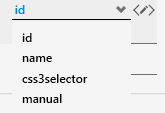
Find By |
Signifies the locator of the UI element on a web application. Identifying the correct element forms one of the first step towards creating an automation workflow. Available options are:
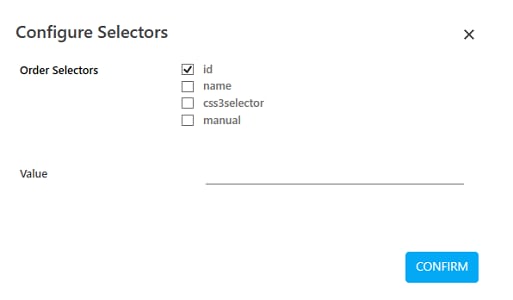
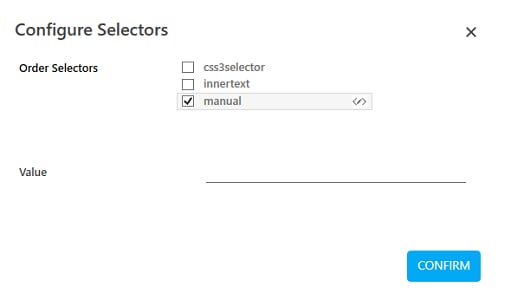
· id - Identifier of the UI element. It is useful for locating elements that has a unique id associated with it. · name - Field name of the UI element. Each element on the web page has a name assigned to it that can be used to select the intended element. · css3selector - Part of the CSS rule that uses selectors such as tags, class, pseudo-element, pseudo-class, combination of selectors and other wide range of selectors to identify the UI element. · css3xpath - Depending on the html tagging, css3xpath can also be available in this list. It uses the Xpath expression to locate the UI element. · manual - Provides manual way of identifying the UI element. Some of the examples of manual values are document.querySelectorAll and h2.s-inline.s-access-title. · innertext - Depending on the html tagging, innertext can also be available in this list. It returns the text content of the UI element based on the tag and its descendents. It can be used when the elements that have a dynamic id, name or selector but its property value remains deterministic. Some of the examples of innerext values are, Search, *Search, *Search* and Search* that is equivalent to equals, starts with, contains and, ends with respectively. · sclocator - This option is available if an application is automated having Smart Google Web Toolkit (GWT) platform. Support for sclocator is available in Selenium based plugins viz. InternetExplorerSelenium, Chrome, and Firefox. · shadow-path - This options is available if an application is automated having a Shadow DOM. You can configure backup selectors to avoid situations where the automation process is unable to find the primary selector. This is not a mandatory step. Follow the instructions to configure the backup selectors: 1. Click
the
2. Select the additional selectors. · If the selector is manual:
a. Click
the
b. In the Select Attribute list, select the attribute of the manual selector, Available options are- class, offset and loopselectorgenerated. c. In the Value list, either select a parameter containing the value of the Attribute selected or select the check box to set a default value. d. In the Condition list, select the condition of the selector. Available options are- Equals, Contains, Starts With and Ends With. e. The Generated Selector field displays the default value generated, if any. You can click Add to add this value in the Selector field. f. In the Selector list, g. Click CONFIRM. 3. In the Value field enter the required query. 4. Drag the selector and drop to change the sequence to rearrange the default order. 5. Click CONFIRM to save the configuration. |
Appears if Action selected is Control Exists, Get Attribute. |
|
Is C-View |
Is applicable only for AssistEdge Engage. If selected, the field configuration captured in Automation Studio is visible in the Engage C-View tab. |
Tab Number |
The window tab on which you want to perform automation. |
Variable Name |
User defined name of the variable that stores the captured value. You can define the variable name here itself or predefine it in the Parameter bar. |
Variable Type |
Type of the variable defined. Available options are: · Text - A sequence of character, either as a constant or a variable. · Numeric - An integer type that range from negative through positive. · Decimal - An exact numeric value defined by its precision and scale. · Boolean - A data type used for making decision. Can have only two values- true or false. · Data Table - A data type that stores tabular data. |
Misc |
|
FrameNo |
Number of the frame of the web page where you want to perform the action. Automation Studio automatically detects the frame number based on the area selected during configuration. |
Item Index |
Index number of the selected item on the web page. |
Item Offset |
The distance between the target item and the anchor. |
 (
(
 (
(
 (pencil) icon to configure the manual selector. The
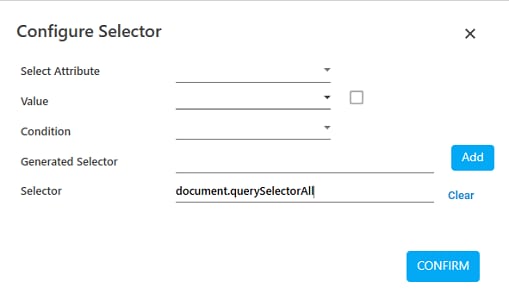
Web Application Properties
The properties of a web application are listed in the following table and can be edited in the Properties grid on the right pane.
Property Name |
Usage |
Control Execution |
|
Ignore Error |
When this option is set to Yes, the application ignores any error while executing the activity. If set to NA, it bypasses the exception (if any) to let the automation flow continue; however, it marks the automation status as failure, in case of an exception. By default, this option is set to No. |
Delay |
|
Wait After |
Specify the time delay that must occur after the activity is executed. The value must be in milliseconds. |
Wait Before |
Specify the time delay that must occur before the activity is executed. The value must be in milliseconds. |
Misc |
|
Breakpoint |
Select this option to mark this activity as the pause point while debugging the process. At this point, the process freezes during execution allowing you to examine if the process is functioning as expected. In large or complex processes, breakpoints help in identifying the error, if any. |
Commented |
Select this option to mark this activity as inactive in the entire process. When an activity is commented, it is ignored during the process execution. |
DisplayName |
The display name of the activity in the flowchart designer. By default, the name is set as the name of the selected application. You can change the name as required. |
On This Page Hide
Related Topics