PDF Template Creator
It allows you to configure a PDF template used to extract a block of data and tabular data from a searchable PDF file. Additionally, you can use the OCR engine available with this tool to extract data from a scanned PDF file.

The following functionality are available in the menu bar of AssistEdge Pdf Viewer screen of the PDF Template Creator canvas tool.
· Page - Enter the page number in the field to go to the required page. Use the > (Next Page) and the > (Previous Page) arrows to navigate to the next or previous page of the PDF file.
· Zoom - Zooms In or Out the PDF file for a better view of the content available in the document.
· Fit Width - Fits the PDF file to the window width.
· Fit Height - Fits the PDF file to the window height.
· Fit Best - Fits the PDF file to view the entire content of the page.
· Template Configuration - Allows you to configure a pdf template for data extraction. Available options are:
§ Create New Template - Creates a new PDF template.
§ Load Existing Template - Opens an already existing PDF template.
· Extract Data - Displays or saves the extracted data as per the type of data extracted. See Extract Data and Export Option section to know the details.
· Export to Studio - Exports the configured template to the Studio menu. See Extract Data and Export Option section to know the details.
· Extract to File - Exports the extracted data into a file. See Extract Data and Export Option section to know the details.
· Save Template - Saves the configured template at %localappdata% > EdgeVerve> AutomationStudio > ProtonFiles> PdfRepository folder.
· Apply OCR - Runs the OCR engine on the scanned PDF file for data extraction. See Using OCR for Extracting Data section to know the related details.
Prerequisite
Microsoft Visual C++ 2015 version X86 must be installed on the system.
Using PDF Template Creator Activity
Depending on whether the PDF is searchable or scanned, the steps to create the PDF template differs. Click any of the links below to know the steps in detail:
· Extracting_Data_From_a_Searchable_PDF
· Extraction of Data From a Scanned PDF
Extracting Data From a Searchable PDF
1. In the Canvas Tools pane, click PDF Template Creator to launch the tool. The Open PDF File dialog box appears.

2. Browse for the required file and click Open. The AssistEdge PDF Viewer along with the selected PDF file appears.
3. Click Template Configuration, and then click Create New Template to create a new template or click Load existing template to view, edit or use and an existing template. A configuration pane appears on the right side of the AssistEdge PDF Viewer. By default, the Configuration Type selected is Reference Configuration.
NOTE: |
You can use the existing PDF template with PDF Extractor activity as well. See PDF Extractor for related details. |

Click any of the links below to know the steps in details for the selected configuration type:
Reference Configuration
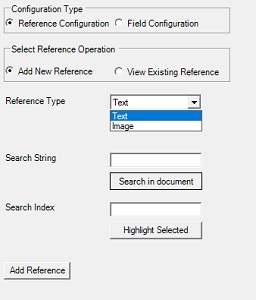
It lets you configure a reference point for data extraction. With the help of reference points, you can indicate the start and the end point of the area within which the data must be extracted. You can configure a string or image as a reference point. You can update or remove the configured references from the PDF template.
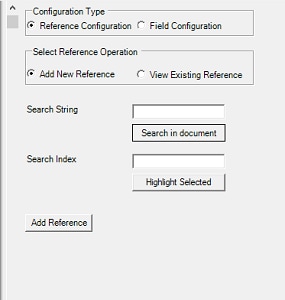
a. In the Configuration Type group, select Reference Configuration to configure references in the PDF template for data extraction.
b. In the Select Reference Operation group, select the type of reference you want to add. You can choose the Add New Reference option to add a new string as a reference or View Existing References option to edit the existing reference.
NOTE: |
The instructions given below are valid for adding a new reference or editing an existing reference. However, if you want to edit an existing reference, upon selecting View Existing References option, Select Reference drop down appears with the list of configured references. You can select the required reference which you want to edit. The configuration details are auto populated in the fields and can be edited, if required. If there is no reference available, by default, -0 appears in Select Reference list. In case you want to remove an existing configuration, select the required configuration, and then click Remove. |
c. In the Search String text box, enter the string that you want to mark for adding as a reference and then click Search in document. This highlights the relevant strings with a blue box across the PDF file. It is not a case sensitive field.
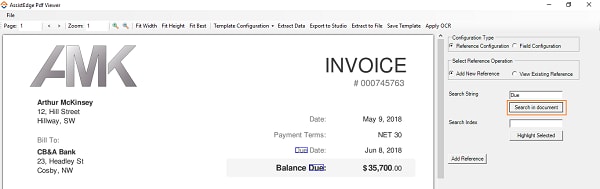
d. In the Search Index text box, enter the index number of the occurrence of the string, and then click Highlight Selected. If the entered string, occurs at multiple instances, you need to specify which instance of the string you want to mark. This keeps the blue box highlight at the specified occurrence of the string. By default, the first occurrence of the string is considered to mark.
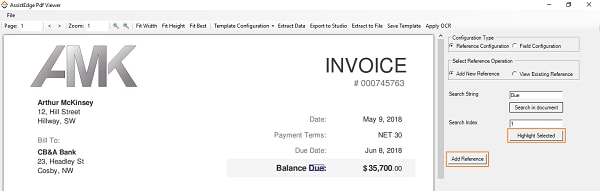
e. Click Add Reference to add the marked string as reference. This button is not available if you are editing an existing reference.
f. Click Update to update the edited reference. This button is not available if you are adding a new reference.
Field Configuration
It lets you create or modify fields to extract a block of data or tabular data from the PDF file.
Fields are a set of configurations that include reference points, rectangular boundaries or even excluded areas to effectively extract the required data. For precision, you can provide related coordinates of the area from where the data must be extracted.
NOTE: |
· Define a reference string before you configure fields, and then define the table which dynamically, along with the reference string, locates the area of data extraction. See Add New Reference to know how to add a reference string. · Table boundaries and columns must be defined in a manner where the string is not cut off. This may affect data extraction. |
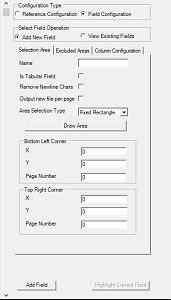
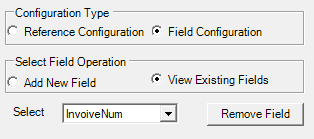
g. In the Configuration Type group, select Field Configuration to configure fields in the PDF template for data extraction.
h. In the Select Field Operation group, select the type of field you want to add. You can choose the Add New Field option to add a new field or choose the View Existing Fields option to edit the existing fields. You can configure three different areas to extract block of data or tabular data. Click any of the links below to know the detailed steps:
NOTE: |
The instructions given below are valid for adding a new field or editing an existing field. However, if you want to edit an existing field, upon selecting View Existing Fields option, the Select drop down appears with the list of configured fields. You can select the required field which you want to edit. The configuration details are auto populated in the fields and can be edited, if required.
In case you want to remove an existing field, select the required field, and then click Remove Field. |
Selection Area
It lets you mark the area for data extraction.
i. In the Name field, enter the desired name for the data to be marked.
ii. Select Is Tabular Field check box if the data to be marked is tabular data.
iii. Select Remove Newline Chars check box if there is a need to remove any newline characters while extracting the data. Removal of the newline characters reflects in the output excel and the data is extracted as a single line data.
iv. Select Output new file per page check box if the output for data extracted from each page is preferred as a new file.
v. In the Area Selection Type list, select the type of boundary, from static or dynamic corners, to mark the area for selection. Available options are- Fixed Rectangle, One Corner, Two Corners and Three Corners.
NOTE: |
· Fixed Rectangle grants static position while the other three are dynamic position. · Except for the Fixed Rectangle option, you must first define the Reference Configuration. This allows you to configure the offset points to let the tool know the rectangular boundaries for data extraction. · Three Corners option is the ideal way to extract the tabular data. |
o If Area Selection Type is Fixed Rectangle:
1. Click Draw Area and select the area that you want to mark for data extraction. The area gets highlighted within a box. The values of the X (horizontal) and Y (vertical) axis of the Bottom Left Corner and Top Right Corner groups get auto filled as per the area selected. Additionally, the Page Number field is auto filled. You can edit the auto filled values, if required.
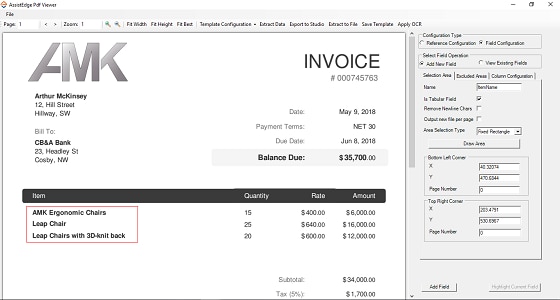
2. Click Add Field to confirm the configuration and add the field.
o If Area Selection Type is One Corner, you can manually define offset of the one corner to form a rectangular boundary along with the reference points:
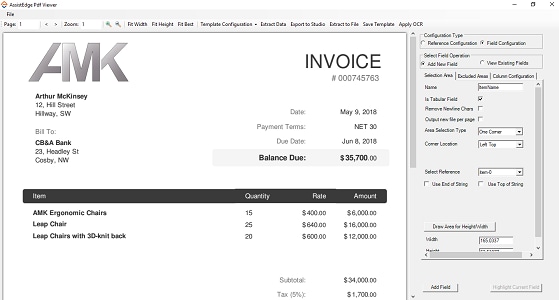
3. In the Corner Location list, define the location of the field boundary. Available options are - Left Bottom, Left Top, Right Bottom, and Right Top. By default, Left Top is selected.
4. In the Select Reference list, select the required reference string.
5. Select the Use End of String check box to either start or stop data extraction when the end of the string is encountered.
6. Select the Use Top of String check box to indicate if the reference string is part of the data extracted.
7. Click Draw Area for Height/Width, and then manually draw the height and width of the boundary. The area gets highlighted with a red box. The Width and Height fields are auto-filled. You can edit the auto-filled values if required.
8. Click Add Field to confirm and add the field.
o If Area Selection Type is Two Corner, you can manually define offset of the two corners to form a rectangular boundary along with the reference points:
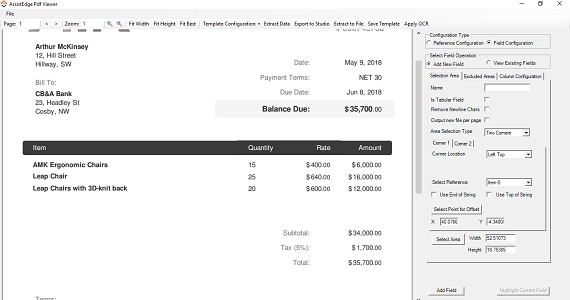
9. In the Corner 1 tab, define the location of field boundary in the Corner Location list. Available options are - Left Bottom, Left Top, Right Bottom, and Right Top. By default, Left Top is selected.
10. In the Select Reference list, select the required reference string.
11. Select the Use End of String check box to either start or stop data extraction when the end of the string is encountered.
12. Select the Use Top of String check box to indicate if the reference string is part of the data extracted.
13. Click Select Point for Offset and then choose a point from where the boundary of the first corner can be drawn. This auto-fills the values of the offset of the selected corner. Alternatively, you can manually enter the values of the X and Y-axis to define the offset of the selected corner. Zoom in the actual pdf file and choose the relevant points to fill the X and Y-axis fields.
14. Click Select Area, and then manually draw the height and width of the boundary. The area gets highlighted with a red box. The Width and Height fields are auto filled. You can edit the auto filled values if required.
15. Repeat step 1 through step 6 to configure Corner 2 tab.
16. Click Add Field to confirm and add the field.
o If Area Selection Type is Three Corner, you can manually define offset of the three corners to form a rectangular boundary along with the reference points:
17. In the Corner 1 tab, define the location of field boundary in the Corner Location list. Available options are - Left Bottom, Left Top, Right Bottom, and Right Top. By default, Left Top is selected.
18. In the Select Reference list, select an existing reference string.
19. Select the Use End of String check box to either start or stop data extraction when the end of the string is encountered.
20. Select the Use Top of String check box to indicate if the reference string is part of the data extracted.
21. Click Select Point for Offset and then choose a point to define the boundary of the first corner. This auto-fills the values of the offset of the selected corner. Alternatively, you can manually enter the values of the X and Y-axis to define the offset of the selected corner. Zoom in the actual pdf file and choose the relevant points to fill the X and Y-axis fields.
22. Repeat step 1 through step 5 to configure Corner 2 and Corner 3 tabs respectively.
Once the area is selected, you can mark required area to exclude from the data extraction.
Excluded Area
In this section you can configure the area that you want to exclude from data extraction.
If a table spans over multiple pages, configure the area spanning from the footer of current page to the header of next page, to be excluded from the extraction.
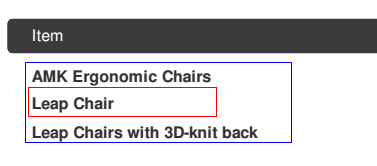
You can mark other areas to enable excluding a particular section from extraction as depicted in the below screen shot. The blue box highlights the area marked for data extraction while the red box highlights the area that must be excluded from extraction.
i. Click the Excluded Area tab.
ii. Click the Add Excluded Area button then select the area on the PDF file to auto fill the Left Top X, Left Top Y, Right Top X, and Right Top Y coordinates of the area to exclude. You can edit the values if required.
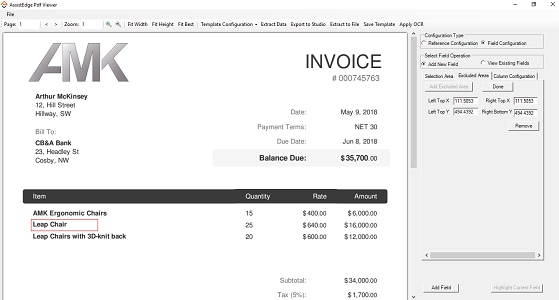
iii. Click Done.
iv. Repeat step i to iii to mark other areas to exclude them from the data extraction. The data is marked for exclusion from extraction.
Column Configuration
In this section you can define the column format in which the extracted tabular data must be saved in the .CSV file after extraction. If you do not mark the columns of the tabular data, the extracted data gets saved in a single row in the .CSV file.
i. Click the Column Configuration tab.
ii. Click Column Auto-Detect to automatically identify the columns. Alternatively, click Add Column to manually mark the columns. Draw vertical lines between the tabular fields that you want to mark for column configuration.
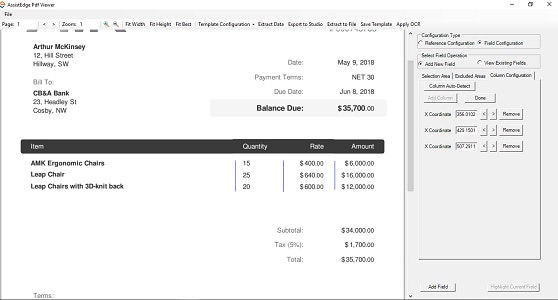
iii. Click Done to save the defined column configuration. The column configuration is done.
NOTE: |
You can view the marked area (added or edited) upon selecting View Existing Fields option. The Select drop-down field appears with the list of configured fields. You can select the required field which you want to view or edit. Click Highlight Current Field button. This highlights the marked or updated area for data extraction. This button is not available while creating or modifying the fields. |
4. Click Add Field to confirm and add the configured field. This button remains disabled if you want to edit an existing field.
5. Click Save Template. The Save As dialog box appears. The dialog box does not appear if your are saving an existing field.
6. Provide the desired file name, and then click Save.
The PDF template gets saved at the %localappdata% > EdgeVerve> AutomationStudio > ProtonFiles> PdfRepository folder.
Extracting Data From a Scanned PDF
You can use the OCR (Optical Character Recognition) technology, available in Automation Studio, to automatically extract text and images from a scanned PDF file.
Additionally, you can use the Apply OCR functionality manually, available in the AssistEdge Pdf Viewer window, to extract scanned data that may be available in the searchable PDF file.
To extract data using OCR:
1. In the Canvas Tools pane, click PDF Template Creator to launch the tool. The Open PDF File dialog box appears.
2. Browse for the required file and click Open. The AssistEdge PDF Viewer along with the selected PDF file appears.
· If it is a scanned PDF file, Automation Studio automatically runs the OCR engine and scans the document.
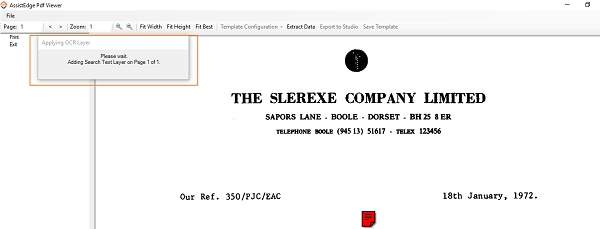
· If it is a searchable PDF file with some scanned data, click Apply OCR. Automation Studio runs the OCR engine and scans the document.
![]()
3. Click Template Configuration and then click New Template. A configuration pane appears on the right side of the AssistEdge PDF Viewer. By default, Configuration Type selected is Reference Configuration. Click any of the links below to know the steps in details for the selected configuration type:
Reference Configuration
It lets you configure a reference point for data extraction. With the help of reference points, you can indicate the start and the end point of the area within which the data must be extracted. You can configure a string or image as a reference point. You can update or remove the references from the PDF template.
a. In the Reference Type list, select Text to extract text or select Image to extract image from the scanned document.
NOTE: |
The instructions given below are valid for adding a new reference or editing an existing reference. However, if you want to edit an existing reference, upon selecting View Existing References option, the Select Reference drop-down field appears with the list of configured references. You can select the required reference that you want to edit. The configuration details are auto populated in the fields and can be edited if required. If there is no reference available, by default, -0 appears in Select Reference list. In case you want to remove an existing field, select the required field, and then click Remove. |
· If you want to extract text, refer the steps mentioned in Reference Configuration section to know the details.
· If you want to use the image as the reference, follow the below mentioned steps:
a. Click the icon, and then select the image to mark for extraction.
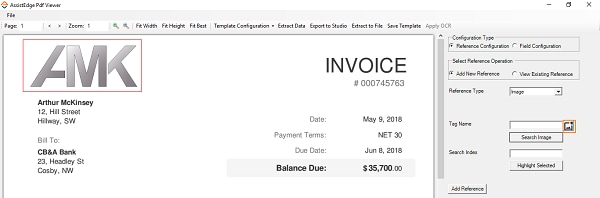
b. In the Tag Name field, enter the image name and then click Search Image. This highlights the images with the entered name.
c. In the Search Index text box, enter the occurrence of the image and then click Highlight Selected. This keeps the blue box highlight at the specified occurrence of the image. If the image entered, occurs at multiple instances, you need to specify which instance of the occurrence of the string you want to mark. By default, the first occurrence of the string is considered for marking.
d. Click Add Reference to add the marked image as reference. This button is not available if you are editing an existing reference.
e. Click Update to update the edited reference. This button is not available if you are adding a new reference.
The image is added or updated as a reference for data extraction.
Field Configuration
It lets you create or modify fields to extract a block of data or tabular data from the PDF file.
Fields are a set of configurations that include reference points, rectangular boundaries or even excluded areas to effectively extract the required data. For precision, you can provide related coordinates of the area from where the data must be extracted. See Field Configuration section to know the details to add or edit the field configuration.
In a scanned PDF file, you can apply filters and process the scanned PDF to enhance the quality of the extracted data.
a. Select View Existing Fields option. The Select drop down appears with the list of configured fields.
b. You can select the required field, and then click Apply Filter. The Configure Filters dialog box appears with the selected area and the available filters.
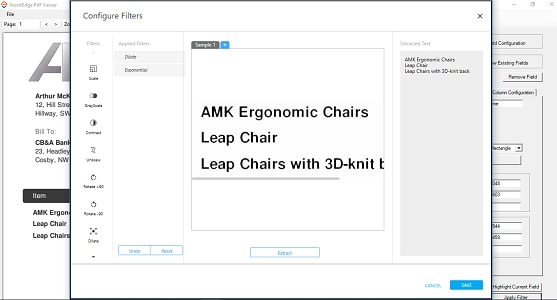
c. Choose the required filter. It starts appearing in the Applied Filters pane. You can use Undo to remove the last applied filter and Reset to remove all the filters.
d. Click Extract to view a sample of the data that would be extracted.
e. Click Save to save the configuration. You are directed back to the AssistEdge Pdf Viewer.
4. Click Save Template. The Save As dialog box appears. The dialog box does not appear if you are editing an existing configuration.
5. Provide the desired file name and click Save.
The PDF template gets saved at the %localappdata% > EdgeVerve> AutomationStudio > ProtonFiles> PdfRepository folder.
See Implementation Tips section to know how a configured template can be edited for performing advanced operations like extracting tabular data that is available over multiple pages.
NOTE: |
· Template defined for scanned PDF files cannot be used for searchable PDF files. · Scanned documents with handwritten data is not supported. · Extraction algorithm works on how the text is indexed in a file. However, in a few PDF files, what appears to be a part of one string may not be its index order. For example, consider the sample data below: Shipping Methods: FedEx 706797210999 FedEx 706797211002 The data is indexed as, Shipping Methods: FedEx 706797210999 706797211002, and not as, Shipping Methods: FedEx 706797210999 FedEx 706797211002, hence the index value must be entered correctly for the relevant data to be extracted. |
Extract Data and Export Options
You must first save the template to extract the data. You can extract data from the configured template by using Extract Data option.
Using the Extract Data option, you can view a sample of extracted block of data in the AssistEdhe PDf Viewer window itself, however, the tabular data gets saved in a .CSV excel file. By default, the .CSV file gets saved in the %localappdata% > EdgeVerve> AutomationStudio folder.
The Extract to File options exports the extracted data in a file and saves the file location in the ExtractedFilePath argument that gets created automatically with the help of the PDF Extractor activity. The PDF Extractor activity is created and the PdfPassword and ExtractedFilePath parameters gets automatically created in the Arguments pane of the Parameter bar. This option is helpful if you want to convert the entire document or certain set of pages into text. See PDF Extractor activity to know how to use it.
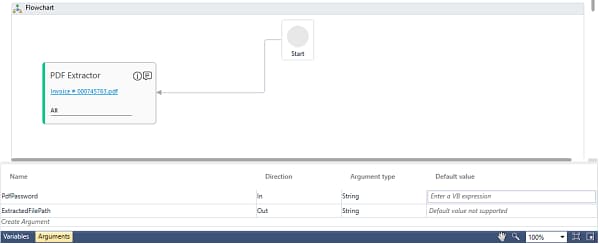
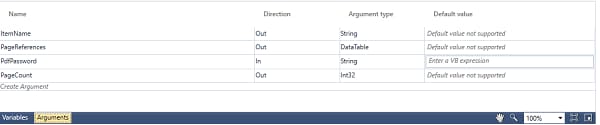
Use the Export to Studio option to export the PDF template to the Studio menu. It creates the PDF Extractor activity with the PageReferences, PdfPassword and PageCount parameters getting automatically created in the Arguments pane. See PDF Extractor activity to know how to use it.
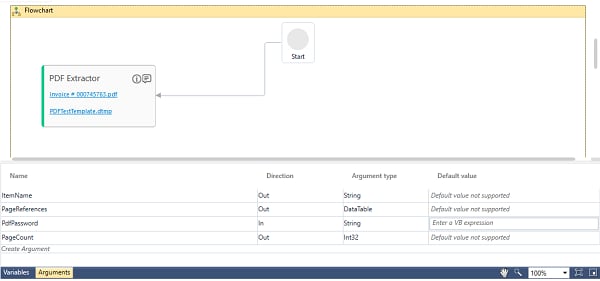
You can use the In arguemnt, PdfPassword, to pass the password of the excel file to make it password protected. The Out arguments, PageReferences and PageCount can be used to store. Another default Out argument, ExtractedFilePath, stores the location where the file gets stored after Export to File option is used.
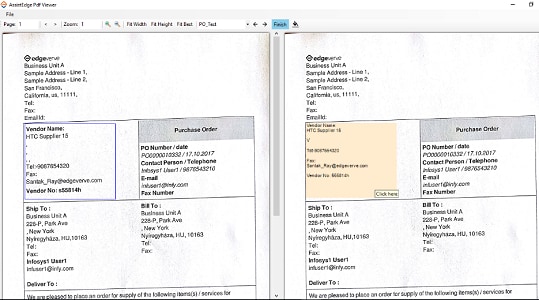
Assisted View
You can compare the data extracted from a scanned PDF file with the original document in a comparison view in Automation Studio. Once the PDF template is exported to Automation Studio, you can select the Compare Result check box available in the Properties grid of the PDF Extractor activity.
While performing Test Run in Automation Studio, a comparative view of the data extracted from the scanned document and the original document is displayed. This enables you to validate the data and make the required changes in the template, if any.
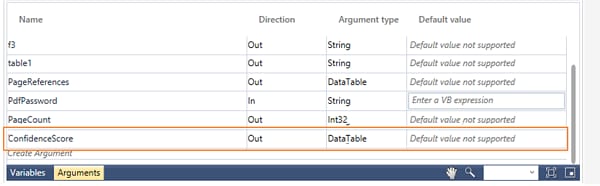
Confidence Score
If you are using a scanned document for data extraction, a default argument, ConfidenceScore, gets created in the Argument pane after the template is exported to the Studio menu. It is used to get the confidence value of all the extracted fields. It can be useful in deciding whether the extracted fields needs manual correction. It compares the original data and the scanned data to provide the confidence score.
You can add a WriteLine activity and enter Convert.ToString(ConfidenceScore.Rows(0)("Field Name")) in the Text field to view the score in Automation Studio.
Implementation Tips
· Configuration scenarios for workaround during development:
The saved PDF template file available at %localappdata% > EdgeVerve> AutomationStudio > ProtonFiles> PdfRepository folder, contains some configuration fields which can be edited in the notepad and used for advanced operations. For example, in tabular form, where the data spread over multiple pages, a table with separate rows must be created instead of extracting the entire table. To create a table with separate rows, edit the ExtractPagewise field of the PDF template as true. This parameter exists at the end of the template.
Following are configuration fields that can be edited:
§ ExtractPagewise - This field is used to append multiple tabular outputs to a single CSV file.
§ AutoAddSpaces and Space Width - What appears as a space, may not be a space character in the file. It could be two sequential characters placed at a distance to give an illusion of space. By default, if there is no space character in the file, the extracted output appears without space. You can set the AutoAddSpaces field to true and define the Space Width flag to let the extractor add a space character whenever the distance between two characters exceeds the space width value in PDF units. Use the corner draw area button to estimate the required space width.
§ Output mapping - This field can be used to map to another variable of Boolean or String type.
§ IsNewRowNewField - Set this field to true to extract a table with one column. Data flows from top to bottom and then to the right, instead of the common scenario of left to right and then top to bottom.
· Password related configurations:
The extraction of password protected PDF files is supported in Automation Studio. Whenever the template is exported to Automation Studio, PdfPassword parameter is created in the Arguments pane.
Do not assign any default value to the argument as it gets stored in the process file. It is recommended to create an automation process workflow using PDF Extractor activity and use the process as a re-use process where the PdfPassword parameter is configured.
· About Backward compatibility:
Templates created in previous versions of Automation Studio cannot be viewed or edited in the current version. However, the automation process workflow configured using previous versions of Automation Studio can be executed in the current version.
· Troubleshooting steps for various scenarios:
a. If the studio activity fails, check for the relevant logs. These logs are located inside the Logs folder in the build path (or Automation Studio parent folder).
b. Check if the file path provided for the PDF is correct.
c. Check if the template being used is relevant.
d. Open the PDF file in Google Chrome to check, if the search string and index combination are as intended.
e. Load the file and template and check if the intended area is correctly highlighted.
On This Page Hide
Related Topics