File Operations
It allows you to automate file operations such as create, move, rename, zip and others. A few of the operations such as open operation, are limited to specific file types as the specific application would be required to open the file.
The application associated with the file type must be present in the system for the automation process workflow to perform the required file operation. For example, if you want to perform a file operation on an excel file, ensure that you have MS Excel installed on the system.
This activity can be used for files available on the network drive as well.
Using File Operations Activity
1. In the Canvas Tools pane, click File to expand the tool and view the associated activities.
2. Drag the File Operations activity and drop on to the Flowchart designer on the Canvas. The validation error symbol disappears when required inputs are provided.
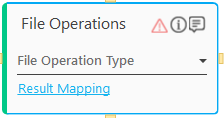
3. In the File Operation Type list, select the operation you want to perform. Click any of the link below to know the steps to perform the selected operation:
· Create · Copy · Move · Rename · Open · Save As |
· Close · Delete · Zip · Unzip · Convert · IsExist |
Create
It helps you to automate the creation of a new file and store it at a specified location, with a desired extension such as .doc, .docx, .txt, .jpg, .html and others.
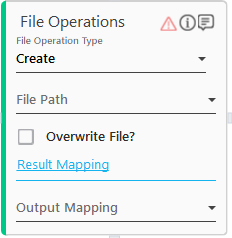
1. In the File Path list, select the parameter holding the document file path along with the file name and file extension to create and save the file at the specified location with the specified name . For example, D:\documents\sampledoc.txt creates a new file sampledoc of .txt file type and saves it in the documents folder available at the D drive. You must define the parameters in the Parameter bar to store the value and make it available for the selection.
2. Select the Overwrite File? check box to overwrite an existing file, if you want to create the file with the name of an existing file.
3. Click the Result Mapping link. The Output Mapping list appears. Select the available parameter to map the status of the file operation performed. Both Boolean and String type is supported. You must pre-define the parameter to make it available for the selection. If the operation is successful, it returns true and if the operation fails it returns false. It can be used as an input for the next action that you want to perform in the automation process workflow, depending upon the success or failure of the file operation performed.
Copy
It helps you to automate copying of one or multiple files from one location to another. You can use this operation to streamline high volume and complex files to copy from one location to another more efficiently, accurately and in less time.
You can copy a specific file from one location to another by providing the file path along with file name and file extension. For example, D:\Data\newfile.txt.
To copy multiple files from one location to another, you must provide only the file path. For example, D:\Data. You can either copy all the files in available in the folder or copy selective files of same file type by providing the file extension.
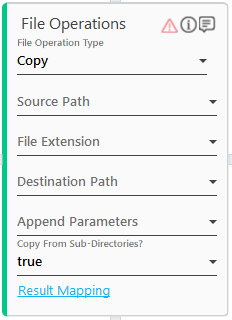
1. In the Source Path list, select the parameter holding the path of the file that needs to be copied. The path can either be the file location or file location along with the file name and its extension depending on the number of files you want to copy. You must define the parameter in the Parameter bar to store the value and make it available for the selection.
2. In the File Extension list, select the parameter holding the file name along with the file extension of the file or files that you want to copy. This is an optional field. You must define the parameter in the Parameter bar to store the value and make it available for the selection. Following three combinations can be used.
· *.*- to copy all the files from source location.
· *.file extension - to copy all files with a specific extension. For example, *.xlsx is used if you want to copy all the excel files.
· File name.File extension - to copy a file with a specific name and extension. For example, Results.xlsx.
3. In the Destination Path list, select the parameter holding the destination path of the file where it must be copied. For example, D:\UpdatedData. You must define the parameter in the Parameter bar to store the value and make it available for the selection.
4. In the Append Parameters list, select the parameter holding the text that you want to add to the name of the file that is being copied. This is an optional field. You must define the parameter in the Parameter bar to store the value and make it available for the selection.
5. In the Copy From Sub-Directories? list, select true to search for one or more files in the sub directories or sub folders of the source location path. By default, the value is set to true. If it is set to false, the required file is searched only in the specified source file path.
6. Click the Result Mapping link. The Output Mapping list appears. Select the available parameter to map the status of the file operation performed. Both Boolean and String type is supported. You must pre-define the parameter to make it available for the selection. If the operation is successful, it returns true and if the operation fails it returns false. It can be used as an input for the next action that you want to perform in the automation process workflow, depending upon the success or failure of the file operation performed.
Move
It helps you to automate moving of one or multiple files from one location to another. By automating the file transfer, you can prevent moving sensitive data to unwanted location and avoid end point vulnerabilities. It helps you to move multiple files with greater accuracy and in lesser time.
You can move a specific file from one location to another by providing the file path along with file name and file extension. For example, D:\Data\newfile.txt.
To move one or more files from one location to another, you must provide only the file path, for example, D:\Data.

1. In the Source Path list, select the parameter holding the source path from where the file must be moved. The path can either be the file location or file location along with the file name and its extension depending on the number of files you want to move. You must define the parameter in the Parameter bar to store the value and make it available for the selection.
2. In the File Extension list, select the parameter holding the file name along with the file extension of the file that you want to move. This is an optional field. You must define the parameter in the Parameter bar to store the value and make it available for the selection. Following three combinations can be used.
· *.* - to move all the files from source location.
· *.file extension - to move all files with a specific extension like *.xlsx is used to copy all the excel files.
· File name.File extension - to move a file with a specific name and extension. For example, Results.xlsx.
3. In the Destination Path list, select the parameter holding the destination file path. For example, D:\UpdatedData. You must define the parameter in the Parameter bar to store the value and make it available for the selection.
4. In the Append Parameters list, select the parameter holding the text that you want to append to the name of the file or files that are being moved. This is an optional field. You must define the parameter in the Parameter bar to store the value and make it available for the selection.
5. In the Copy From Sub-Directories? list, select true to search for the required file or files in the sub directories or sub folders of the source location path. By default, the value is set to true. If it is set to false, the required file or files are searched only in the specified source location path.
6. Click the Result Mapping link. The Output Mapping list appears. Select the available parameter to map the status of the file operation performed. Both Boolean and String type is supported. You must pre-define the parameter to make it available for the selection. If the operation is successful, it returns true and if the operation fails it returns false. It can be used as an input for the next action that you want to perform in the automation process workflow, depending upon the success or failure of the file operation performed.
Rename
It helps you to automate renaming a file or a folder. Automating the task of renaming files or folders lets you handle multiple files in less time with greater accuracy and consistency.
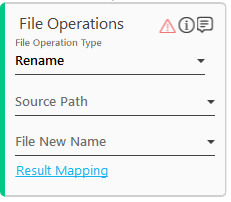
1. In the Source Path list, select the parameter holding the source path of the file along with the file name and file extension or the folder name that needs to be renamed. You must define the parameter in the Parameter bar to store the value and make it available for the selection.
2. In the File New Name list, select the parameter holding the name that you want to rename the file or the folder with. You must define the parameter in the Parameter bar to store the value and make it available for the selection.
3. Click the Result Mapping link. The Output Mapping list appears. Select the available parameter to map the status of the file operation performed. Both Boolean and String type is supported. You must pre-define the parameter to make it available for the selection. If the operation is successful, it returns true and if the operation fails it returns false. It can be used as an input for the next action that you want to perform in the automation process workflow, depending upon the success or failure of the file operation performed.
Open
It helps you to open a file automatically from a particular location.
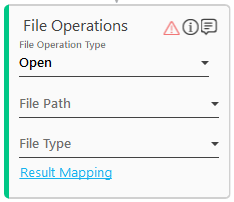
1. In the File Path list, select the Parameter holding the source path of the file with the file name and file extension. You must define the parameter in the Parameter bar to store the value and make it available for the selection.
2. In the File Type list, select the type of file you want to open. Available options are- Excel, Word and Others.
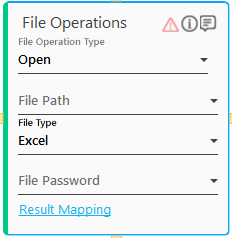
3. If the File Type selected is Excel or Word, the File Password list appears. In the File Password list, select the parameter holding the password to open the file if the file is password protected.
4. Click the Result Mapping link. The Output Mapping list appears. Select the available parameter to map the status of the file operation performed. Both Boolean and String type is supported. You must pre-define the parameter to make it available for the selection. If the operation is successful, it returns true and if the operation fails it returns false. It can be used as an input for the next action that you want to perform in the automation process workflow, depending upon the success or failure of the file operation performed.
Save As
It helps you to automate saving an open file with a desired name and file extension. Automating the task of saving files prevents the possibility of losing any unsaved data due to system failure or human error.
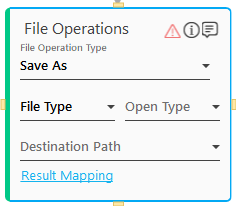
1. In the File Type list, select the type of file you want to save. Available options are- Word and Excel.
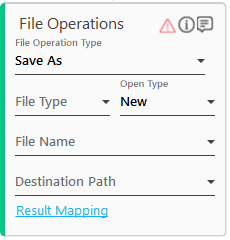
2. In the Open Type list, choose if you want to open a New or an Existing file. New indicates that the file is not saved previously while Existing indicates that the file is already saved at a certain location.
3. If the Open Type selected is New, the File Name list appears.
· In the File Name list, select the parameter holding the file name along with the file extension with which you want to save the file.
4. If the Open Type list selected is Existing, the Source Path list appears.
· In the Source Path list, select the parameter holding the source path of the file along with the file name and file extension of the file that you want to save.
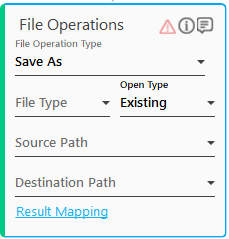
5. In the Destination Path list, select the Parameter holding the destination path of the file along with the file name and file extension with which you want to save the file. The new name must not be same as the previous name.
6. Click the Result Mapping link. The Output Mapping list appears. Select the available parameter to map the status of the file operation performed. Both Boolean and String type is supported. You must pre-define the parameter to make it available for the selection. If the operation is successful, it returns true and if the operation fails it returns false. It can be used as an input for the next action that you want to perform in the automation process workflow, depending upon the success or failure of the file operation performed.
Close
It helps you to automatically close a specified file. Automating the task of closing files can avoid losing data that might occur during some system failures, if the file remains open.
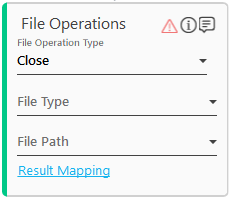
1. In the File Type list, select the type of file you want to save. Available options are- Word and Excel.
2. In the File Path list, select the parameter holding the source path of the file with the file name and file extension. For example, D:\Data\newfile.txt. You must define the parameter in the Parameter bar to store the value and make it available for the selection.
3. Click the Result Mapping link. The Output Mapping list appears. Select the available parameter to map the status of the file operation performed. Both Boolean and String type is supported. You must pre-define the parameter to make it available for the selection. If the operation is successful, it returns true and if the operation fails it returns false. It can be used as an input for the next action that you want to perform in the automation process workflow, depending upon the success or failure of the file operation performed.
Delete
It helps you to automatically delete the specified file. Automating the task of deleting files allows you to get rid of unwanted files without any human intervention, saving the disk space and time. Since the deletion of file happens in the background, other task can be performed simultaneously.
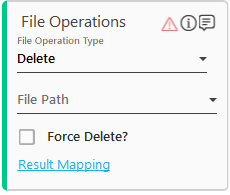
1. In the File Path list, select the parameter holding the source path of the file with the file name and file extension. For example, D:\Data\newfile.txt. You must define the parameter in the Parameter bar to store the value and make it available for the selection.
2. Select the Force Delete? check box to forcefully delete a file that is in open state.
3. Click the Result Mapping link. The Output Mapping list appears. Select the available parameter to map the status of the file operation performed. Both Boolean and String type is supported. You must pre-define the parameter to make it available for the selection. If the operation is successful, it returns true and if the operation fails it returns false. It can be used as an input for the next action that you want to perform in the automation process workflow, depending upon the success or failure of the file operation performed.
Zip
It helps you to automatically zip one or more files inside a folder. Automating the task of zipping files facilitates data organization and transfer accurately and efficiently. It saves the administrative time and effort required to manage multiple files transfer.
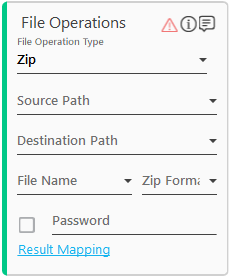
1. In the Source Path list, select the parameter holding the source path of the folder or the file for zipping. The path can either be the file location or file location along with the file name and its extension depending on whether you want to zip a folder or a file. You must define the parameter in the Parameter bar to store the value and make it available for the selection.
2. In the Destination Path list, select the parameter holding the destination path where the selected file needs to be zipped. For example, D:\UpdatedData. You must define the parameter in the Parameter bar to store the value and make it available for the selection.
3. In the File Name list, select the parameter holding the name of the zipped folder to be created. You must define the parameter in the Parameter bar to store the value and make it available for the selection.
4. In the Zip Format list, select .zip as the format of the zip file/folder. The supported format is only .zip.
5. Select the Password check box if you want to password protect the created zipped folder. You must define the parameter, holding the password, in the Parameter bar and select the parameter in the Password list.
6. Click the Result Mapping link. The Output Mapping list appears. Select the available parameter to map the status of the file operation performed. Both Boolean and String type is supported. You must pre-define the parameter to make it available for the selection. If the operation is successful, it returns true and if the operation fails it returns false. It can be used as an input for the next action that you want to perform in the automation process workflow, depending upon the success or failure of the file operation performed.
Unzip
It helps you to automatically extract archives. Automating the task of unzipping the compressed folder lets you unzip the file or folder without requiring a specific software to open the archive. It saves the time spent in manually extracting the files.
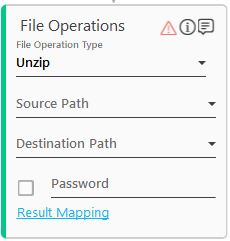
1. In the Source Path list, select the parameter holding the source path of the folder or the file for unzipping. The path can either be the file location or file location along with the file name and its extension depending on whether you want to zip a folder or a file. You must define the parameter in the Parameter bar to store the value and make it available for the selection.
2. In the Destination Path list, select the parameter holding the destination path where the selected file or files have to be unzipped. For example, D:\UpdatedData. You must define the parameter in the Parameter bar to store the value and make it available for the selection.
3. Select the Password check box if you want to password protect the unzipped folder. You must define the parameter, holding the password, in the Parameter bar and select the parameter in the Password list.
4. Click the Result Mapping link. The Output Mapping list appears. Select the available parameter to map the status of the file operation performed. Both Boolean and String type is supported. You must pre-define the parameter to make it available for the selection. If the operation is successful, it returns true and if the operation fails it returns false. It can be used as an input for the next action that you want to perform in the automation process workflow, depending upon the success or failure of the file operation performed.
Convert
It helps you to automatically convert one file type to another, thus having all the conversions consistent every time. It allows you have ideal file formats for security and shareability. It saves time and effort for ongoing, constant file conversion requirements.
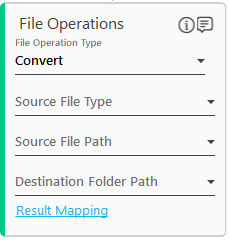
In the Source File Type list, select the type of file you want to convert into different format. Available options are- Excel, CSV, TSV and Custom. You can use the Custom option to create a custom file format with specified separators.
Excel
It lets you convert a single sheet into a different file of specified file type. The sheet name must be a single sheet name and not multiple sheets.
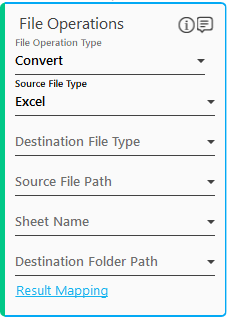
1. In the Destination File Type list, select the desired format to which you want the source file to be converted. Available options are - CSV, TSV and Custom.
2. In the Source File Path list, select the parameter holding the source path of the file along with the file name. You must define the parameter in the Parameter bar to store the value and make it available for the selection.
3. In the Sheet Name list, select the parameter holding the name of the sheet that you want to convert into selected file type. You must define the parameter in the Parameter bar to store the value and make it available for the selection. Leave this field blank, if you want to convert the entire excel file into a different format.
4. In the Destination Seperator list, select the parameter holding the field separator to tell the operation where each field begins and ends in the converted file type. This field appears only when Destination File Type is Custom.
5. In the Destination Folder Path list, select the parameter holding the destination folder name where the converted file must be saved. For example, D:\UpdatedData. You must define the parameter in the Parameter bar to store the value and make it available for the selection.
6. Click the Result Mapping link. The Output Mapping list appears. Select the available parameter to map the status of the file operation performed. Both Boolean and String type is supported. You must pre-define the parameter to make it available for the selection. If the operation is successful, it returns true and if the operation fails it returns false. It can be used as an input for the next action that you want to perform in the automation process workflow, depending upon the success or failure of the file operation performed.
CSV/TSV
It lets you converts a file to Comma Separated (CSV) or Tab Separated Values (TSV) file format.
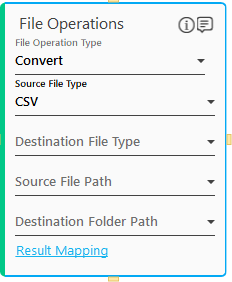
1. In the Destination File Type list, select the file type that you want to convert the selected file into. Available options are - Excel, TSV and Custom.
2. In the Source File Path list, select the parameter holding the source path of the file along with the file name. You must define the parameter in the Parameter bar to store the value and make it available for the selection.
3. In the Destination Seperator list, select the parameter holding the desired field separator to tell the operation where each field begins and ends in the converted file type. This field appears only when Destination File Type is Custom.
4. In the Destination Folder Path list, select the parameter holding the destination folder name where the converted file must be saved. For example, D:\UpdatedData. You must define the parameter in the Parameter bar to store the value and make it available for the selection.
5. Click the Result Mapping link. The Output Mapping list appears. Select the available parameter to map the status of the file operation performed. Both Boolean and String type is supported. You must pre-define the parameter to make it available for the selection. If the operation is successful, it returns true and if the operation fails it returns false. It can be used as an input for the next action that you want to perform in the automation process workflow, depending upon the success or failure of the file operation performed.
Custom
It lets you define your own file format.
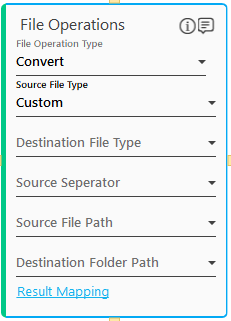
1. In the Destination File Type list, select the file type that you want to convert the selected file into. Available options are - CSV, Excel, TSV and Custom.
2. In the Source Seperator list, select the parameter holding the desired separator of the values such as $, & and so on.
3. In the Source File Path list, select the parameter holding the source path of the file along with the file name and file extension. You must define the parameter in the Parameter bar to store the value and make it available for the selection.
4. In the Destination Seperator list, select the parameter holding the field separator to indicate the operation where each field begins and ends in the converted file type. This field appears only when Destination File Type is Custom.
5. In the Destination Folder Path list, select the parameter holding the destination folder where the converted file must be saved. For example, D:\UpdatedData. You must define the parameter in the Parameter bar to store the value and make it available for the selection.
6. Click the Result Mapping link. The Output Mapping list appears. Select the available parameter to map the status of the file operation performed. Both Boolean and String type is supported. You must pre-define the parameter to make it available for the selection. If the operation is successful, it returns true and if the operation fails it returns false. It can be used as an input for the next action that you want to perform in the automation process workflow, depending upon the success or failure of the file operation performed.
IsExist
It helps you to automate checking whether a file exists at a particular location.
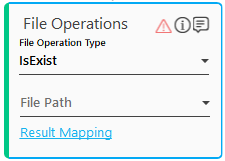
1. In the File Path list, select the parameter holding the source path of the file along with the file name and file extension. You must define the parameter in the Parameter bar to store the value and make it available for the selection.
2. Click the Result Mapping link. The Output Mapping list appears. Select the available parameter to map the status of the file operation performed. Both Boolean and String type is supported. You must pre-define the parameter to make it available for the selection. If the operation is successful, it returns true and if the operation fails it returns false. It can be used as an input for the next action that you want to perform in the automation process workflow, depending upon the success or failure of the file operation performed.
File Operations Properties
The properties of File Operations activity are listed in the following table and can be edited in the Properties grid on the right pane.
Property Name |
Usage |
Control Execution |
|
Ignore Error |
When this option is set to Yes, the application ignores any error while executing the activity. If set to NA, it bypasses the exception (if any) to let the automation flow continue; however, it marks the automation status as failure, in case of an exception. By default, this option is set to No. |
Delay |
|
Wait After |
Specify the time delay that must occur after the activity is executed. The value must be in milliseconds. |
Wait Before |
Specify the time delay that must occur before the activity is executed. The value must be in milliseconds. |
Misc |
|
Breakpoint |
Select this option to mark this activity as a pause point while debugging the process. At this point, the process freezes during execution allowing you to examine if the process is functioning as expected. In large or complex processes, breakpoints help in identifying the error, if any. |
Commented |
Select this option to mark this activity as inactive in the entire process. When an activity is commented, it is ignored during the process execution. |
DisplayName |
The display name of the activity in the flowchart designer area. By default, the name is set as File Operations. You can change the name as required. |
On This Page Hide
Related Topics