Step-By-Step Guide to Use File Operations to Create a file, Move it to Another Folder and Zip the Files
Let's see an example of creating a .txt file, move all the .txt files available in the folder to a different folder and then zip the folder.
To create the .txt file, move and zip the folder:
1. In the Canvas Tools pane, click File to expand the tool and view the associated activities.
2. Drag the File Operations activity and drop on to the Flowchart designer on the Canvas.
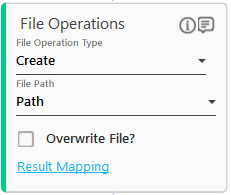
3. In the File Operation Type list, select Create operation.
4. In the Parameter bar, create an In argument, Path to pass the folder path as input for identifying the required file.

5. In the File Path list, select the Path argument created above.
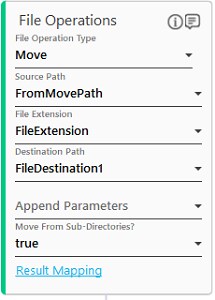
6. Add another File Operations activity. Create the In arguments of type String and define the input details:
· FromMovePath - to pass the path of the folder from where all the .txt files must be moved.
· FileExtention - to pass the file format of the file that must be moved to other folder.
· FileDestnation1 - to pass the path of the folder where all the .txt files must be moved.

7. In the Source Path list, select the Path argument created above.
8. In the File Extension list, select the FileExtension argument created above.
9. In the Destination Path list, select the FileDestination1 argument created above.
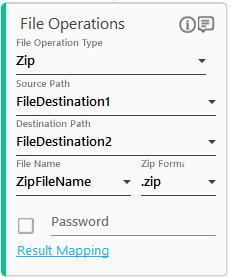
10. Add one more File Operations activity. Create the In arguments of type String and define the input details:
· FileDestnation2 - to pass the path of the destination folder where zipped folder must be created.
· ZipFileName - to pass the name with which the zipped folder must be created.

11. In the Source Path list, select the FileDestnation1 argument created above. This is path where the created file is moved.
12. In the Destination Path list, select the FileDestination2 argument created above.
13. In the File Name list, select the ZipFileName argument created above.
14. In the Zip Format list, select .zip as the format of the zip file/folder.
15. Save the process.
16. Setup the environment and then perform test run. You can publish, deploy and assign this process to a robot if you want to execute the process outside Automation Studio.
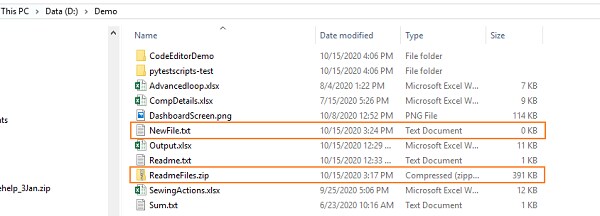
Observe that a .txt file with the specified name NewFile.txt gets created within the Sample folder.

The NewFile.txt along with other .txt files are then moved to the Demo folder and all the files get zipped and saved inside the same folder.
Related Topics