SMTPMail
It allows you to automate certain e-mail operations such as drafting E-mails and send them, search for the required E-mails based on various search criteria, read e-mails and download attachments, send reply, forward or delete the e-mails, using the SMTP server.
Message ID or Trigger ID are used to perform certain SMTP operations like search and read an e-mail. Message ID is a unique identifier associated with an e-mail in the mailbox that helps to select the required e-mail to perform the intended operation.
NOTE: |
This activity must be used inside an Application activity or the system displays an error. This lets you establish a connection between Automation Studio and the configured SMTP server. |
Prerequisite
You must configure the SMTP sever in Automation Studio before you start configuring the steps of the automation process workflow. This establishes the connection between the SMTP server and Automation Studio to perform the automation.
Below are the minimum required properties for configuring the intended SMTP server. If you want to define remaining properties, refer SMTPApp in the Admin Menu.
1. In the Admin menu, add an application of Application Type- SMTPApps. The mandatory fields are highlighted with red box.
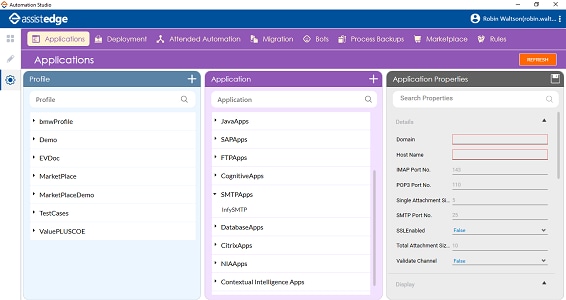
2. In the Domain field, enter the domain name of the SMTP server.
3. In the Host Name field, enter the host name or the IP address of the SMTP server.
4. The IMAP Port No. and the POP3 Port No. fields are auto filled with the default values, 143 and 110 respectively. You can edit the port number if the server is configured using different port number. If IMAP port number is not known, use the default value for configuring the SMTP application.
5. Click
the  (Save
Properties) icon to save the application.
(Save
Properties) icon to save the application.
The SMTP server is configured.
Using SMTP E-Mail Activity
1. In the Canvas Tools pane, click Process Components to expand the tool and view the associated activities.
2. Drag the Application activity and drop on to the Flowchart designer on the Canvas. The validation error symbol disappears when required inputs are provided.
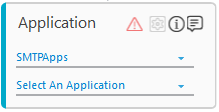
3. In the Application Type list, select SMTPApps. You must have at least one application added for it to appear in the list.
4. In the Select An Application list, select the configured SMTP server where you want to perform automation. Alternatively, you can add a new web application at this point in time. To add web application:
a. In the Select An Application list, click Add New Application. The Add New Application dialog box appears.

b. In the Application name field, enter the desired name of the SMTP server you want to add. The name must not contain any special character or space.
c. In the Host Name field, enter the host name or the IP address of the SMTP server.
d. In the Domain field, enter the domain name of the SMTP server.
e. In the SMTP Port No field, enter the port used to connect to the SMTP server. The default value of the SMTP port is 25.
f. In the Pop3 Port No field, enter the port number of the POP3 protocol. The default value of the POP3 port is 110.
g. In the IMAP Port No field, enter the port number of the IMAP protocol. It is an advanced protocol compared to POP3 protocol for mail server connection. The default value of IMAP port is 143.
h. In the Single Attachment Size Limit (MB) field, enter the maximum file size of the attachment allowed to be sent in an e-mail using SMTP, specified in MB. By default, the single attachment size is 5 MB.
i. In the Total Attachment Size Limit (MB) field, enter the total file size of the attachment allowed to be sent in an e-mail using SMTP, specified in MB. By default, the total attachment size is 10 MB.
j. In the SSL Enables list, select True if SSL is enabled for the SMTP server, else select False.
k. In the ValidateChannel list, select True if the user Id used to connect to the server is same as the from e-mail address in Send E-Mail activity, else select False.
l. Click SAVE. The SMTP server is configured
5. Double click the Application activity, drag the SMTP E-Mail Activity and drop inside the Application activity.
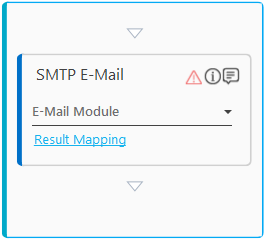
6. In the E-Mail Module list, select the operation you want to perform. Click any of the link below to know the steps to perform the selected operation:
NOTE: |
The Getting EntryId operation can be directly used without the Application activity. |
Send E-Mail
It helps you to create a new e- mail, attach a file, mention the priority of the e-mail, and then send the e-mail to intended recipients using SMTP server.
You can add multiple senders and recipients separated by semi-colon (;). All the files to be attached, must be available and accessible.
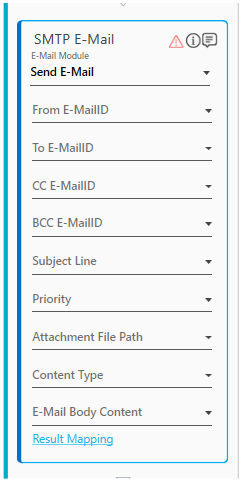
a. In the From E-MailID list, select the parameter holding the e-mail Ids to be used for sending the e-mail. The Ids must be semi-colon (;) separated values. You must define the parameter in the Parameter bar to make them available for the selection.
b. In the To E-MailID list, select the parameter holding the e-mail Ids to which the e-mail must be sent. The Ids must be semi-colon (;) separated values. You must define the parameters in the Parameter bar to make them available for the selection.
c. In the CC E-MailID list, select the parameter holding the e-mail Ids of the recipients whom you want to copy on the e-mail publicly. The Ids must be semi-colon (;) separated values. You must define the parameters in the Parameter bar to make them available for the selection.
d. The BCC E_MailID list, select the parameter holding the e-mail Ids of the recipients whom you want to copy on the e-mail privately. The Ids must be semi-colon (;) separated values. You must define the parameters in the Parameter bar to make them available for the selection.
NOTE: |
It is mandatory to select at least any one among To E-EmailID, CC E-MailID and BCC E_MailID list. |
e. In the Subject Line list, select the parameter holding the subject of the e-mail to be sent. You must define the parameters in the Parameter bar to make them available for the selection.
f. In the Priority list select the priority of the e-mail to be sent as High, Normal or Low.
g. In the Attachment File Path list, select the parameter holding the list of files to be attached to the e-mail. The list of files must be separated by a semi-colon (;). You must enter the file path along with file name and extension. You must define the parameters in the Parameter bar to make them available for the selection.
h. In the Content Type list, select the type of content of the e-mail body. Available options are - HTML and PlainText. If none of the options is selected, PlainText is considered by default.
i. In the E-Mail Body Content list, select the parameter holding the body of the e-mail. The body of the e-mail is plain text or HTML. Images are embedded in the HTML only if they are present online and if they are available and accessible to the intended recipient. Signature is automatically added if it is configured in the Outlook. You must define the parameters in the Parameter bar to make them available for the selection.
j. Click the Result Mapping link. The Output Mapping list appears. Select the available parameter to map the status of the operation performed. Both Boolean and String type is supported. You must pre-define the parameter to make it available for the selection. If the operation is successful, it returns true and if the operation fails it returns false. It can be used as an input for the next action that you want to perform in the automation process workflow, depending upon the success or failure of the file operation performed.
Get EntryId
This activity is helpful if you want to use a load generator along with the trigger and still use Outlook. If a load balancer performs the e-mail operations, it uses an e-mail trigger and in return a Trigger ID is created. A Trigger ID comprises multiple fields such as Message ID, Subject, From, To, Date and so on.
Use this activity to retrieve the EntryID from the Message ID and other fields present in the Trigger ID.
An EntryID is a unique Id field generated by the messaging storage system of Outlook application. Whenever an item is created in a folder, it is assigned a new EntryID.
NOTE: |
This activity is not dependent on the SMTP application and can be used outside the Application activity. |
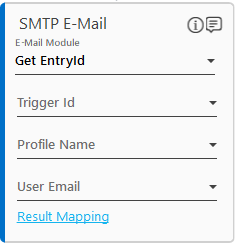
1. In the Trigger Id list, select the parameter holding the Trigger ID from which the EntryID must be retrieved. You must define the parameters in the Parameter bar to make them available for the selection.
2. In the Profile Name list, select the parameter holding the Outlook profile name consisting of the account and other setting details. You must define the parameter in the Parameter bar to make them available for the selection.
3. In the User Email list, select the parameter holding the e-mail id whose EntryID must be retrieved.
4. Click Result Mapping link, the Output Mapping list appears. Select the available parameter to map the status of the operation performed. Both Boolean and String type is supported. If the operation is successful, it returns true and if the operation fails, it returns false. It can be used as an input for the next action that you want to perform depending upon the success or failure of the operation. You must define the parameters in the Parameter bar to make them available for the selection.
Read E-Mail
It helps you to read the e-mail selected as per the Message ID and saves the message as a folder, at the specified location. This operation works with both Message ID and Trigger ID. Based on the input pattern, the type of ID provided is recognized by the system.
The folder gets created in the drive with the specified Message ID as the folder name. All the content of the selected e-mail along with the attachments is saved inside the created folder.

1. In the Message Id list, select the parameter holding the Message ID for selecting the e-mail to be read. Based on the input pattern, the system automatically identifies if the input is a message Id or a trigger Id. You must define the parameters in the Parameter bar to make them available for the selection.
2. In the Protocol list, select the type of protocol used to configure the SMTP server. Available options are IMAP and POP3.
3. In the Download Path list, select the parameter holding the drive or folder location where the e-mail must be saved. The drive must be accessible. You must define the parameters in the Parameter bar to make them available for the selection.
4. In the Source Folder list, select the parameter holding the folder name of the mailbox from where the e-mail must be read. this field disappears if the Protocol selected is POP3. POP3 is an old protocol, by default, the inbox is used as the source folder. You must define the parameters in the Parameter bar to make them available for the selection.
5. Click Result Mapping link, the Output Mapping list appears. Select the available parameter to map the status of the operation performed. Both Boolean and String type is supported. If the operation is successful, it returns true and if the operation fails, it returns false. It can be used as an input for the next action that you want to perform depending upon the success or failure of the operation. You must define the parameters in the Parameter bar to make them available for the selection.
Move E-Mail
It helps you to move an e-mail, selected as per the Message ID, from one folder to another in the mailbox. This operation works with both Message ID and Trigger ID. Based on the input pattern, the type of ID provided is recognized by the system.
This activity uses the IMAP protocol by default. A Pop3 is an older protocol and does not support moving an e-mail from one location to another.
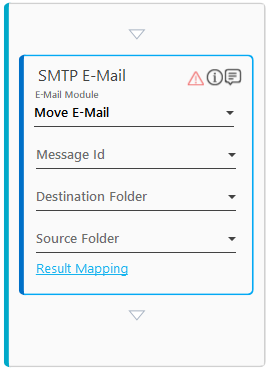
1. In the Message Id list, select the parameter holding the Message ID for selecting the e-mail to be moved. You must define the parameters in the Parameter bar to make them available for the selection.
2. In the Destination Folder list, select the parameter holding the folder name of the mailbox to which the e-mail must be moved. You must define the parameters in the Parameter bar to make them available for the selection.
3. In the Source Folder list, select the parameter holding the folder name of the mailbox from where the e-mail must be moved. By default, the source folder is inbox. You must define the parameters in the Parameter bar to make them available for the selection.
4. Click the Result Mapping link. The Output Mapping list appears. Select the available parameter to map the status of the operation performed. Both Boolean and String type is supported. You must pre-define the parameter to make it available for the selection. If the operation is successful, it returns true and if the operation fails it returns false. It can be used as an input for the next action that you want to perform in the automation process workflow, depending upon the success or failure of the file operation performed.
Search E-Mail
It helps you search one or more e-mails as per the specified search criteria. This operation uses the IMAP protocol to search the intended e-mails. The search criteria are applied as Boolean AND operator. You must select at least one search criteria for this operation to work. The advance search options such as subject, date range, sender of the e-mail and others, are available to set different search criteria as per your requirement.
This activity becomes the trigger point for all the operations that use Message ID or Trigger ID for selecting the intended e-mails.
All e-mails matching the search criteria, are stored in the specified Excel file (XLSX format) with their respective Message IDs. Use Excel Loop activity to iterate the data saved in the Excel file. The Message ID is read in the loop to perform operations such as Read or, Move. For example, to read e-mails based on a condition like only e- mails from a particular sender or a specific subject, use the Search E-Mail operation in SMTPMail activity to search for specific e-mails, and then perform the Read E-mail operation.
NOTE: |
Message ID is derived from the Trigger ID for a Load Generator process workflow. |
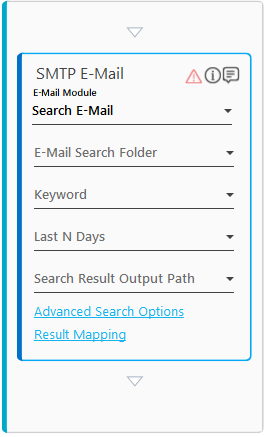
1. In the E-Mail Search Folder list, select the parameter holding the folder name where the required e-mail is present. The folder must be present inside the specified root folder. For example, Inbox or Inbox\CustomFolder. The default value is inbox. YYou must define the parameters in the Parameter bar to make them available for the selection.
2. In the Keyword list, select the parameter holding the generic keyword for search such as the subject line, body, from address, to address, cc address, attachment name, and attachment content. You must define the parameters in the Parameter bar to make them available for the selection.
3. In the Last N Days list, select the parameter holding the last n number of days, for example, 2 searches for e-mails received in the last two days. You must define the parameters in the Parameter bar to make them available for the selection.
4. In the Search Result Output Path list, select the parameter holding the excel file path where the search result is written. The file gets automatically created if it is not present at the target location.
5. In the Search Result Output(Json) list, select a parameter to store the details of the e-mail in JSON format. The Json data contains sender e-mail Id, received time, subject, body, attachment path and attachment name. You must define a String type parameters in the Parameter bar to make them available for the selection.
6. Click Advanced Search Options link to set the advance search criteria. The Outlook Search - Advanced dialog box appears.
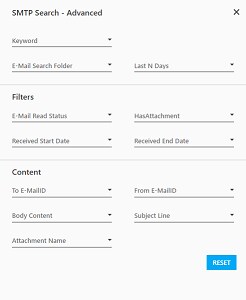
a. In the Keyword list, select the parameter holding the generic keyword for search such as the subject line, body, from address, to address, cc address, attachment name, attachment content. You must define the parameters in the Parameter bar to make them available for the selection. The parameter selected in the Search activity block reflects in the SMTP Search - Advanced dialog box and vice versa.
b. In the E-Mail Search Folder list, select the parameter holding the folder name where the required e-mail is present. The folder must be present inside the specified root folder, for example, Inbox or Inbox\CustomFolder. You must define the parameters in the Parameter bar to make them available for the selection. The parameter selected in the Search activity block reflects in the SMTP Search - Advanced dialog box and vice versa.
c. In the Last N Days list, select the parameter holding the last n number of days, for example, 2 searches for e-mails received in the last two days. You must define the parameters in the Parameter bar to make them available for the selection. The parameter selected in the Search activity block reflects in the SMTP Search - Advanced dialog box and vice versa.
d. In the E-Mail Read Status list, select the filter criteria to search the required e-mail. Available options are - All, Read and Unread.
e. In the HasAttachment list, select Yes if you want to filter e-mails that have attachments. Select No, if you want to filter e-mails that do not have attachments.
f. In the Received Start Date list and Received End Date list, select the parameter holding the start date and the end date respectively. The dates must be in the mm/dd/yy format. It forms the date range to filter the required e-mails that are received in the specified date range. Both the lists must be selected together.
g. In the To E-MailID list, select the parameter holding the e-mail Id of the receiver to search the e-mails based on the receiver of the e-mail. You must define the parameters in the Parameter bar to make them available for the selection.
h. In the From E-MailID list, select the parameter holding the e-mail Id of the sender to search the e-mails based on the sender of the e-mail. You must define the parameters in the Parameter bar to make them available for the selection.
i. In the Body Content list, select the parameter holding the body content of the e-mail to filter the e-mail based on the body content. You must define the parameters in the Parameter bar to make them available for the selection.
j. In the Subject Line list, select the parameter holding the subject of the e-mail to filter the e-mail based on the subject line. You must define the parameters in the Parameter bar to make them available for the selection.
k. In the Attachment Name list, select the parameter holding the name of the attachment to filter the e-mail based on the attachment name. You must define the parameters in the Parameter bar to make them available for the selection.
l. Click RESET to reset and enter the details again, else close the dialog box to save the advance search options.
7. Click Result
Mapping link,
the Output Mapping
list appears. Select
the available parameter to map the status of the operation performed.
Both Boolean and String type is supported. If the operation is
successful, it returns true and if the operation fails, it returns
false. It can be used as an input for the next action that you
want to perform depending upon the success or failure of the operation.
You must define the parameters in the Parameter
bar to make them available for the selection.
The respective SMTP operations are configured.
SMTPMail Properties
The properties of SMTPMail activity are listed in the following table and can be edited in the Properties grid on the right pane.
Property Name |
Usage |
Control Execution |
|
Ignore Error |
When this option is set to Yes, the application ignores any error while executing the activity. If set to NA, it bypasses the exception (if any) to let the automation flow continue; however, it marks the automation status as failure, in case of an exception. By default, this option is set to No. |
Delay |
|
Wait After |
Specify the time delay that must occur after the activity is executed. The value must be in milliseconds. |
Wait Before |
Specify the time delay that must occur before the activity is executed. The value must be in milliseconds. |
Misc |
|
Breakpoint |
Select this option to mark this activity as a pause point while debugging the process. At this point, the process freezes during execution allowing you to examine if the process is functioning as expected. In large or complex processes, breakpoints help in identifying the error, if any. |
Commented |
Select this option to mark this activity as inactive in the entire process. When an activity is commented, it is ignored during the process execution. |
DisplayName |
The display name of the activity in the flowchart designer area. By default, the name is set as SMTP E-Mail. You can change the name as required. |
Root Folder Name |
The name of the root folder where the SMTP operations must be performed. |
On This Page Hide