Credential Manager
Credential Manager is a secure repository wherein the details used while logging into the applications are stored. These details are encrypted in the AssistEdge Database and are accessible to only the authorized users.
Credentials Manager determines which profile, processes, users and roles have permission to access the information. Additionally, you can store the data in a third party application (CyberArk or BeyondTrust) which is integrated with RPA Database.
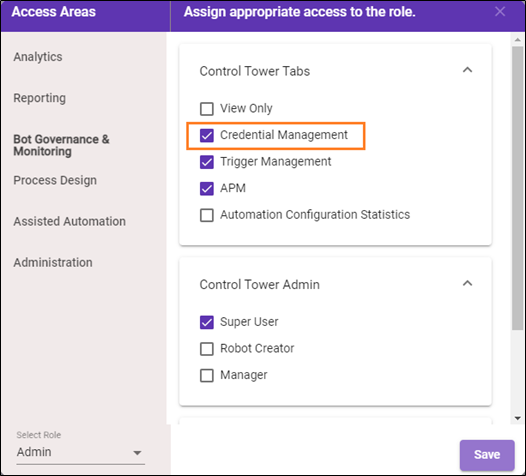
As Super Admin, you can manage the credentials for profiles through the credential vault. A credential vault is a repository that holds the credentials, such as user Ids and passwords, for the profiles. Only, Robot Creator, Super User, Manager or Robot Owner are allowed to access the Credential Manager.
Configuring Credential Manager
Credential Manager tab is accessible only to the users with relevant access.
To configure the credential manager:
- Ensure that logged-in user role has page access to the Control Tower.
- Logged-in user should be mapped to <RPA_Trigger Management> access in Specify Role access. For more information about user role mapping, see Managing Roles section in the Administrator.
Starting with Credential Manager
Credential Manager provide following option in vault type, which includes:
- Default
- CyberArk
- BeyondTrust - Managed Accounts
- Third Party External Credential Vault: AssistEdge enables you to integrate with any third-party external credential vault. For more information about third party vault customization and integration, see Third Party External Vault section in Customization.
To start with credential manager:
- From the Navigation panel, click the
 (Credential Manager) icon or click Credential Manager.
|
NOTE: |
Update and save the credentials for applications mapped to the profiles assigned to a particular User ID, using the Credential Manager. |
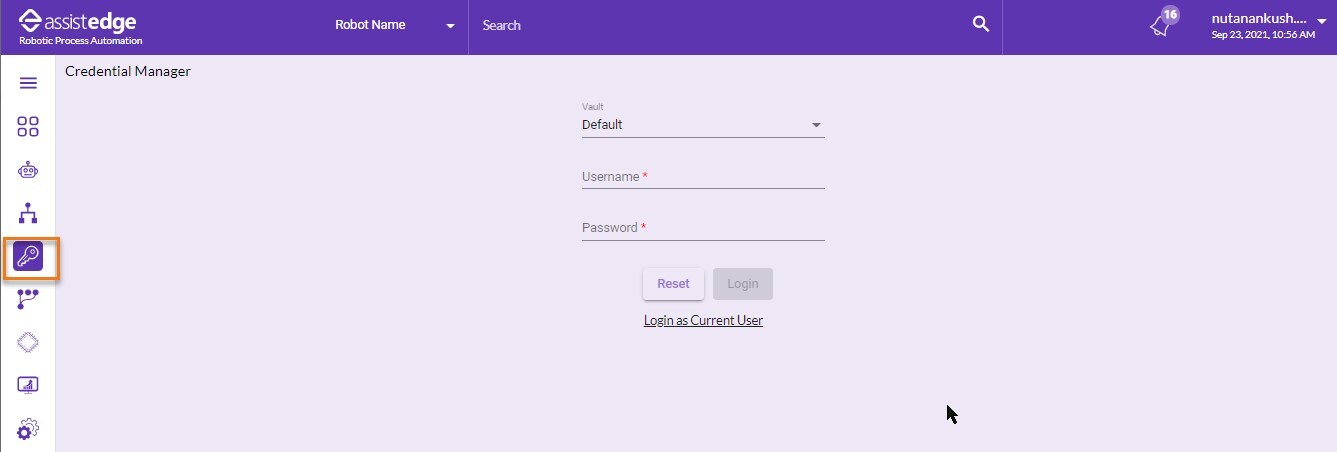
The CREDENTIAL MANAGER page is displayed.
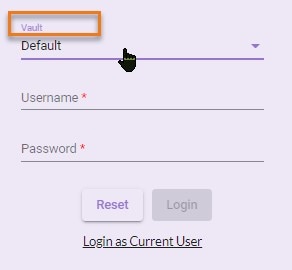
- In the Vault list, select the Vault from the available options.
|
NOTE: |
In case, you have configured the third-party external credential vault then, the particular vault appears in the Vault list. For more information about integration of third-party external credential vault, see Third Party External Vault in Customization. |
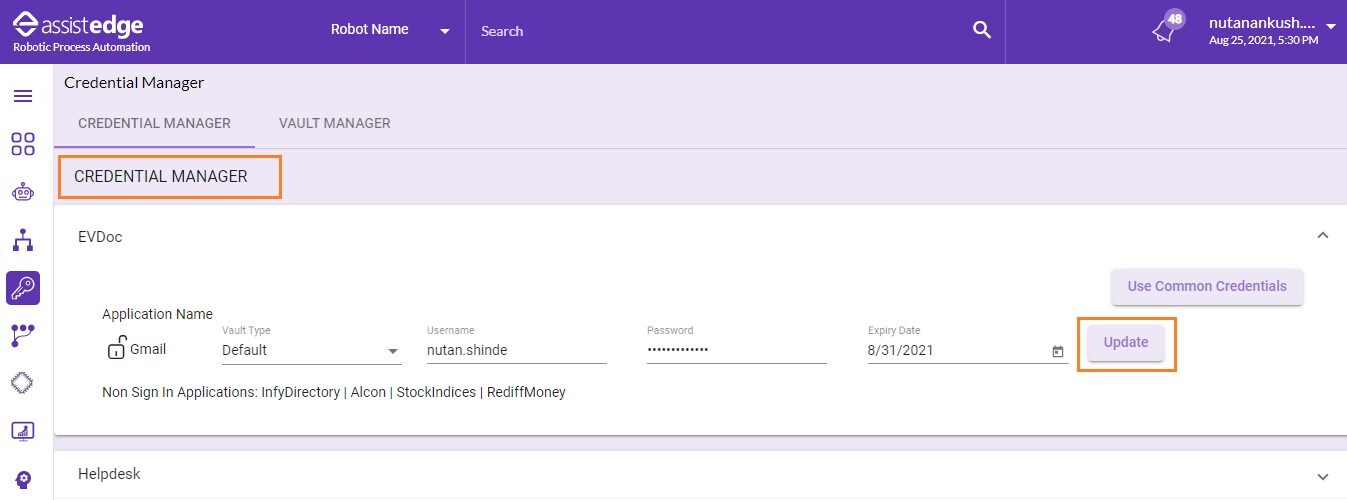
- Default: In case, you select default option from the list then, you are required to enter the username and password and click Login.
OR
You can also click Login as Current User directly in order to log into credential manager with the default vault type and current logged in user credentials details.
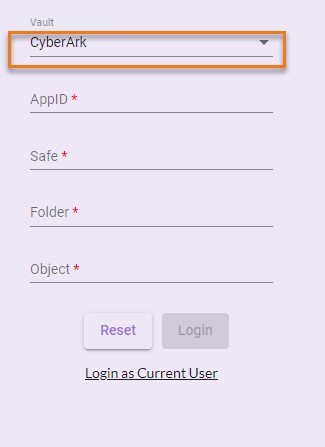
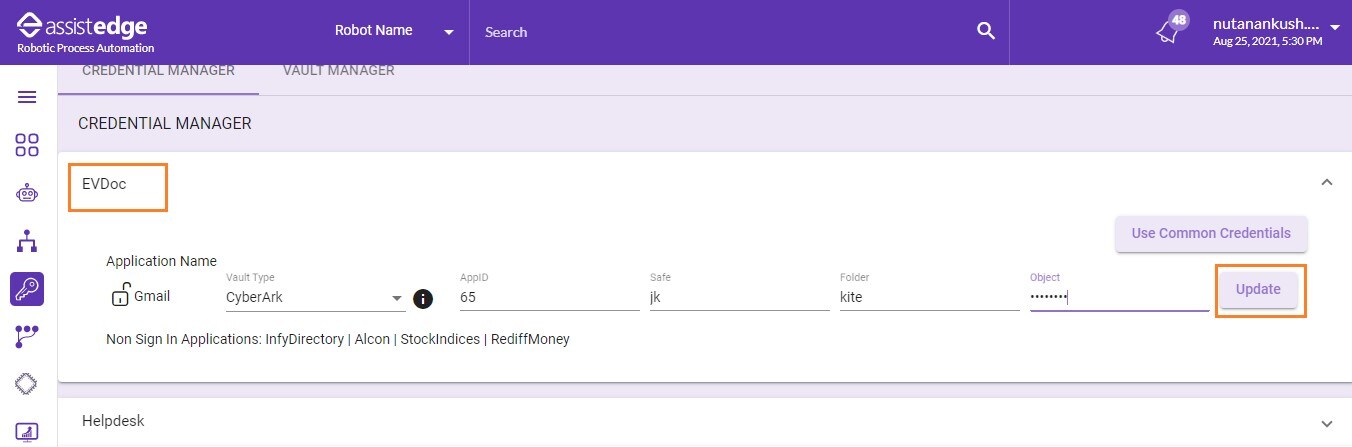
- CyberArk: CyberArk Enterprise Password Vault is independent application which maintains application credentials. For more details about CyberArk, see https://www.cyberark.com/.
In case, you select the CyberArk option from the list then, you must configure the CyberArk Vault details in configuration file. For more information about the configuration of CyberArk vault, see Configuration Vault type – CyberArk section. You are also required to specify the other field details such as AppID, Safe, Folder, and Object. For more information about the details of CyberArk fields, see CyberArk section.
|
NOTE: |
Additionally, click RESET to reset the login details of an application. |
A message as Authentication Successful appears. Then, logged in user is logged in to the Credential Manager page.

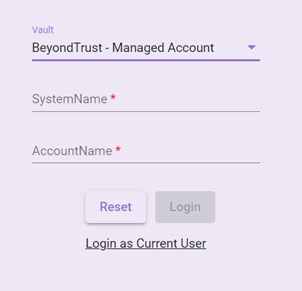
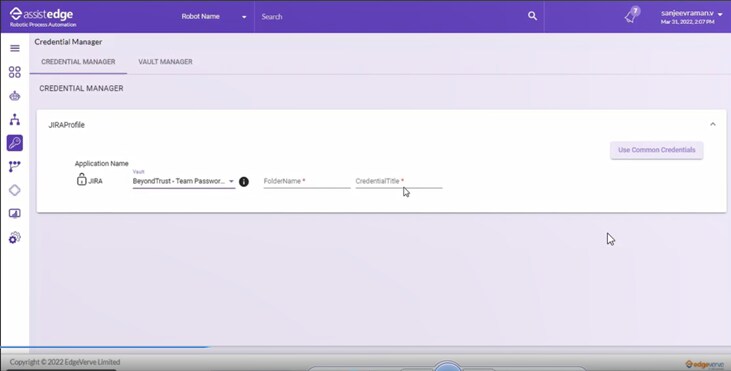
- BeyondTrust: BeyondTrust is the worldwide leader in Privileged Access Management, offering the most seamless approach to preventing data breaches related to stolen credentials, misused privileges, and compromised remote access. For more details about BeyondTrust, see https://www.beyondtrust.com/.
BeyondTrust PasswordSafe has two methods for storing credentials:- BeyondTrust – Managed Accounts: BeyondTrust – Managed Accounts are user accounts that are local accounts or active directory accounts on the managed system.
- BeyondTrust – Team Passwords: BeyondTrust – Team Passwords enables teams to easily store and manage shared credentials for accounts that are commonly held and managed within specific teams in a fully auditable and controlled environment.
- In case, you select the BeyondTrust – Managed Accounts or BeyondTrust – Team Passwords option from the list then, you must configure the BeyondTrust Vault details in configuration file. For more information about the configuration of BeyondTrust vault, see Configuration Vault type – BeyondTrust. You are also required to specify the other field details such as SystemName, and AccountName for BeyondTrust – Managed Accounts and FolderName, and CredentialTitle for BeyondTrust – Team Passwords. For more details on BeyondTrust fields, see BeyondTrust section.
|
NOTE: |
Additionally, click RESET to reset the login details of an application. |
- The Authentication Successful message appears, and the user is logged in to the Credential Manager page.
- You can update the credentials for all the applications under different profiles.
Credential Manager comprises of two tabs, which includes:
Configuration Vault type – CyberArk
You can configure the CyberArk Vault type globally. To enable this CyberArk integration, you are required to perform certain configuration. Before proceeding, ensure that Control Tower is stopped.
To configure vault type -CyberArk as per requirement:
- Navigate to build location - $\app\admin\config\ and open the config.yml file in edit mode.

- Edit the vault details such as url, key, cert, and ca in the configuration file as per your requirement.
- Save the file and then, restart the Control Tower.
Configuration Vault type – BeyondTrust
You can configure the BeyondTrust - Vault type globally. To enable this BeyondTrust integration, you must perform certain configurations. Before proceeding, ensure that Control Tower is stopped.
To configure vault type -BeyondTrust:
- Navigate to build location - $\app\admin\config\ and open the config.yml file in edit mode.

- Edit the vault details such as url, apikey, and runas in the configuration file.
-
url: The URL of the BeyondTrust cloud server instance that stores credentials.
-
apikey: The API key configured while setting up API registrations on the BeyondTrust server.2
-
runas: A user created on the BeyondTrust portal with access to the API registration.
-
- Save the file and then, restart the Control Tower.
Credential Manager
Credential Manager enables you to update the credentials depending upon the Vault Type. This tab displays all the linked profile with the applications. You can select vault from the available vault.
Default (LDAP)
If the credentials are already saved in the vault manager, you can select default type.
Based on the Modern Authentication type configured in Automation Studio, the authentication details for the sign-in application varies. For Example, Client Credential flow type needs only the Client ID, Access Token Url, Client Secret (or Client Certificate related details) and Scope.
|
NOTE: |
The Modern Authentication provider supported is Microsoft. |
The supported authentication types are TOTP, Authorization Code, Authorization Code with PKCE, Implicit, Client Credentials and ROPC. For more information on the OAuth types, see Auth Types activity.
Below are the various authentication details required depending upon the selected Modern Authentication type:
- Loginid or Username - the email ID required to login to the application.
- Password - the password corresponding to the loginid or username required to login to the application.
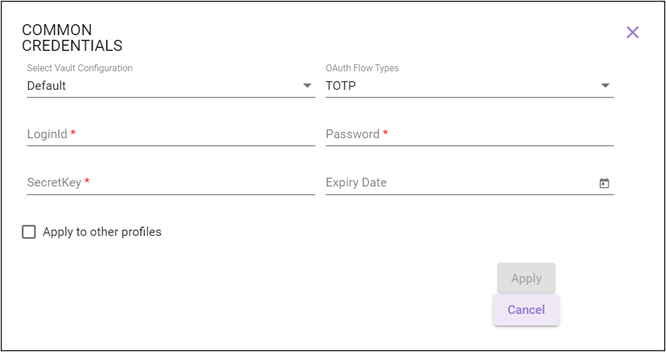
- SecretKey – the MFA key using which OTP code gets generated.
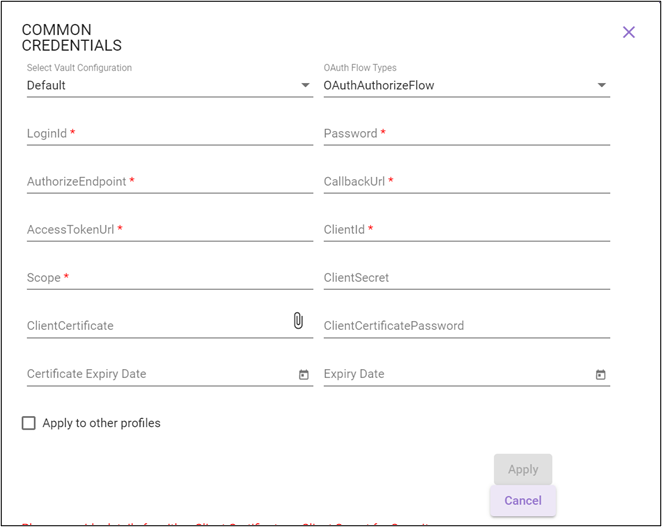
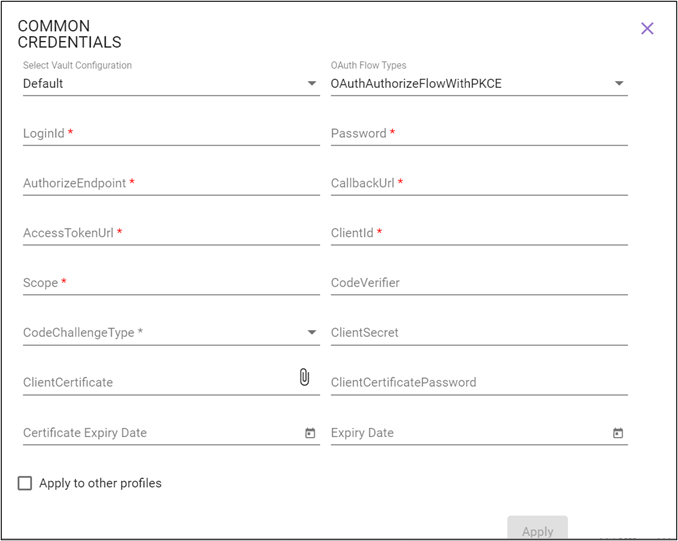
- AuthorizeEndpoint - the URL to request authorization. For ex., https://authorization-server.com/oauth/authorize.
- CallbackUrl/RedirectUrl - the URL to which you must be redirected after the authorization is complete. For ex., https:// authorization-server.com/oauth/nativeclient.
- AccessTokenUrl – the URL that must contain the access token.
- ClientId- the unique identifier for your application that you receive at the time of registering the application. For ex., 6779ef20e75817b79602.
- Scope - the grants used to limit different levels of application access. An application can request one or more scopes. For example, User.Read Mail.Send.
- ClientCertificate - a certificate used to authorize the application requesting the access token. This certificate is password protected and typically contains information such as the digital signature, client name, expiration date and so on.
- ClientCertificatePassword - the password of the client certificate.
- Certificate Expiry Date – the date of expiration of the client certificate or client secret key.
- ClientSecret - a value used to authorize the application requesting the access token.
|
NOTE: |
|
To start with default vault type in credential manager:
- Click Credential Manager.
- Click the Application profile for which the sign-in to application is required.
|
NOTE: |
Under the Non Sign In Applications, applications for which the sign-in process is not required is displayed. |
- From the Vault dropdown list, select Default.

- Do one of the following:
- For applications not using Modern Authentication, enter LoginId and Password of the application. For more information about various authentication fields, refer the Authentication Details section.
OR- For application using Modern Authentication, refer the below table for the required fields.
You can hover over the (i) icon to know which flow type is configured for the required application.
Name Description TOTP Enter LoginId, Password, and SecretKey. OAuthauthorizeFlow Enter LoginId, Password, AuthorizeEndpoint, CallbackUrl, AccessTokenUrl, ClientId, Scope and ClientSecret (or upload ClientCertificate, ClientPassword and CertificateExpiryDate). OAuthauthorizeFlowWithPKCE - Enter LoginId, Password, AuthorizeEndpoint, CallbackUrl, AccessTokenUrl, ClientId, Scope, and ClientSecret (or upload ClientCertificate and ClientPassword and CertificateExpiryDate).
- Specify CodeVerifier.
The code verifier value should be between 43-128 characters and should only use A-Z, a-z, 0-9, -, _, . , ~ characters.
Note: In case, this field is left blank then, random system generated value is assigned. - Select CodeChallengeType.
- Available options are- Plain and SHA256.
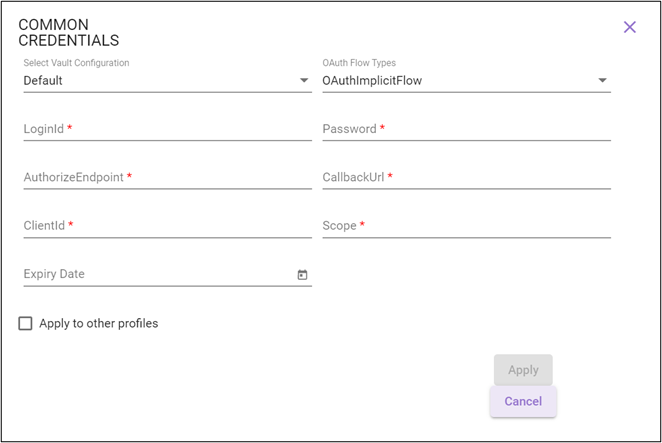
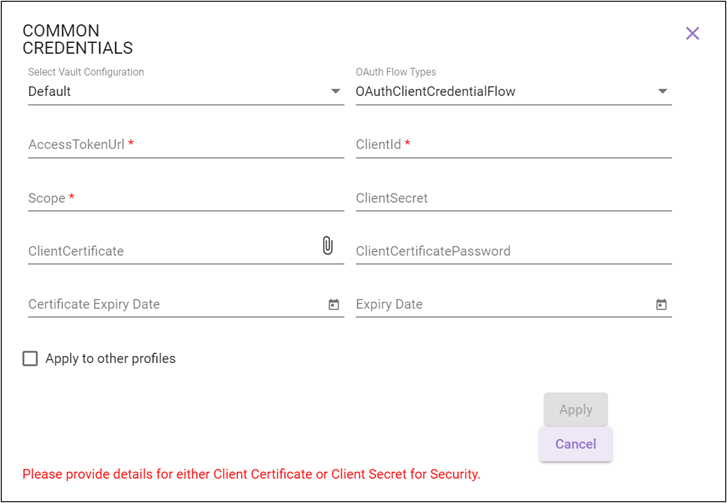
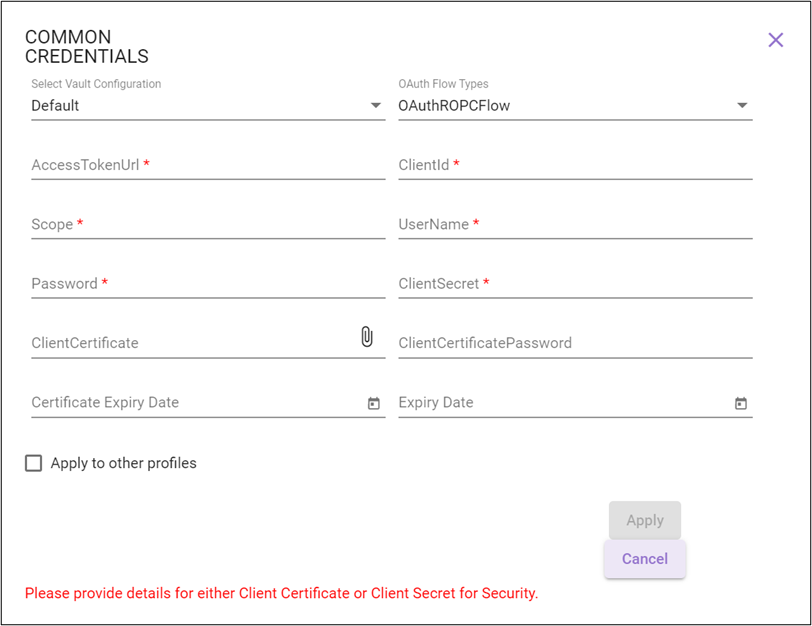
OAuthImplicitFlow Enter LoginId, Password, AccessTokenUrl, ClientId, and Scope. OAuthClientCredentialFlow Enter AuthorizeEndpoint, CallbackUrl, ClientId, Scope and ClientSecret (or upload ClientCertificate and enter ClientPassword and CertificateExpiryDate). OAuthROPCFlow Enter AccessTokenUrl, ClientId, Scope, UserName, Password and ClientSecret (or upload ClientCertificate , and enter ClientPassword and CertificateExpiryDate).
For more information about various authentication fields, refer the Authentication Details section
- For application using Modern Authentication, refer the below table for the required fields.
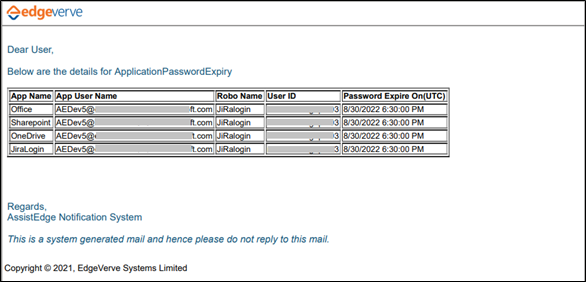
- In the Expiry Date, select the expiry date for the default vault type. This field is optional and is relevant in case the e-mail alerts are to be sent days before password expiry. E-mail notifications are managed from the: <build folder path>\app\Vanguard\Monitor\PeriodicXml\MonitorAlerts.xml
Below is the sample alert E-mail sent when the configured vault is about to expire:
Below is the sample alert E-mail sent when the client certificate or the client secret is about to expire:

- For applications not using Modern Authentication, enter LoginId and Password of the application. For more information about various authentication fields, refer the Authentication Details section.
- Click UPDATE to update the credentials of the applications.
CyberArk
If you are using CyberArk Enterprise Password Vault to save the credentials, you can select the CyberArk type.
To integrate application, sign-in with CyberArk:
- In the Vault list, select the CyberArk Vault type.
- In the AppID field, enter the AppID that is authorized to provide access to CyberArk and retrieve credentials.
- In the Safe field, enter the CyberArk safe ID that contains the credentials for the assets required to be scanned.
- In the Folder field, enter the CyberArk folder ID that contains the credentials for the assets required to be scanned. The default folder is Root.
- In the Object field, enter the name of the object that stores the credentials.
- Click UPDATE.
|
NOTE: |
These values are provided by the Integration partner and required to be filled in Credential Manager to fetch credential from CyberArk. |
BeyondTrust
If you are using BeyondTrust Vault to store the credentials securely, you can either select the BeyondTrust – Managed Accounts or the BeyondTrust – Team Passwords.
To integrate application, sign-in with BeyondTrust – Managed Accounts:
- In the Vault list, select the BeyondTrust – Managed Accounts type.
- In the SystemName field, enter the SystemName (Managed System) for which BeyondTrust credentials are to be retrieved.
- In the AccountName field, enter the authorized AccountName (Managed Account) for which BeyondTrust credentials are to be retrieved.
- Click Update.

To integrate application, sign-in with BeyondTrust – Team Passwords:
- In the Vault list, select the BeyondTrust – Team Passwords type.
- In the FolderName field, enter the FolderName of the teams folder used to organize and store the credentials.
- In the CredentialTitle field, enter the authorized CredentialTitle to allow a set of specified users to authenticate using credentials retrieved from BeyondTrust.
- Click Update.
|
NOTE: |
The field values for both BeyondTrust – Managed Accounts and BeyondTrust – Team Passwords are configured on the BeyondTrust portal by security administrator. |
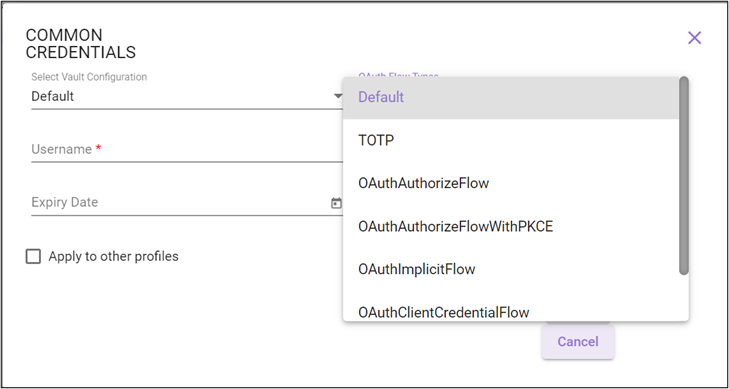
Use Common Credentials
Use Common Credentials enables you to store the credentials for multiple profiles at a time.
To use common credentials:
- Select the Application profile for which the sign-in to application is required.
- Click Use Common Credentials.
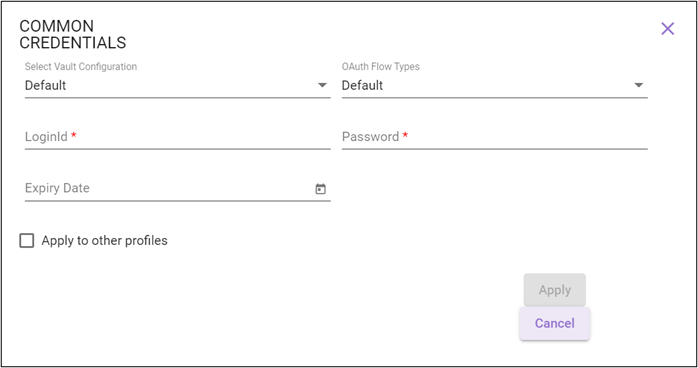
The Common Credentials window is displayed.
- The instructions related to the specific common credential vault configuration differ depending upon the selected vault type.
- Default
- CyberArk
- BeyondTrust – Managed Account
- BeyondTrust – Team Passwords
- In the Expiry Date, select the expiry date for the default vault type. This field is optional and is relevant in case the e-mail alerts are to be sent days before password expiry.
- Select Apply to other profiles check box, to apply the same credentials for all the other profiles.
|
NOTE: |
The Modern Authentication credentials are not applied to non-Modern Authentication profiles and vice-versa. In case of the Modern Authentication OAuth type profiles, the authentication credentials are applied to the profiles that have applications of the same OAuth type. For example, an application of the Authentication Code OAuth flow type, the common credential details are applicable to the profiles that have applications of Authentication Code OAuth flow type. |
- Click APPLY to apply all the changes to the profiles or else click CANCEL to discard the changes.
Default
- From the Select Vault Configuration dropdown list, select Default.
- From the OAuth Flow Types dropdown list, select the Modern Authentication flow type in sync with the OAuth type configured in Automation Studio. Available options are:
Default
For information regarding relevant authentication fields, see Default (LDAP) in the Credential Manager section.
TOTP
For information regarding relevant authentication fields, refer TOTP in the Credential Manager section.
OAuthAuthorizeFlow
For information regarding relevant authentication fields, see OAuthAuthorizeFlow in the Credential Manager section.
OAuthAuthorizeFlowWithPKCE
For information regarding relevant authentication fields, see OAuthAuthorizeFlowWithPKCE in the Credential Manager section.
OAuthImplicitFlow
For information regarding relevant authentication fields, see OAuthImplicitFlow in the Credential Manager section.
OAuthClientCredentialFlow
For information regarding relevant authentication fields, see OAuthClientCredentialFlow in the Credential Manager section.
OAuthROPCFlow
For information regarding relevant authentication fields, see OAuthROPCFlow in the Credential Manager section.
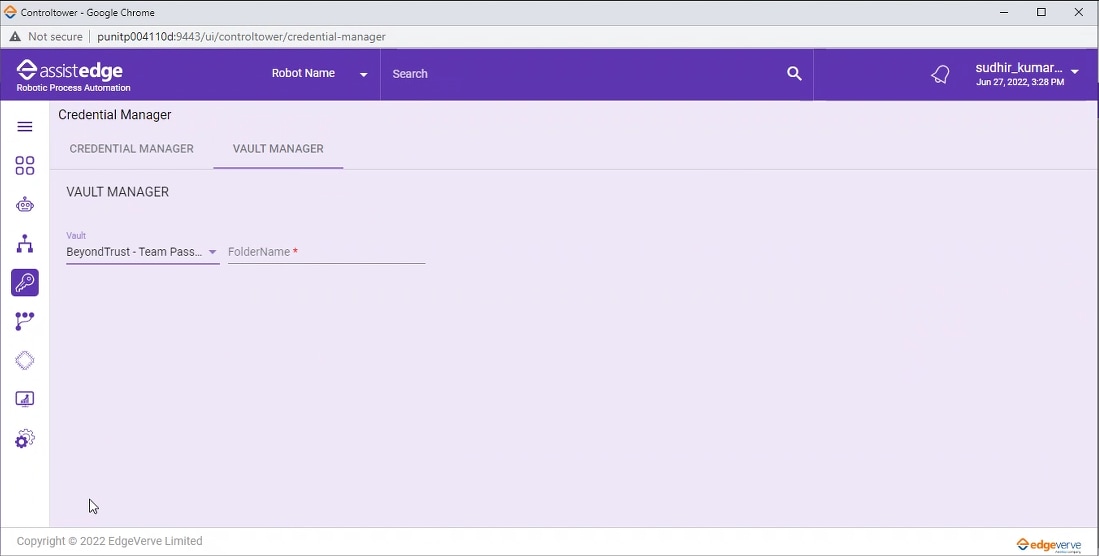
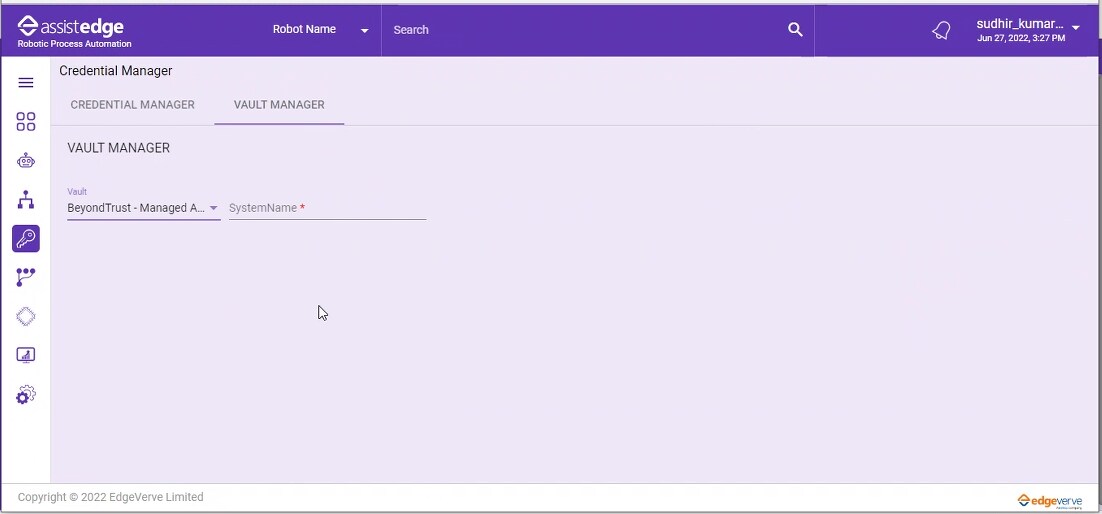
Vault Manager
Vault Manager enables you to set the default values of the particular Vault. When the values are set in the credential manager, they directly populate in all the configured application which configured for the first time or are using Default as Vault Type.
To set value in CyberArk Vault Manager
- In the Select Default Vault Configuration list, select the vault type.
- In the AppID field, enter the AppID that is authorized to provide access to CyberArk and retrieve credentials.
- In the Safe field, enter the CyberArk safe ID that contains the credentials for the assets required to be scanned.
- In the Folder field, enter the CyberArk folder ID that contains the credentials for the assets required to be scanned. The default folder is Root.
- Click SET DEFAULT, to save the credentials as default for CyberArk. The default credentials saved are prompted in the credentials manager.
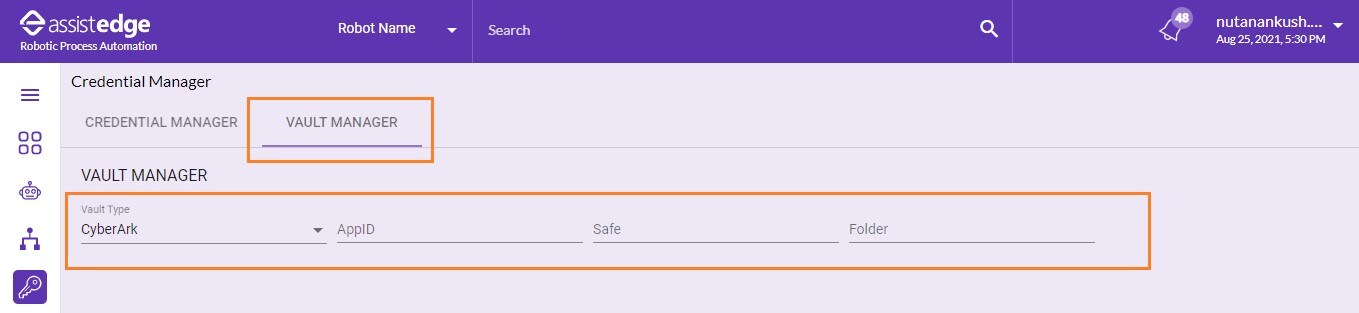 A message appears as Default Vault Values Set Successfully.
To set value in BeyondTrust – Managed Accounts Vault Manager
- In the Select Default Vault Configuration list, select the Vault type as BeyondTrust – Managed Accounts.
- In the SystemName field, enter the SystemName (Managed System) for which BeyondTrust credentials are to be retrieved.
- Click SET DEFAULT, to save the credentials as default for BeyondTrust – Managed Accounts. The default credentials saved are prompted in the credentials manager.
To set value in BeyondTrust – Team Passwords Vault Manager
- In the Select Default Vault Configuration list, select the Vault type as BeyondTrust – Team Passwords.
- In the FolderName field, enter the FolderName of the teams folder that is permitted to give BeyondTrust access to certain applications.
- Click SET DEFAULT, to save the credentials as default for BeyondTrust – Team Passwords. The default credentials saved are prompted in the credentials manager.