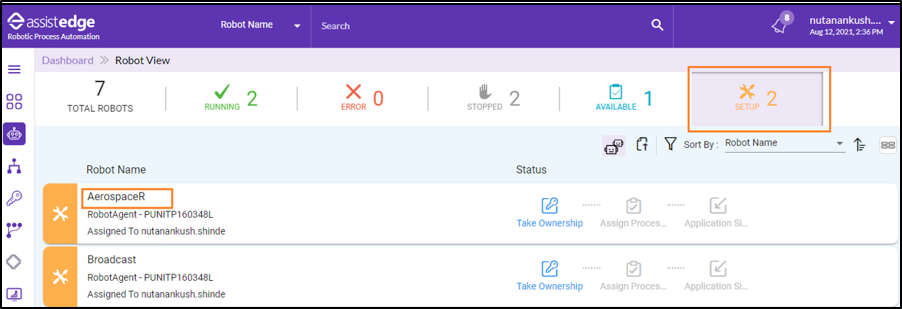
Setup Robots View
When the robot is assigned to a user, it appears in the Setup robot view. In the Setup View, only the assignee can take ownership of the robot.
Users can set up multiple Robots, by selecting multiple Robots to take multiple ownerships, multiple assigning of processes and updating multiple application signin.
In the Setup view you can:
- Set up Single Robot
- Set up Multiple Robot
Role Access to Setup View
Following roles can do robot setup:
- Super User
- Manager
- Robot Owner
To setup a robot following steps are involved:
Take Ownership (Robot Ownership)
Ownership is taken using the valid credentials.
To take ownership of robot:
- In the Setup view, click Take Ownership.
- In the Robot and Machine Name, respective details are populated by default.
- In the Vault list, select the preferred option.
-
Default: If you select Default Vault option, then you must enter the username and password.
-
CyberArk: If you select CyberArk option, then you must enter the details such as App ID, Safe, Folder and so on.
For more information about the CyberArk, see CyberArk section in the Credential Manager.
-
BeyondTrust Managed Account: If you select BeyondTrust - Managed Account option, you must enter the details such as SystemName and AccountName.
-
BeyondTrust Team Passwords: If you select BeyondTrust - Team Passwords option, you must enter the details such as FolderName and CredentialTitle.
For more information about the BeyondTrust – Managed Account or BeyondTrust – Team Passwords options, see BeyondTrust – Managed Account or BeyondTrust – Team Passwords section in the Credential Manager.
NOTE:
In case, you have configured the third-party external credential vault then, the particular vault appears in the Vault list. For more information about integration of third-party external credential vault, see Third Party External Vault in Customization.
-
- Select the Use Global Signin Application Credentials check box to allow the robot to automatically sync its application credentials with the ones provided in credential manager automatically. If Use Global Signin Application Credentials option is not selected, you are required to enter the credentials at the third (Application Signin) step .
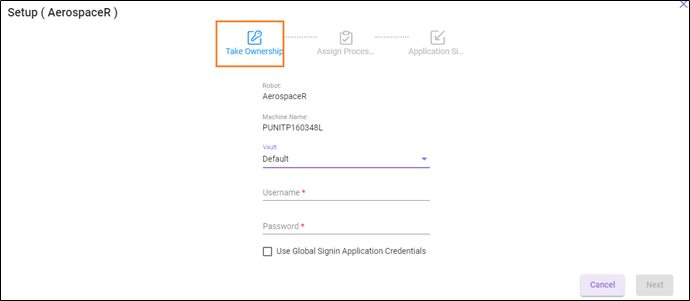
- Then, click NEXT.
You are directed to Assign Processes page.
To setup a multiple robots following steps are involved:
- In the Setup view, click the icon
 (Multiple Robot Setup). The Multiple Robot Setup screen appears.
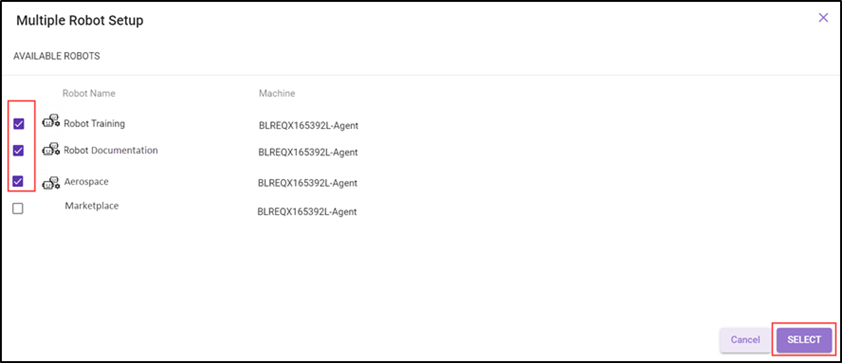
- Select the robots to be assigned and click SELECT.
- To assign all the existing robots, select the Select All checkbox.
- Select the Machine Name, Robots and the Vault for the set up and click Save. You will get a list of saved robots.
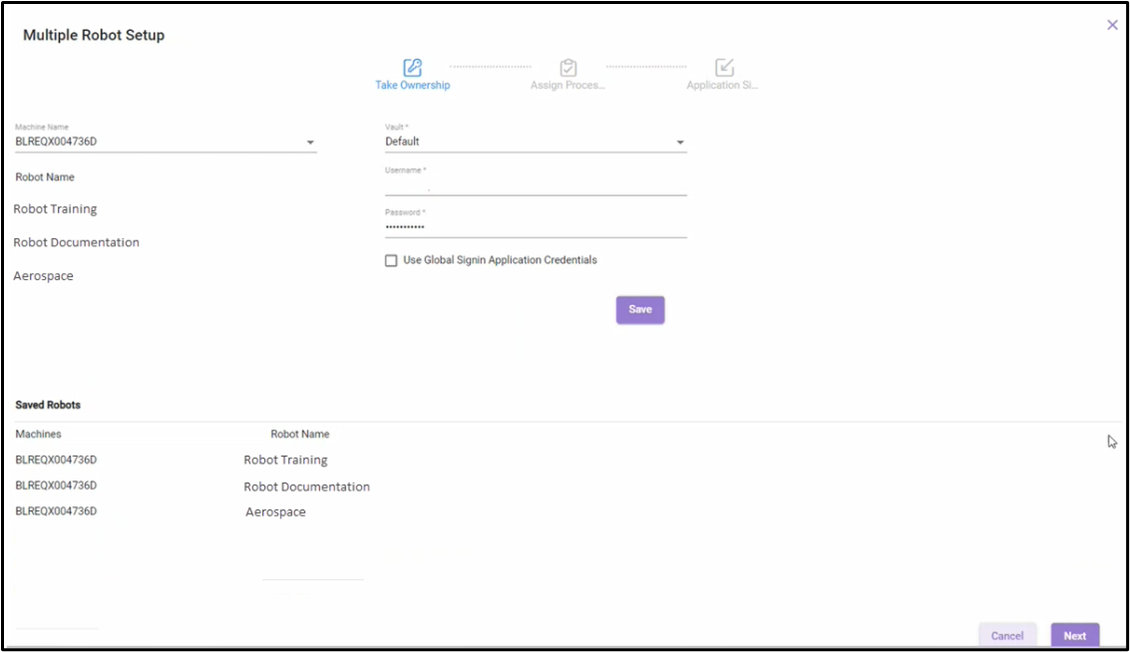
- To take ownership of multiple robots, select multiple robots from the Saved Robots list. For more information about taking ownership, see Take Ownership.
- Click Next. You are directed to Assign Processes page.
Assign Processes
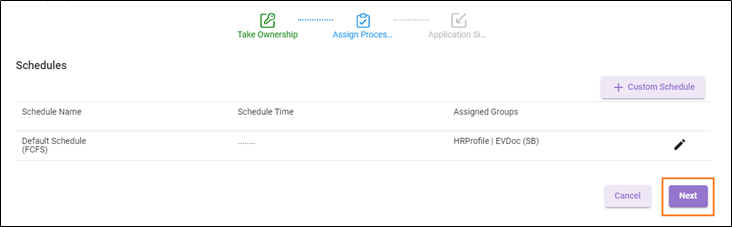
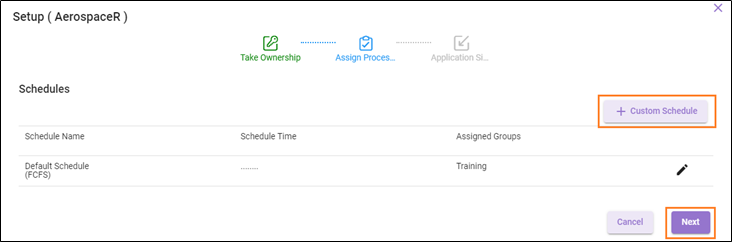
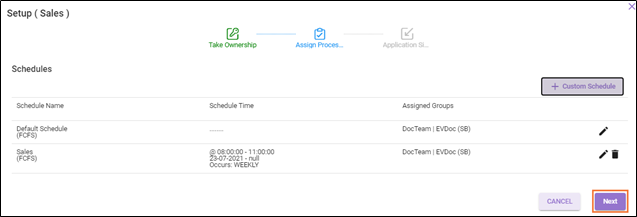
Once the credentials are validated, you are directed to Assign Processes page. The processes can be assigned to robot in the following schedules. There are following types of schedules:
- Default Schedule: Default schedule is the backup schedule. If no schedule is defined for a robot for a specific period, the robot runs in default schedule.
- Default Schedule-Superbot Mode: Superbot moves from its default profile to priority profile as per the preference set in the Dynamic Reallocation Criteria.
- Custom Schedule: A schedule is created for a robot for a specific period on a daily or weekly basis.
|
NOTE: |
By default, you can select only five profiles in the control tower. But you can increase the profile selection limit in the control tower by performing following change in the Config.json.
|
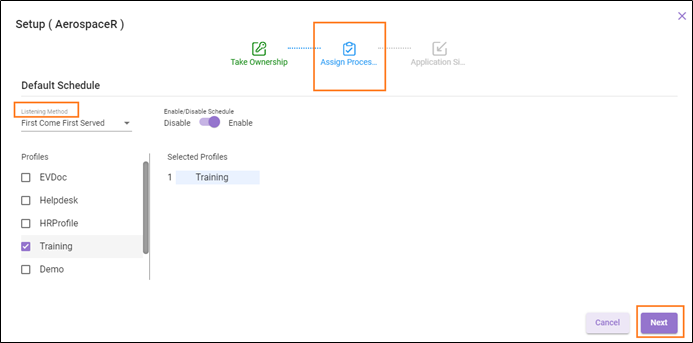
Default Schedule
Users can create Default Schedule and update the schedule to multiple Robots.
To assign the default schedule to robot:
- In the Listening Method list, select the listening method of which robot have to listen such as:
- First Come First Serve
- Round Robin
- Priority Based
For more information about listening method, see Listening Method section.
- In the Profiles, select the check box corresponding to the profile which you want to assign the robot. Once the profile is selected, the profile appears under the Select Profiles panel.
- In the Enable/Disable schedule s, if required you can enable or disable the default schedule.
- Click NEXT.
The schedule details are displayed.
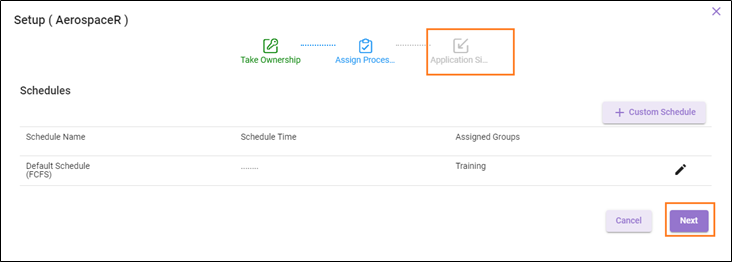
Click Next, and you are directed to Application Signin page.
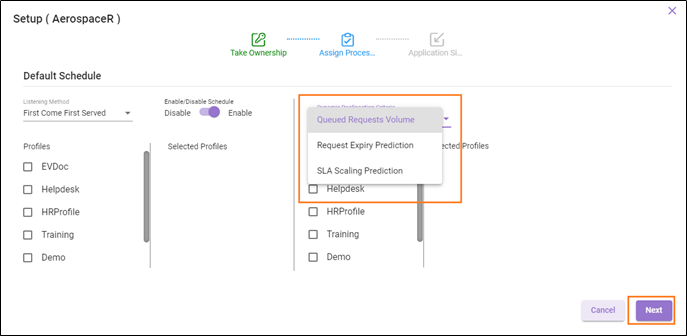
Default schedule – Superbot Mode
If the robot is marked as Superbot while creating the robot, additional options are available to configure the priority profiles. Dynamic reallocation criterion is selected from the available options such as Queued Requests Volume, Request Expiry Prediction, and SLA Scaling Prediction. Priority profiles are then selected along with their relative priorities. The Superbot mode profiles are mutually exclusive to regular profiles (default schedule and custom schedules) of the robot.
To assign the default schedule to the Superbot:
- In the Enable/Disable schedule, if required you can enable or disable the default schedule for the Superbot.
- In the Listening Method list, select the listening method to which robots have o listen such as:
- First Come First Serve
- Round Robin
- Priority Based
For more information about listening method, see Listening Method section.
- From the Profiles section, select the check box corresponding to the profile which you want to assign the robot to.
- Once the profile is selected, the profile appears under the Select Profiles panel. The profile selected in this panel will be a default profile assigned to robot.
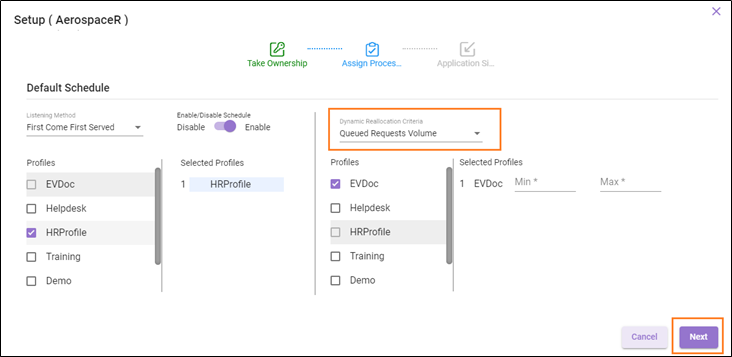
- In the Dynamic Reallocation Criteria list, select the preferred option such as:
- Queued Requests Volume: Select the Queued Requests Volume to monitor the process request que manually. QueueMonitor property has to marked as ON in <build folder path>\app\Vanguard\Monitor\PeriodicXml\ MonitorAlerts.xml file for Superbot to continuously monitor the high priority profile queues.
- Request Expiry Prediction : Select the Request Expiry Prediction to set the Superbot to address high priority processes based on request expiry by Cognitive Engine. You must define the Request Expiry Prediction in the Transaction Expiration (Seconds) field while creating the trigger in the Trigger Manager tab.
- For more information about setting the trigger expiration, see Creating trigger section in the Trigger Manager Tab.
- For more information about request expiry configuration, see Infrastructure Health Monitoring section in the Administrator.
- SLA Scaling Prediction: Select the SLA Scaling Prediction to set the Superbot to address high priority processes based on SLA Scaling prediction by Albie Cognitive
- Engine. You must define the SLA Expiry while the process is deployed in the Automation Studio. For more information about setting up SLA for process, see AutomationStudio.
For more information about dynamic reallocation criteria in detail, see Smart Resource Management.
- From the Profiles section, select the check box corresponding to the profile which you want to assign as priority profiles with their relative priorities.
- Selected Profiles: The selected profile shown under this section is priority profile for Superbot.
- In the Selected Profiles, enter MIN and MAX thresholds value according to which the robots gets dynamically reallocated to high priority profile if maximum threshold level is breached.
- Similarly, robot is dynamically reallocated to regular profiles if requests volume falls below the minimum threshold value. The Superbot mode profiles are mutually exclusive to regular profiles (default schedule and custom schedules) of the robot.
- Click the
 icon to deselect the selected profile.
- Selected Profiles: The selected profile shown under this section is priority profile for Superbot.
- Click NEXT.
The Setup <Robot Name> - Schedules page is displayed.
- Once the default schedule is set up, click NEXT. If you click NEXT, you are directed to Application SignIn page for updating the application credentials.
- If required, you can create a custom schedule or move to NEXT step. For more information to create custom schedule, see Custom Schedule.
Custom Schedule
On the Schedule page, you can create a custom schedule if required or move to the next step for updating the application credentials.
To assign the custom schedule to the robot:
- In the Assign Processes > Schedules > click CUSTOM SCHEDULE.
The Custom Schedule page is displayed.
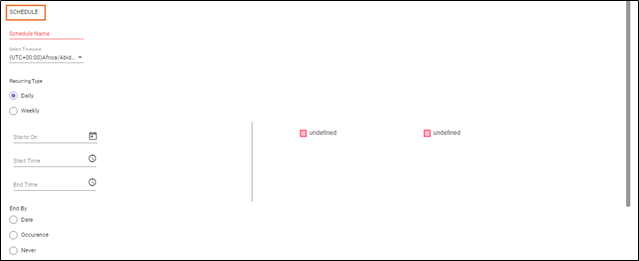
- In the Schedule Name field, enter the name of the custom schedule.
- In the Select Time-zone, select the time zone according to which the custom schedule should be created and sent to RPAListener.
- From the Recurring Type, select the preferred option such as:
- Daily
- Weekly
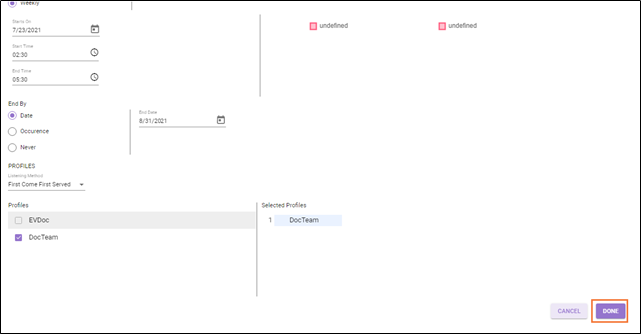
- From the Starts On , select the preferred option.
- Select the Start On Date from which the request should be executed.
- Select the Start Time and End Time at which the request is required to be executed.
- From the End by, select the preferred option:
- Select the Date from which the request should be stopped.
- Select the Occurrence option and enter the number of occurrences for which the schedule should be executed.
- Select the Never option, if you do not want to stop the custom scheduled until the end or for a specific time of a specific day.
- In the Listening Method list, select the preferred listening method for the robot. There are three listening methods available under a schedule such as:
- First Come First Serve
- Round Robin
- Priority Based
For more information about listening method, see Listening Method section.
- From the Profiles section, select the check box corresponding to the profile for which you want to enable custom schedule. Once the profile is selected, the profile appears in the left panel.
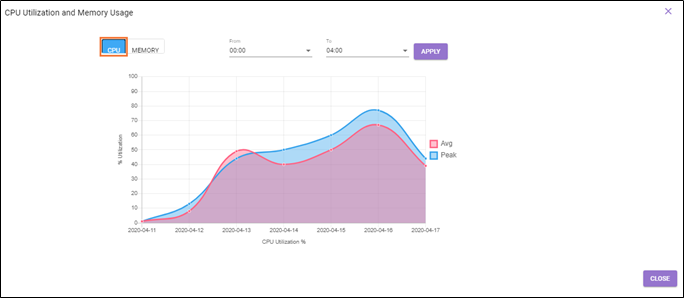
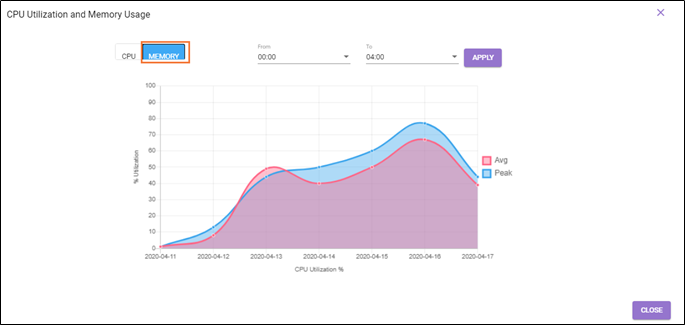
- Click CPU Utilization or Memory Usage to view the CPU utilization and Memory usage trends for the selected period while creating the custom schedule. This trend displays the Average (Avg) and Peak CPU Utilization and Memory Usage which enables you to take a decision whether to create a schedule, for a specific period of the day.
- In the From and To list, select the time for which you want to view the CPU Utilization and Memory Usage.
- Then, click APPLY.
- Once done, click CLOSE. You will be directed to schedules page.
- Click Done.
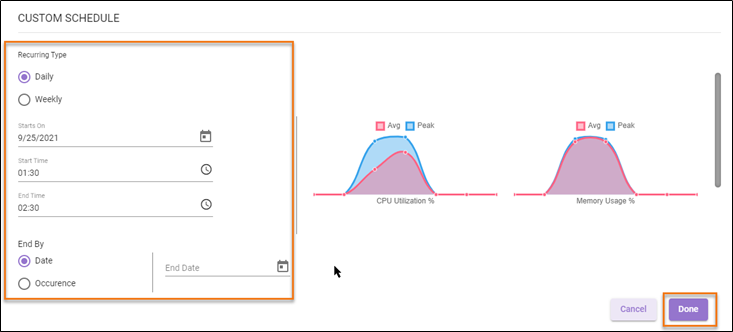
A message appears as <Schedule_name> is created successfully on the page.
- Click NEXT.
Once, the custom schedule is created and you are directed to Application Signin page.