Delete Range
Delete Range feature enables you to delete a range of cell data from a specific worksheet of a workbook.
Using Delete Range feature
- Make sure the prerequisites for using Office 365 activities are met.
- In the Canvas Tools pane, click Office 365 Services to expand the tool and view the associated activities.
- Drag the Excel 365 activity inside the Office 365 Application Activity. Ensure that the output token of the OAuth process is passed on to the Excel activity for authentication. For more information, see OAuth Activity.
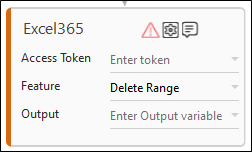
- The validation error symbol disappears when you select relevant values in the particular field from the available list. For example, Access Token, Delete Range, and Output.
- The validation error symbol disappears when you select relevant values in the particular field from the available list. For example, Access Token, Delete Range, and Output.
- In the Access Token list, select the output parameter holding the value of access token from the OAuth activity to pass in the Excel 365 activity. For more information, see OAuth activity.
- In the Feature list, select Delete Range.
- Click the
 (Setting) icon to configure the input configuration. The Input Configuration screen appears.
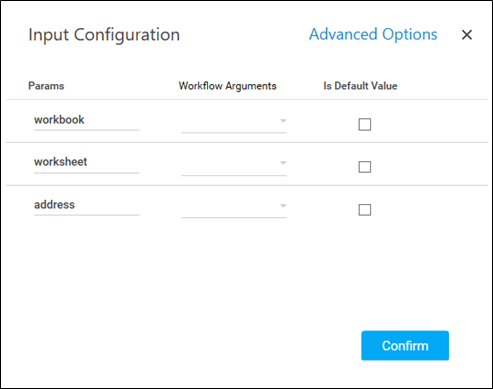
- Ensure to define all the input parameters as an in argument in the Parameter bar for selection in the mandatory and advanced options.
- Mandatory Options:
- In the workbook, select the parameter holding the select the parameter holding the path along with workbook name or name (if workbook is in root folder) of the workbook wherein you want to delete the range. For example, FolderName/WorkbookName.xlsx. Ensure to add the extension of excel while providing the name of workbook. i.e.xlsx.
- In the worksheet, select the parameter holding the name of the sheet to which the data need to be appended.
- In the address, select the parameter holding the address for which the data needs to be deleted. For a table, you can delete multiple rows but for a data without table, you refer following example.
- For example, if you have data in cells D1:E5, and you enter "D1:E3", the data in cells D1:E3 is deleted and the data in cells D4:E5 remains and shifted according to your specified Shift value.
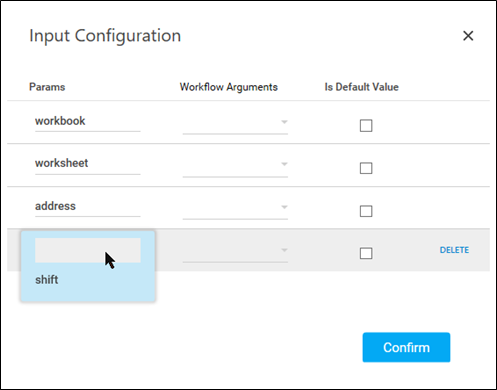
- Advanced Options:
- In the shift list, select the parameter holding the surrounding cells for which range is deleted. Use the drop-down list to select one from the available options, such as:
- Up: Indicates that the cells below the range are moved up to populate the deleted range of cells.
- Left: Indicates that the cells to the right of the range are moved left to populate the deleted range of cells.
- Mandatory Options:
- Click Delete to remove the input parameter from the list.
- You can select the Is Default Value checkbox to set the selected input parameter as the default value.
- Once done, click Confirm.
- Click the
- In the Output list, select the argument which should store the result. The argument should be of Out Direction.
- Save the process.
- In the Tool bar, click Setup Environment.
NOTE:
You must select the relevant scope as per the activities in the automation process.
- Once environment setup is completed perform the Test Run. The studio console will display the successful message with the required output else, output will be blank.
- Output is of the format : {"Response": "Range Deleted Successfully"}.
- Output is of the format : {"Response": "Range Deleted Successfully"}.