Pre-Install Preparations
As part of installation of the server-side components, validate the prerequisites and then extract product package. Access the installation folder AssistEdgeAutomation.zip for Windows and AssistEdgeAutomation.tar.gz for Linux.
Server-Side Prerequisite Manual Validation
This section discusses about the manual validation and installation process of server-side perquisites.
File Archiver
To verify if 7.zip is installed
- In the Start menu, enter 7-zip, if already present it appears in the list of applications displayed
- If not found, download 7-zip, and install it on the given system from here
|
CAUTION: |
Default decompression of Windows fails to properly unzip files with longer path. Incorrect extraction leads to failure of installation; hence, it is recommended to use 7-zip for extraction of the installation folder. |
Extracting Product Package
| For Windows | For Linux | ||
|
To extract AssistEdgeAutomation.zip:
|
To extract AssistEdgeAutomation.tar.gz:
|
||
| AssistEdge-LowCode.zip Download and extract this file. Once extracted, navigate to AssistEdge-LowCode > runtime folder and copy the tomcat folder inside the AssistEdgeAutomation > runtime folder. |
AssistEdge-LowCode.tar.gz Download and extract this file. Once extracted, navigate to AssistEdge-LowCode > runtime folder and copy the tomcat folder inside the AssistEdgeAutomation > runtime folder. |
||
| AssistEdge-ML.zip Download and extract this file. Once extracted, navigate to AssistEdge-ML > runtime folder and copy the python folder inside the AssistEdgeAutomation > runtime folder. |
AssistEdge-ML.tar.gz Download and extract this file. Once extracted, navigate to AssistEdge-ML > runtime folder and copy the python folder inside the AssistEdgeAutomation > runtime folder. |
|
CAUTION: |
The path where you are extracting product package should not contain any space in the parent folder names. |
You also need to update the configuration files stored within the installation folder as per the deployment you wish to achieve.
In the AssistEdgeAutomation folder, access scripts folder and then update the following:
- Deployment Properties - in this section you need to update details of the system where you wish to install server-side components
- Server Properties – in this section you need to update server properties such as details related to cluster, ML and so on.
- Component Properties – this section is applicable only if you wish to change the default settings that depends on the deployment architecture you intend to deploy. The properties of components are the advance configuration setting of AssistEdge.
Deployment Properties
The deployment.properties file is used for storing and retrieving deployment runtime behavior. You need to update the file with details of the system you want to install AssistEdge on.
To Update deployment.properties File:
- Access AssistEdgeAutomation > scripts > app > install > config folder.
- Locate the deployment.properties file and edit the below mentioned properties:
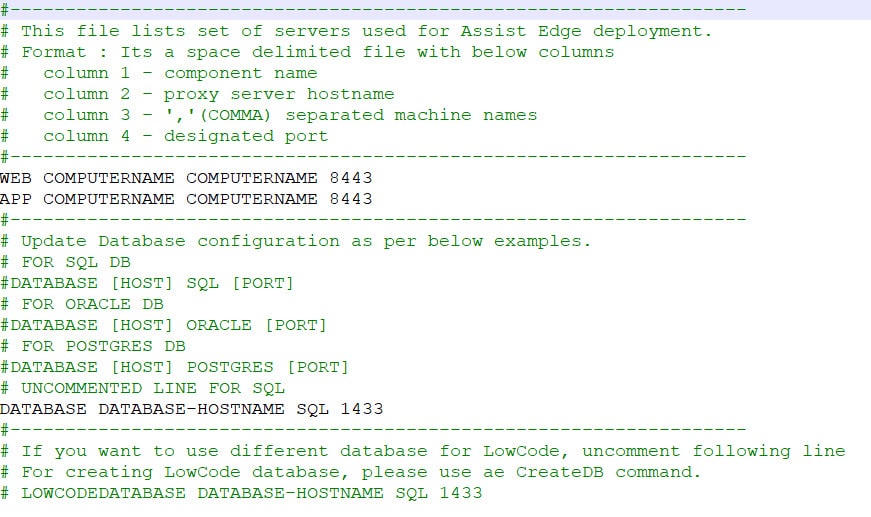
| Name of Property | Description | ||
| WEB | Signifies the various parameters of the UI components such as hostname of the proxy server/load balancer to which it connects, computer name of the system where the components of the UI components server are installed, and the port number of the server. All the components are accessed using this hostname only. For example, defining ‘ae-dev’ as proxy server hostname while using ‘ae-dev.ad.com’ to access the component post installation may lead to multiple errors. Default value is set to- localhost COMPUTERNAME 8443.
|
||
| APP |
Signifies the various parameters of the backend components such as hostname of the proxy server/load balancer to which it connects, computer name of the system where the components of the app server are installed, and the port number of the server.
|
||
| DATABASE |
Signifies the name/instance of the database server where AssistEdge RPA database gets created/used. It also indicates the type of database used such as SQL or Oracle. For SQL, default value is set to- DATABASE DATABASE-HOSTNAME SQL 1433.
For Oracle, enter the values in the given syntax- DATABASE [HOST] ORACLE [PORT].
|
||
| LOWCODEDATABASE (Optional) |
Signifies the name/instance of database server where LowCode Database is created. By default, this line is commented and LowCode tables are created in AssistEdge database. Uncomment this line if LowCode database should be separate.
It also indicates the type of database used such as SQL or Oracle
|
The deployment properties are updated.
|
NOTE: |
On Linux if you wish to deploy on port 443 (any port number with value less than 1000) then deploy it on the default port 8443 and use the TCP routing to route traffic from 443 to 8443. The sample command is: |
Component Properties
The component.properties file defines whether a component runs on the UI server or the backend server.
The properties of a component are pre-defined within component.properties file. You can overwrite this property by changing web to app and vice versa.
|
NOTE: |
You should not modify or remove the component name, else, the installation fails. |
To Update component.properties File:
- Access AssistEdgeAutomation > scripts > app > install > config folder.
- Find component.properties file, right click and then click Edit. The component.properties file opens as shown below.
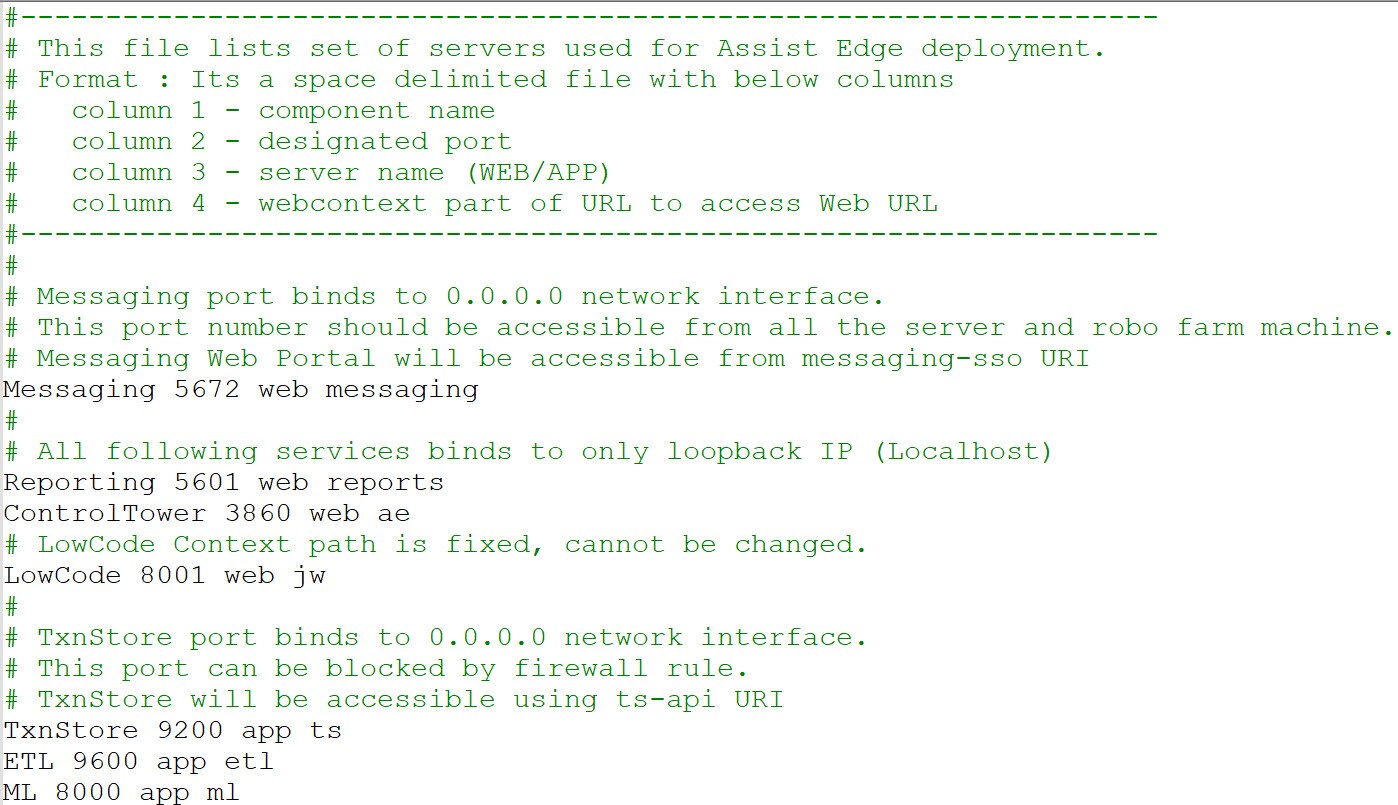
- Update the below properties to configure according to your deployment and then Save the file:
| Name of Property | AE Components | Description |
| Messaging | web |
Signifies the RabbitMQ component of AssistEdge. Default value is set to- Messaging 5672 web messaging.
|
| TxnStore | app |
Signifies the Open Distro component of AssistEdge. Default value is set to- TxnStore 9200 app ts.
|
| Reporting | web |
Signifies the Kibana component of AssistEdge.
|
| ControlTower | web | Signifies the ControlTower component of AssistEdge. default value is set to- ControlTower 3860 web controltower.
|
| LowCode | web | Signifies the LowCode component of AssistEdge. Default value is set to- LowCode 8001 web jw.
|
| ETL | app | Signifies the Logstash component of AssistEdge. Default value is set to- ETL 9600 web etl.
|
| ML | app | Signifies the Machine Learning (ML) component of AssistEdge. default value is set to- ML 8000 app ml.
|
The component properties are updated.
Server Properties
The server.properties file defines several server properties such as domain, cluster, and so on. Update this file as part of the pre-install process. It is important to maintain the default structure while updating the values of the parameter.
To update server.properties file:
- Access AssistEdgeAutomation > scripts > app > install > config folder.
- Find server.properties file, right click and then click Edit. The server.properties file opens as shown below.
- Update the following details mentioned below to configure your deployment and then Save the file:
Clustering Details
In this section, you can update clustering details such as Messaging port number, TxnStore port number and so on as shown in the below screen shot.
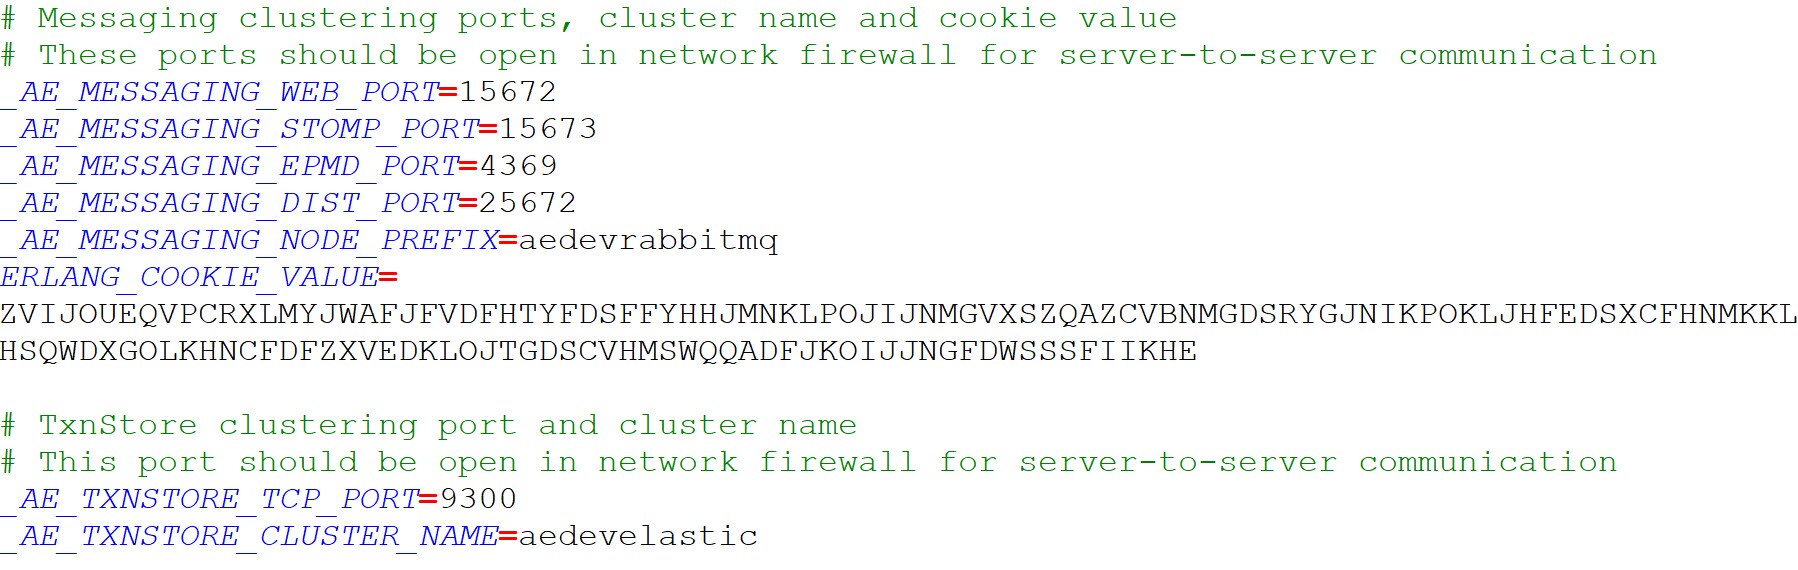
| Name of Property | Description |
| _AE_MESSAGING_WEB_PORT |
Signifies the RabbitMQ Web Management plugin port number. The RabbitMQ management plugin provides management and monitoring of RabbitMQ nodes and clusters. default value is set to 15672. |
|
_AE_MESSAGING_STOMP_PORT |
Signifies the default port of WEBSTOMP Protocol used to connect to RabbitMQ Messaging Server. default value is set to 15673. |
| _AE_MESSAGING_EPMD_PORT | Signifies the epmd port number. EPMD is a peer discovery service that is used by RabbitMQ and Command Line Interface (CLI) tools for resolving the address of nodes in a clustered deployment. default values is set to 4369. |
| _AE_MESSAGING_DIST_PORT |
Signifies the distribution port number. RabbitMQ communicates with CLI Tools and other nodes via distribution port. |
| _AE_MESSAGING_NODE_PREFIX | Signifies the prefix of the node name of RabbitMQ. A node name consists of a prefix that is unique for each node. It is required to communicate among themselves within a cluster. default value is set to aedevrabbitmq. |
| _AE_TXNSTORE_TCP_PORT |
Signifies the port to bond for communication between nodes. default value is set to 9300 |
| _AE_TXNSTORE_CLUSTER_NAME | Signifies the name of the cluster of Open Distro. Nodes recognize cluster with their name. Cluster name is unique for each cluster in an environment, or the nodes might connect to the wrong cluster. default value is set to aedevelastic. |
Core Cognitive Engine/ML Details
In this section you can update details related to Core Cognitive Engine/ML such as enabling or disabling predictor and so on.
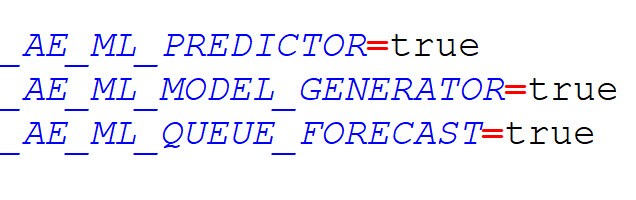
| Name of Property | Description |
| _AE_ML_PREDICTOR | Signifies the component of ML that is used to predict the ML output based upon the ML inputs. default value is set to true. If set to ‘false’ it stops the ML Predictor component to predict the outputs. |
| _AE_ML_MODEL_GENERATOR | Signifies the component of ML that provides training data and ML algorithm to the ML models. default value is set to true. If set to ‘false’ it stops the ML Model Generator component. |
| _AE_ML_QUEUE_FORECAST |
Signifies the component of ML that predicts assignments of RPA requests to robots based upon current system metrics. It also helps in predicting the SLA for each request. default value is set to true. If set to ‘false’ it stops the Queue Forecast component. |
LowCode Details
In this section you can update the LowCode port number as shown in the below screen shot:

| Name of Property | Description |
| _AE_LOWCODE_SERVER_PORT |
Signifies the communication port number for LowCode component administration (start-stop). Any other access must be blocked by the firewalls. default value is set to 8002. |