Post Install Setups
After successful installation of server-side components, few optional configurations can be done as per the need. You also need to start the server-side components for them to run.
Below section guides you to the advanced configuration of AssistEdge such as Key and Salt configuration and updating the runtime properties. It also walks you through the process to start the components.
Advanced Configuration for Key and Salt
For AssistEdge setup, there is a provision to customize the source for salt and key used for encryption of the application credentials.
By default, Key-Salt combination for AssistEdge setup is retrieved from the database. This can be extended to a JSON file or Custom JS file API call.
If you wish to change the default settings for Key and Salt, configure it immediately after installation of server-side components. The Key and Salt set up is used for application credential encryption for AssistEdge. Perform the configuration before you start the server-side components.
|
CAUTION: |
If you want to change the default values, you must make the required changes before starting the server side components. Once the server-side components are started the source for Key and Salt configuration i.e., Database, JSON file, custom JS file API call cannot be changed. |
|
NOTE: |
|
Update Runtime Properties
Following files must be updated to update the runtime properties of the components:
- ae.properties
- ae-profile-default.properties
Update ae.properties File
The run time properties of components are defined in the ae.properties file. The values contained in this file can we overwritten to change the default settings.
To update the ae.properties file:
- Access AssistEdgeAutomation > scripts folder.
- Locate the ae.properties file and edit the below mentioned properties.
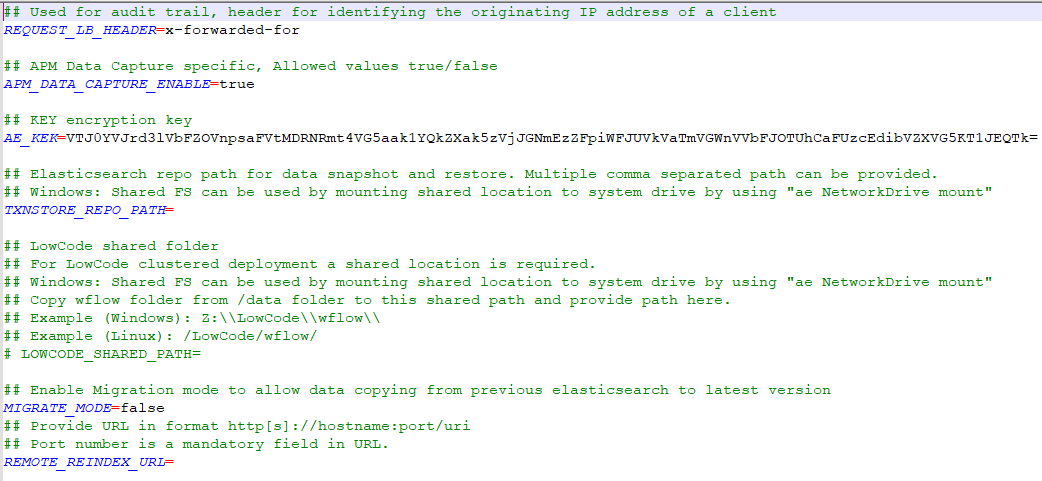
- Update the below properties to change the default values:
| Name of Property | Description | ||
| REQUEST_LB_HEADER | Used for audit trail. It is the header for identifying the originating IP address of a client. | ||
| APM_DATA_CAPTURE_ENABLE | Signifies if APM data capture is allowed. Default value is set to ‘true’. Enter false to disable it. |
||
| AE_KEK |
Signifies the decryption key of the Key and Salt. You can change the value of the key though this is not a mandatory step.
3. Enter y. Please provide input KEK value : appears. Enter the value of the KEK that you want to update. The KEK value should not contain any spaces or special characters. It must be minimum 16 characters and maximum 32 characters long.
A message Update KEK successful is displayed on the successful update of the KEK value. |
||
| TXNSTORE_REPO_PATH | Signifies the data backup/ restoration path of TxnStore. | ||
| MIGRATE_MODE | Signifies that the current installation is in migration mode. For details refer AE-RPA Migration Guide.pdf file. Default value is set to ‘false’. |
||
| REMOTE_REINDEX_URL | Signifies the URL for old ElasticSearch deployment. For details refer AE-RPA Migration Guide.pdf file. |
The installation of AssistEdge is completed.
|
NOTE: |
The default authentication of AssistEdge is set to Windows > Lightweight Directory Access Protocol (LDAP). However, you can change the default authentication setting to either Custom or SAML/OIDC Authentication.
|
Update ae-profile-default.properties File
The default system settings that will be used during start-up of the AE components is mentioned in the ae-profile-default.properties file. You can update the values as per user workload.
To update the ae-profile-default.properties file:
- Access AssistEdgeAutomation > scripts folder
- Locate the ae-profile-default.properties file and edit the below mentioned properties.
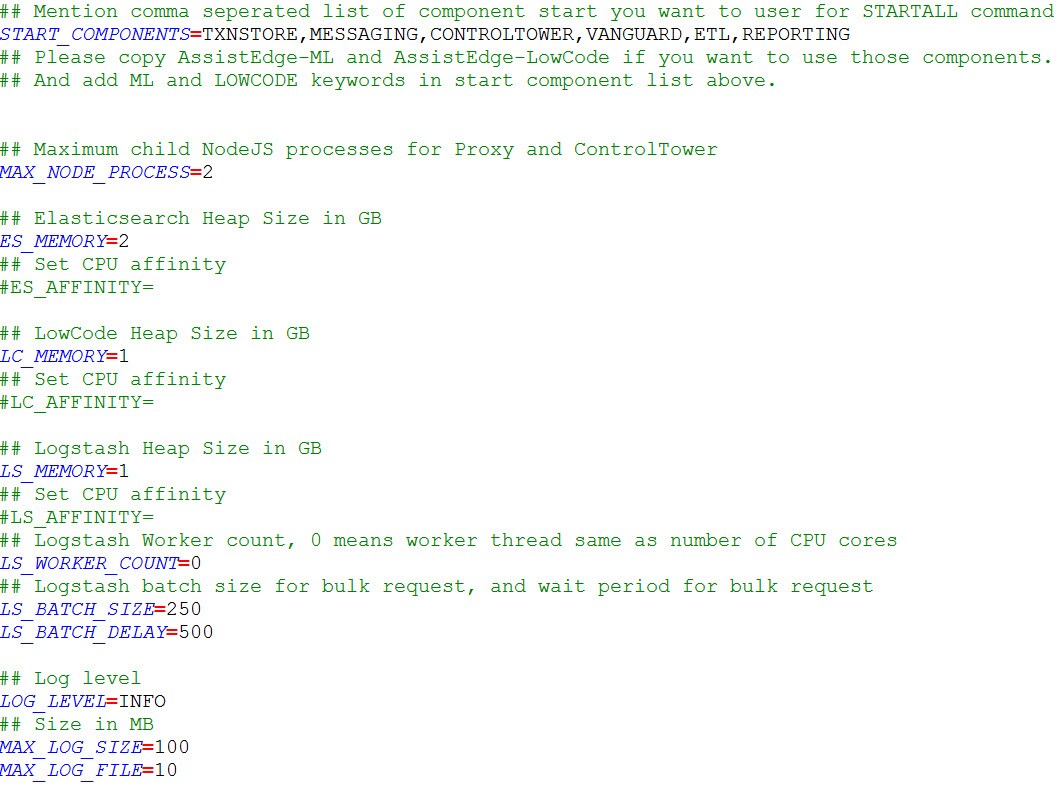
| Name of Property | Description |
| START_COMPONENTS | Signifies the list of components that must be started when the ae sartall command is executed. |
| MAX_NODE_PROCESS |
Signifies the maximum child Node JS processes for Proxy and ControlTower. Default value is number of CPU cores. If you are facing high CPU or RAM utilization then, based on your environment you can configure to a small number less than CPU Cores. default value is set to ‘2’. |
| ES_MEMORY | Signifies the memory space allocated to Open Distro in the RAM. The unit for RAM memory is in Giga Byte (GB). default value is set to ‘2’. |
| LC_MEMORY | Signifies the memory space allocated to LowCode in the RAM. The unit for RAM memory is in Giga Byte (GB). default value is set to ‘1’. |
| LS_MEMORY | Signifies the memory space allocated to Logstash in the RAM. The unit for RAM memory is in Giga Byte (GB). default value is set to ‘1’. |
| LS_WORKER_COUNT | The number of workers that will, in parallel, execute the filter and output stages Logstash. If you find that events are backing up, or that the CPU is not saturated, consider increasing this number to better utilize machine processing power. default value is set to ‘0’. |
| LS_BATCH_SIZE | The maximum number of events an individual worker thread will collect from inputs before attempting to execute its filters and outputs. Larger batch sizes are generally more efficient, but come at the cost of increased memory overhead. default value is set to ‘250’. |
| LS_BATCH_DELAY | When creating pipeline event batches, how long in milliseconds to wait for each event before dispatching an undersized batch to pipeline workers. default value is set to ‘500’. |
| LOG_LEVEL | Signifies the log level for Open Distro, RabbitMQ and Logstash. default value is set to INFO. |
| MAX_LOG_SIZE | Signifies maximum size of the log file for log rotation. The unit for the log size is MB. default value is set to ‘100’. |
| MAX_LOG_FILE | Signifies the maximum number of log files for log rotation. default value is set to ‘10’. |
|
NOTE: |
An additional profile called ae-profile-dev.properties is available at AssistEdgeAutomation > scripts folder. This profile can be used for development, POC or small-scale deployments. |
Authentication Details
The authentication details related to the user are defined in the auth.yml file. The values contained in this file can we overwritten to change the default settings.
To update the auth.yml file:
- Access AssistEdgeAutomation > scripts folder.
- Locate the auth.yml file and edit the below mentioned properties.
- Update the below properties to change the default values:
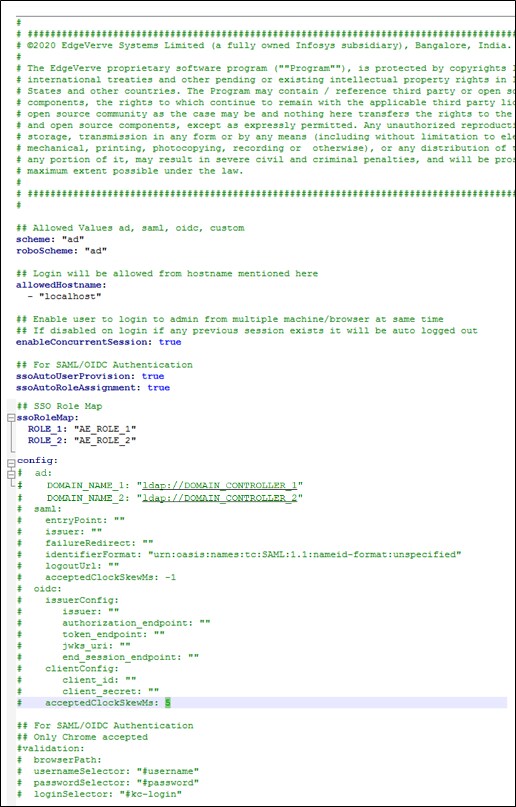
| Name of Property | Description |
| Scheme | The mode to authenticate the user. Available options are:
|
| roboScheme | The mode to authenticate the robots. Available options are:
|
| allowedHostname | The list of hostnames through which the AE instance can be accessed. |
| enableConcurrentSession | Signifies if logging into multiple instances is permitted. By default, it is set to true. |
| ssoAutoRoleAssignment |
This property is applicable only for SAML and OIDC. If this is enabled, the created new user gets a role automatically assigned. |
| ssoRoleMap |
This property is applicable only for SAML and OIDC. If the ssoAutoRoleAssignment property is enabled, the sso (SAML/OIDC) role gets mapped with the specified AE role. |
| config | Specify the configuration details of the scheme specified above. |
Multi-Domain Setup
By default, AE is configured for authentication against single domain. If your organization has multi-domain, and you want to allow users from all the domain to login to AE then you must provide the domain name and domain controller value in the auth.yml file.

Once multiple domains are configured then during login, provide username in the format- domain name\user name. In case domain name is not provided then the user is authenticated against the domain provided during installation.
To access the client facing tools, update their respective config files and set the customauthentication as true.
SSL Certification Details
The SSL certification related details are defined in the ssl.yml file. The values contained in this file can we overwritten to change the default settings.
To update the ssl.yml file:
- Access AssistEdgeAutomation > scripts folder.
- Locate the ssl.yml file and edit the below mentioned properties.
| Name of Property | Description | ||
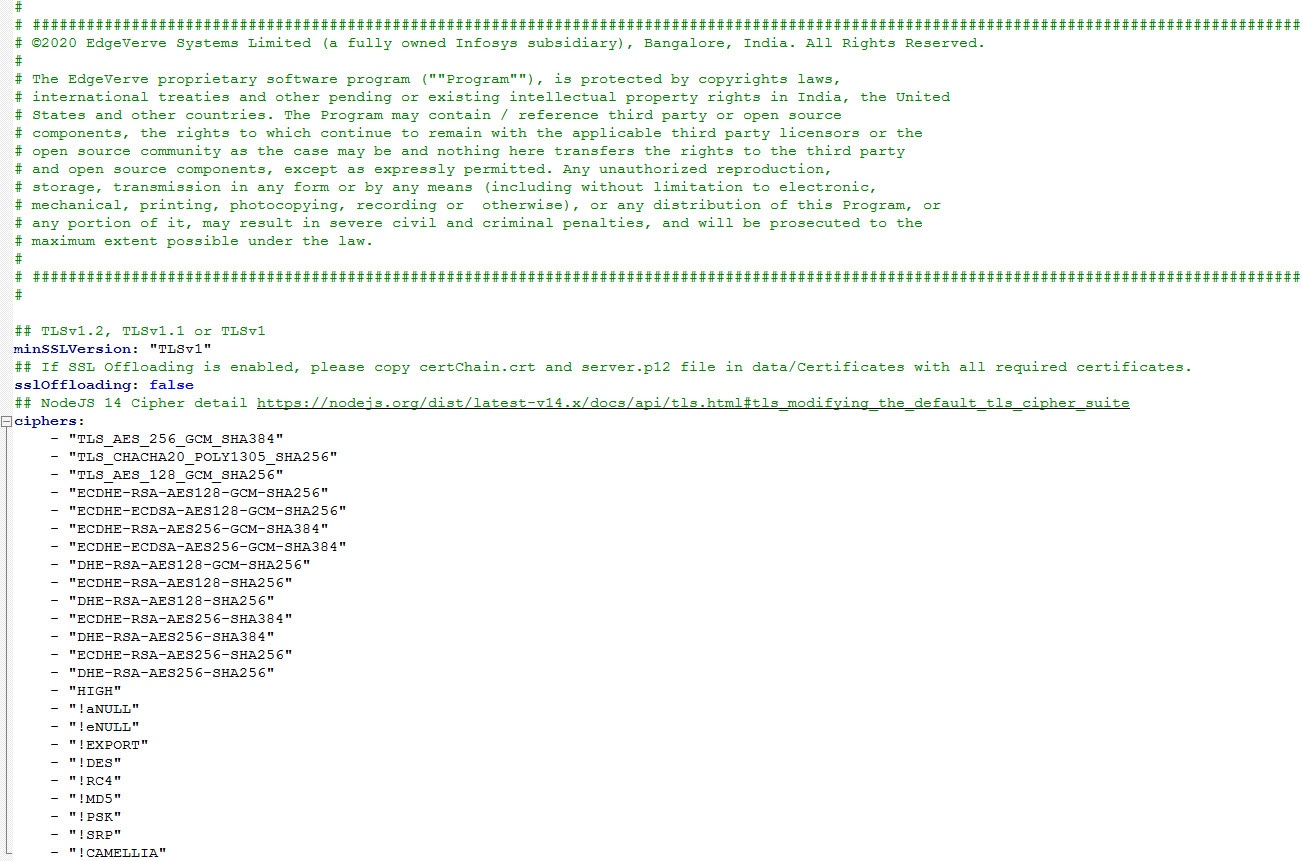
| minSSLVersion | Signifies the TLS protocol version supported by AE servers i.e. 8443. It is recommended to set the lowest version available that in turn ensures all the higher version are available. Default value is set to ‘TLSv1’. Possible values are:
|
||
| sslOffloading |
If you want to do ssl offloading at load balancer enable this by setting to true. By default, it is set to false.
|
||
| ciphers | The set of algorithms used to secure the connection. |
Setting-Up Lowcode in Cluster Deployment
After the installation for the cluster setup is completed follow the below mentioned steps on all the machines where the installation is done:
- Mount network drives:
- For Windows: Run ae networkdrive mount command. Enter below required inputs:
- Enter Drive Letter: <Mount drive letter>. Make sure that the drive letter is same on all the machines.
- Enter Network Location: <Shared network drive path>
- Enter Username: <Shared network username>
- Enter Password: <Shared network password>
- For Linux: Mount a shared drive at a common location on all servers in the cluster. The assistEdge group created above must have access to this drive. Refer Mounting Shared Drive section to know how to mount the shared drive in Linux.
- Make sure that the mounted network drive folder has read/write permissions.
- Update ae.properties file:
- Copy the \data\wflow folder to the shared file directory.
- If the mapped drive is Z: add the below setting in the ae.properties file located in AssistEdgeAutomation > scripts directory. For example, LOWCODE_SHARED_PATH=Z:\\wflow
- Access the server.xml file located at AssistEdgeAutomation > runtime > tomcat > apache-tomcat-<version> > conf folder.
- Uncomment the below mentioned tags and update as described below :
- <Engine name="Catalina" defaultHost="localhost" jvmRoute="jvm1">
- Replace the entry of the jvmRoute with the hostname of the respective machine.
- <Cluster className="org.apache.catalina.ha.tcp.SimpleTcpCluster"/>
- Refer http://tomcat.apache.org/tomcat-8.5-doc/cluster-howto.html for more details related to the tomcat cluster settings.
- Repeat step 1 through step 4 on all the machines where the installation is done for the cluster setup.
Start Server-Side Components
After installation, you also need to start all the components.
To Start the Components:
- Run the ae start <component name> command:
- For Windows: Run the command with Administrator rights and start all the components in below order.
- For Linux: No special privilege is required.
- Alternatively, run ae startall to start all the components at once.
|
NOTE: |
|
| Order to Start Components | Component Name | RPA | Engage |
| 1 | Messaging | ✔ | ✔ |
| 2 | TxnStore | ✔ | ✔ |
| 3 | ControlTower | ✔ | ✔ |
| 4 | Vanguard | ✔ | ✔ |
| 5 | ETL | ✔ | ✔ |
| 6 | Reporting | ✔ | ✔ |
| 7 | Lowcode | ✔ | ✔ |
| 8 | ML | ✔ | ✖ |
3. Run ae statusall to check the status of all the components.
|
PID: 3900
MESSAGING :STARTED 2021-09-30T12:36:49.372Z
REPORTING :STARTING |
|
NOTE: |
Sometimes a component takes longer time than usual to start. Before you start the next component, wait until the current component starts successfully. |
The current status of each of the component is displayed. Below are the various statuses of the components:
- STARTED- signifies that the component has started
- STARTING- signifies that the component is still in the starting phase
- STOPPED- signifies that the component has stopped
- STOPPING- signifies that the component ha is still in the stopping phase
- PreCheck: Pending- Signifies that the pre-check of the component is pending
- Not installed on this System- signifies that the stated component is not install on your system
- PreCheck: Failed – signifies that the pre-check of the component has failed
Server-Side Component URLs
- ControlTower – The Control Tower component is accessible using the URL, https://<proxy_server_hostname>:8443/ui/Admin
- Reporting – The Reporting component is accessible using the URL, https:// <proxy_server_hostname>:8443/reports
- LowCode – The LowCode component is accessible using the URL, https:// <proxy_server_hostname>:8443/jw
- TxnStore - The TxnStore component is accessible using the URL, https:// <proxy_server_hostname>:8443/ts-api. If you are already logged in to AE, no further authentication is required. If you are trying to call the TxnStore API from a code/utility, then you can pass AE user credentials in the Basic Authentication format.
https://<proxy_server_hostname>:8443/ts endpoint does not accept AE user credentials. If you want to access this endpoint, you need to create a TxnStore local user. For TxnStore local user creation, refer https://opendistro.github.io/for-elasticsearch-docs/docs/security/configuration/yaml/#internal_usersyml. - Messaging - The Messaging component is accessible using the URL, https:// <proxy_server_hostname>:8443/messaging-sso. If you are already logged in to AE, no authentication is required. If you are not logged in to AE, you are re-directed to the AE login page.
https:// <proxy_server_hostname>:8443/messaging endpoint does not accept AE user credentials. If you want to access this endpoint, you need to create a Messaging local user using command, ae rabbitmq.