Step-by-Step Guide to Use Oracle EBS Application to Retrieve Employee Information
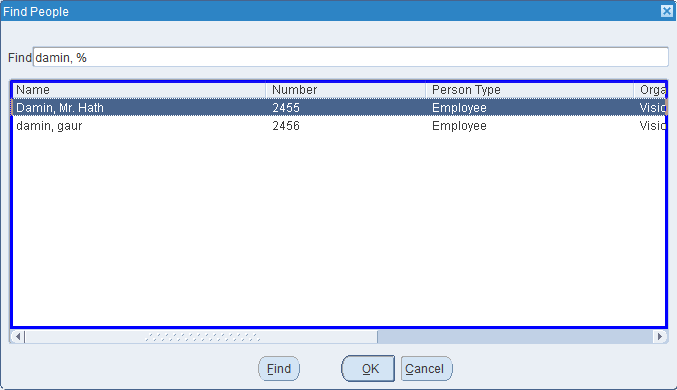
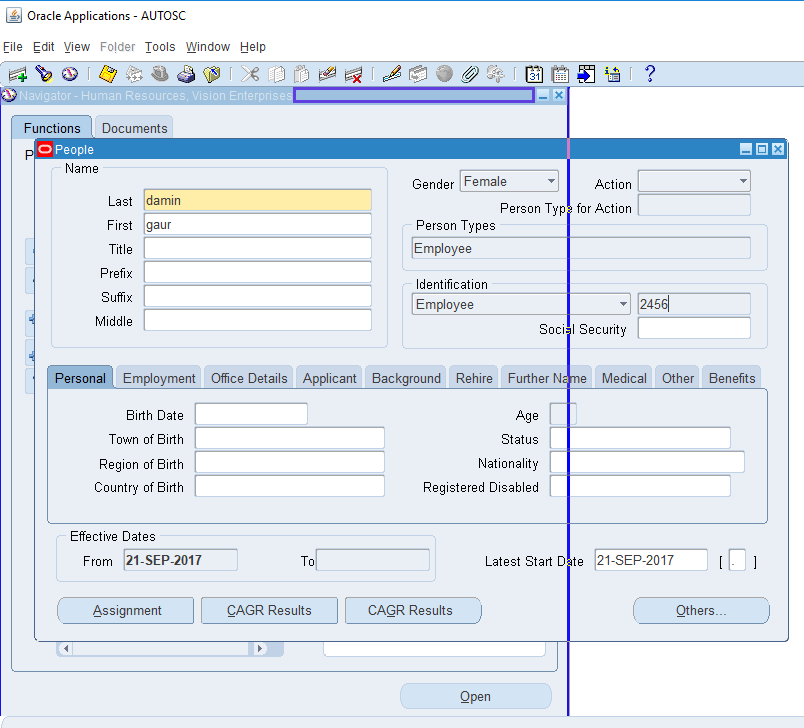
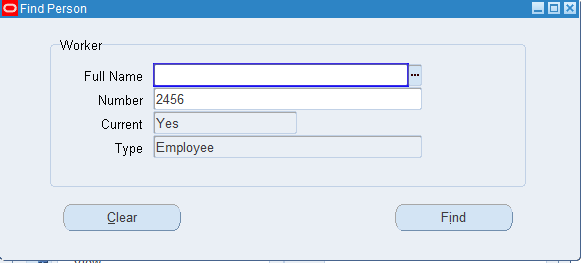
Let's create an example to open the Human Resource, Vision Enterprises Form of Oracle EBS application and search an employe with the last name damin in the Find People window. Select an employee named Damin Gaur from the view-list displayed and then retrieve the employee number from the People window.
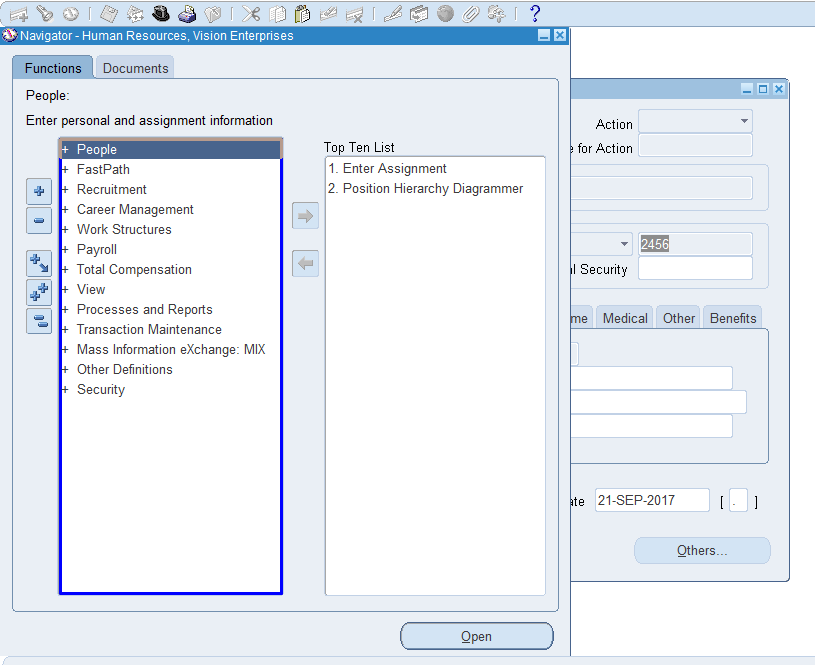
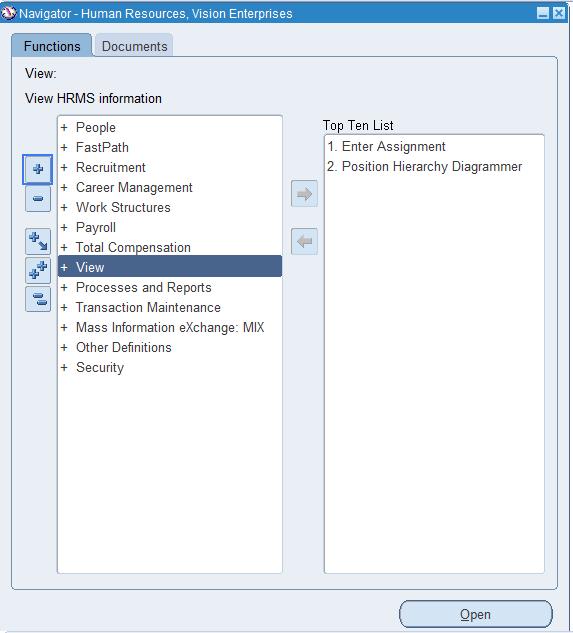
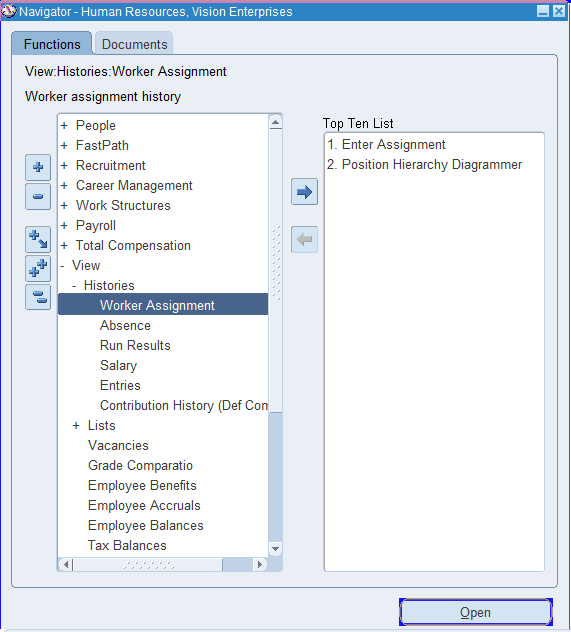
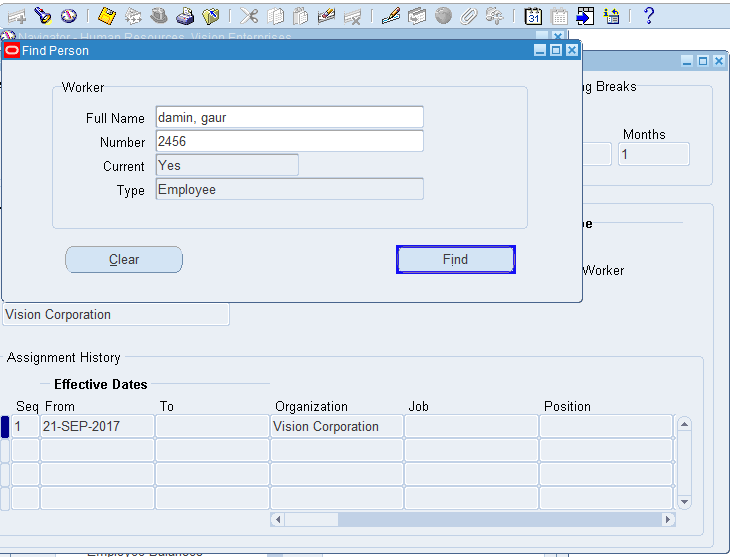
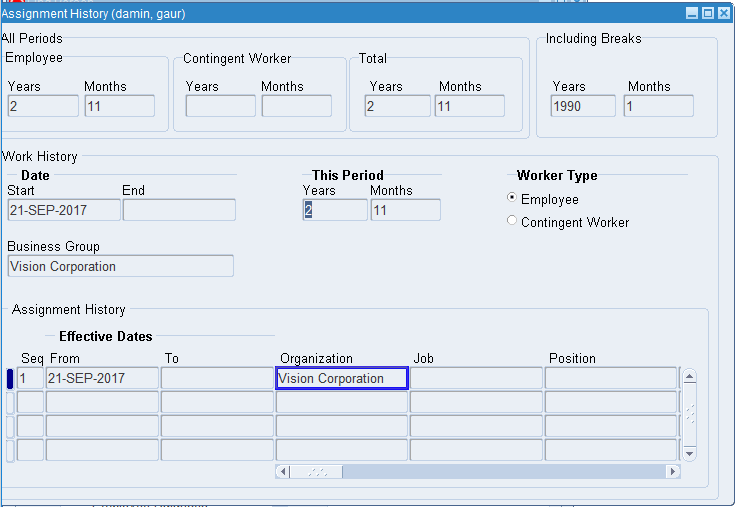
Next, we open the Navigator window and navigate to the Human > View > Work Assignment function. Open the Work Assignment window, enter the retrieved employee number, and then automatically fill the full name of the employee. As the output of the automated steps, view all the actions happening on the Oracle EBS Form automatically. At the completion of the workflow the Assignment History of Damin Gaur gets displayed and the Organization name is retrieved.
|
NOTE: |
You must Close Environment and then Reset Environment every time you want to Test Run a process workflow, else, error is received or the test run fails. |
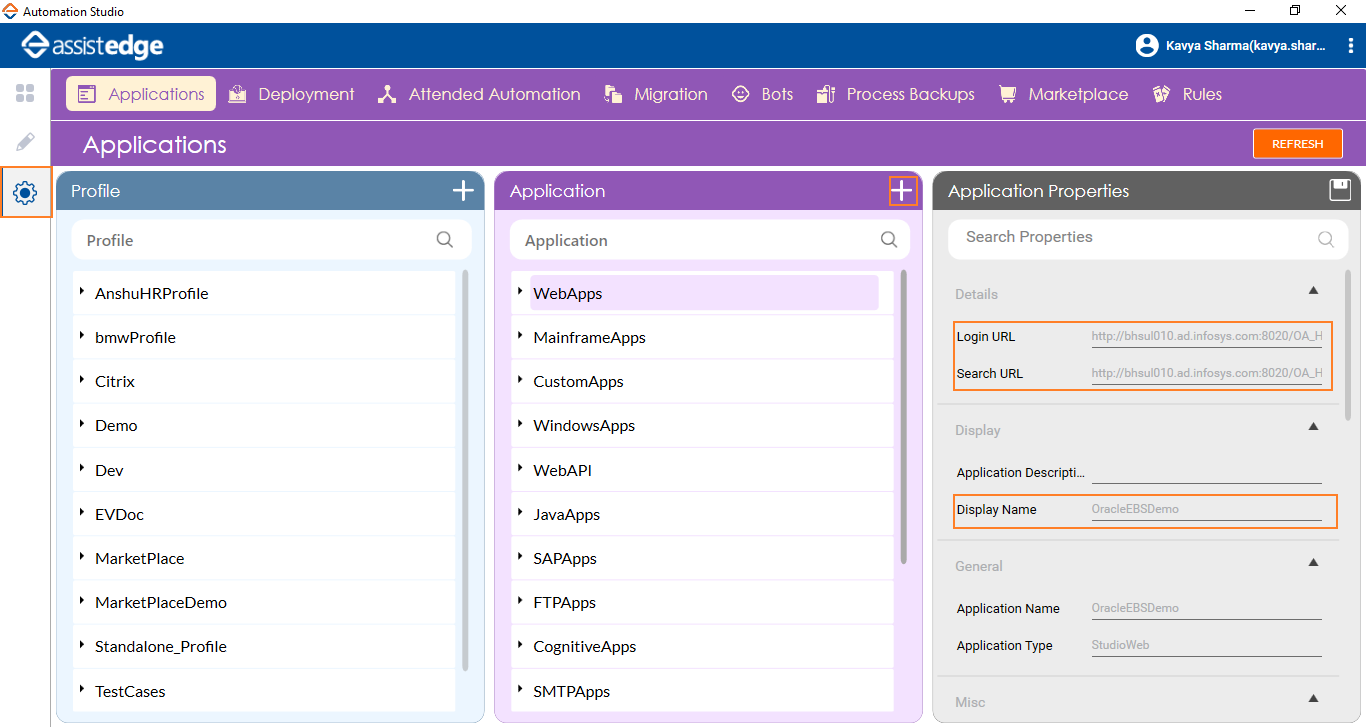
- In the Admin menu, add a WebApps application.
- In the Application Properties panel:
- Enter the Login URL of the Oracle EBS Form, Human Resource, Vision Enterprises. To retrieve the Form URL:
- Navigate to Human Resource, Vision Enterprises Form.
- Right click, and then click Properties
- Enter the Search URL of the Oracle EBS Form. It must be same as the Login URL.
- Enter a Display Name, OracleEBSDemo. You can enter any name of your choice.
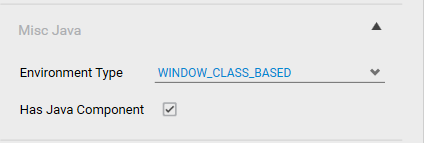
- In the Misc Java section, select the Has Java Components check box.
- In the Misc Java section, select the type of environment in the Environment Type list.
- Enter the Login URL of the Oracle EBS Form, Human Resource, Vision Enterprises. To retrieve the Form URL:
- Click the
 (Save Properties) icon to save the application. The Oracle EBS application is configured.
 - Create a new Process.
- In the Canvas Tools pane click Process Components to view the associated activities.
- Drag the Application activity and drop on to the Flowchart designer on the Canvas. The validation error symbol disappears when required inputs are provided.
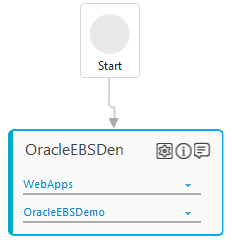
- In the Application Type list, select WebApps.
- In the Select An Application list, select the configured host application, OracleEBSDemo.
- Click the
 (Settings) icon to launch the WEB MODE to capture the steps of logging to the Oracle EBS application. The configured Oracle EBS application appears.
 - Click the
 (Play) icon and then click the User ID field. The Field Properties panel of the Web Mode of the web application appears. The fields that are mandatory are highlighted with red box.
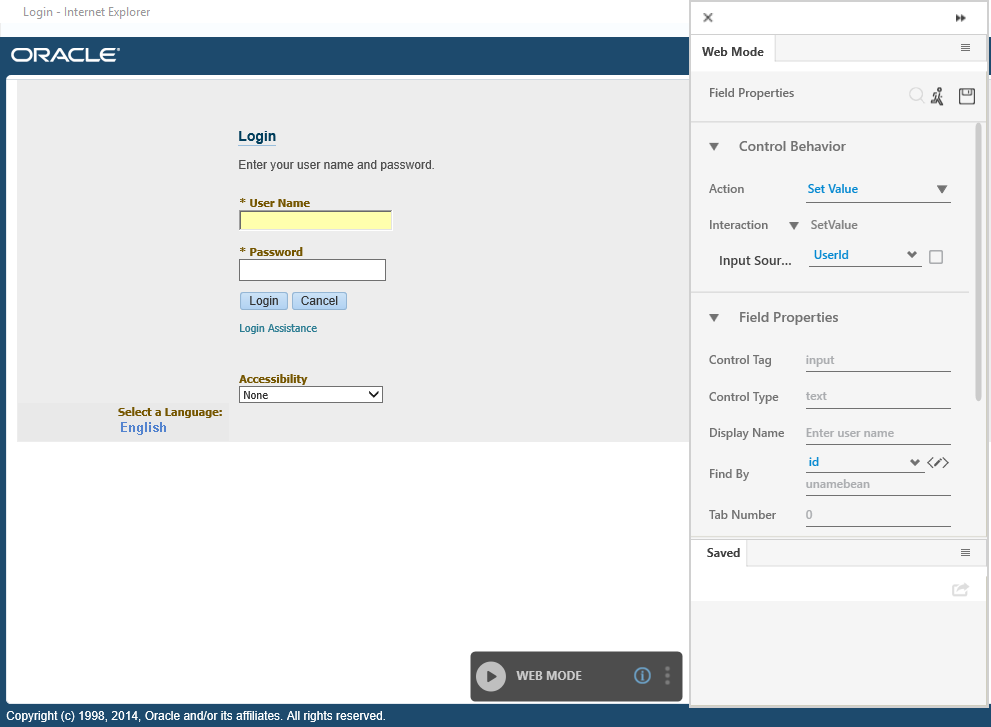
- In the Action list, select Set Value.
- In the Input Source, select UserId.
- Enter a Display Name and then click the
 (Save) icon to configure the details captured. The saved details start appearing in the Saved tab of Field Properties bar.
 - Click the (Play) icon and then click the Password field. The Field Properties panel of the Web Mode of the web application appears. The fields that are mandatory are highlighted with red box.
- In the Action list, select Set Attribute.
- In the Input Source, select Password.
- Enter a Display Name and then click the (Save) icon to configure the details captured. The saved details start appearing in the Saved tab of Field Properties bar.
- Click the (Play) icon and then click the Login button. The Field Properties panel of the Web Mode of the web application appears. The fields that are mandatory are highlighted with red box.
- In the Action list, select Click.
- Enter a Display Name and then click the (Save) icon to configure the details captured. The saved details start appearing in the Saved tab of Field Properties bar.
- Click the
 (Save configured field and return to studio) icon to save the field that you configured and return to the Studio menu. The login steps are captured.
 - In the Menu bar of the Studio menu, click Test Run drop down, and then click Setup Environment to setup and launch the configured application using the Automation Studio.
- Double click the Application activity and add the Application Host activity inside the Application activity.
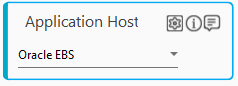
- In the Application Host activity, select Oracle EBS from the drop down list.
- Click the (Settings) icon of the Application Host activity to attach the plug in based on the type of selected host application. A dialog box appears where you can define configurations related to the attached plug in.
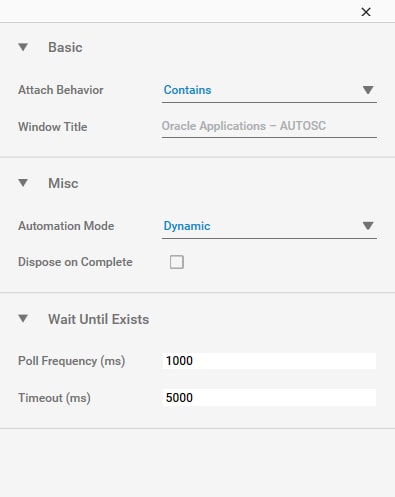
- In the Attach Behavior list of the Basics category, select Contains.
- In the Window Title field, enter Oracle Applications – AUTOSC. Other default settings remain same. Close the dialog box to save the plug in configurations.
- Double click to open the Application Host activity block.
We have demonstrated Set Text, Get Text, Click, Select Listview item by index and Activate Window operations, that can be performed on the configured Oracle EBS form. You can configure other operations in the similar way depending on your business requirement.
Set Text
- Click ADD to add the Application Control activity.
- Click the
 (Field Configuration) icon of the of the Application Control activity, and then bring the Oracle EBS application window in focus.
 - Hover over the Full Name field . The area that you can capture gets highlighted with a blue box.
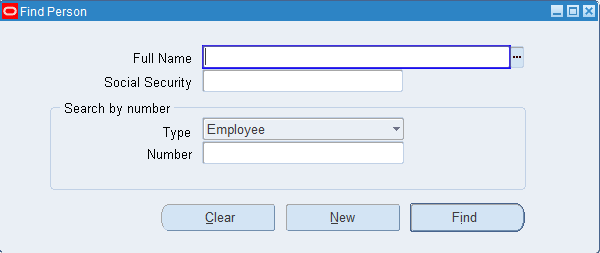
- Click the highlighted area to extract the Id of the UI element. A dialog box appears where you can configure the details related to the captured UI element. The Id of the component and the window name are auto filled. The fields that are mandatory are highlighted with red box.
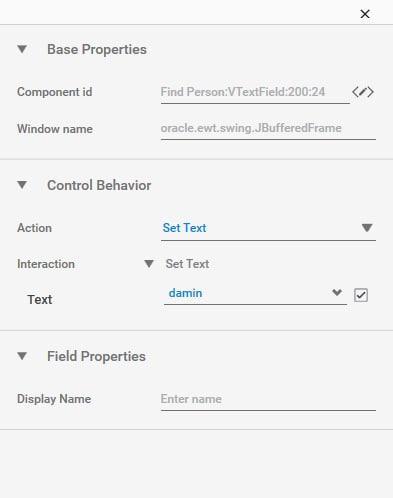
- In the Action list, select Set Text.
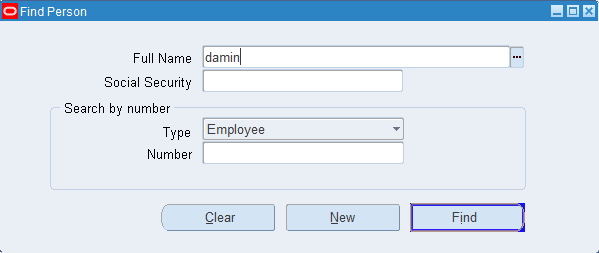
- In the Text field, enter damin and select the Is Default Value. You can enter any employee name that you want to search.
- In the Display Name, enter Name. You can enter any name of your choice to be displayed.
- Close the dialog box. The Save Confirmation message box appears.
- Click YES to save the entered details.
- In the Properties pane of the added Application Control activity, set the Wait After time as 3000 as the next screen takes time to load.
Follow below steps to configure the subsequent steps of the automation process workflow example.
Click
- Click ADD to add the Application Control activity.
- Click the (Field Configuration) icon of the of the Application Control activity, and then bring the Oracle EBS application window in focus.
- Hover over the Find field, and the click the button. A dialog box appears.
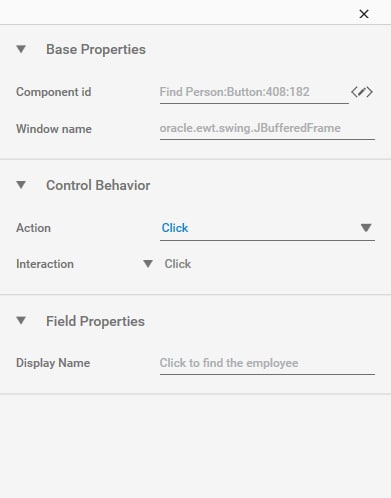
- In the Action list, select Click.
- In the Display Name, enter Click to find the employee. You can enter any name of your choice to be displayed.
- Close the dialog box. The Save Confirmation message box appears.
- Click YES to save the entered details.
- In the Properties pane of the added Application Control activity, set the Wait After time as 3000 as the next screen takes time to load.
Follow below steps to configure the subsequent steps of the automation process workflow example.
Select Listview item by index
- Click ADD to add the Application Control activity.
- Click the (Field Configuration) icon of the of the Application Control activity, and then bring the Oracle EBS application window in focus.
- Hover over the list view, and the click the highlighted area. A dialog box appears.
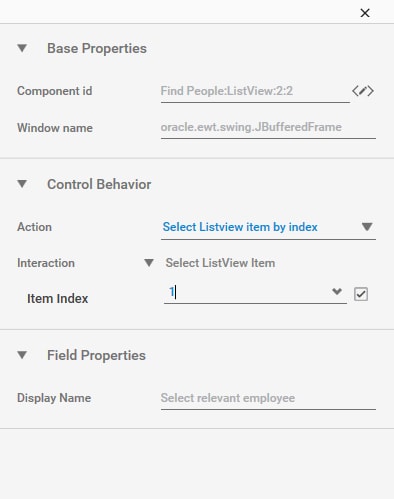
- In the Action list, select Select Listview item by index.
- In the Index field, enter 1 to select the second data available in the list.
- In the Display Name, enter Select relevant employee. You can enter any name of your choice to be displayed.
- Close the dialog box. The Save Confirmation message box appears.
- Click YES to save the entered details.
- Click ADD to add the Application Control activity.
- Click the (Field Configuration) icon of the of the Application Control activity, and then bring the Oracle EBS application window in focus.
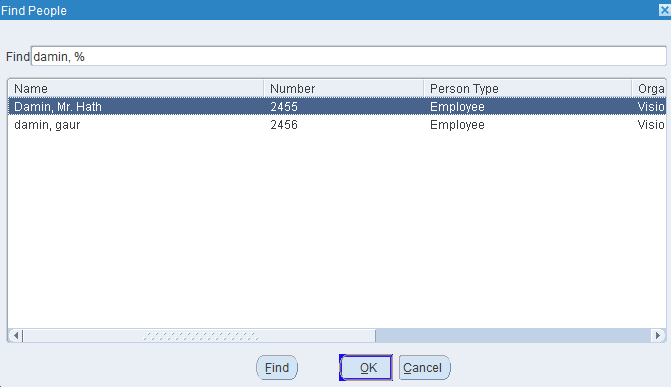
- Hover over the OK field, and the click the button. A dialog box appears.
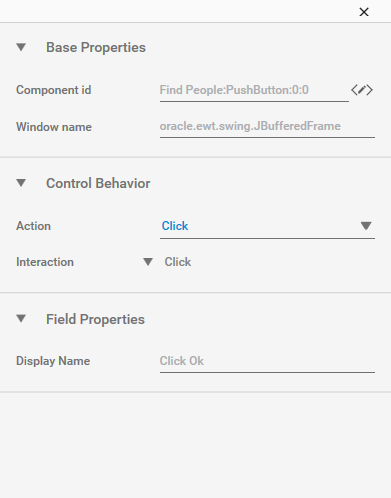
- In the Action list, select Click.
- In the Display Name, enter Click Ok. You can enter any name of your choice to be displayed.
- Close the dialog box. The Save Confirmation message box appears.
- Click YES to save the entered details.
- In the Properties pane of the added Application Control activity, set the Wait After time as 3000 as the next screen takes time to load.
Follow below steps to configure the subsequent steps of the automation process workflow example.
Get Text
- Click ADD to add the Application Control activity.
- Click the (Field Configuration) icon of the of the Application Control activity, and then bring the Oracle EBS application window in focus.
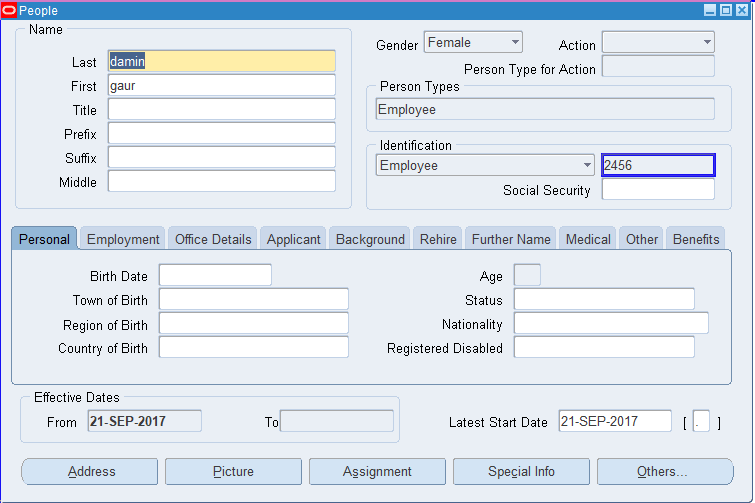
- Hover over the Identification field, and the click the field containing the employee Id. A dialog box appears.
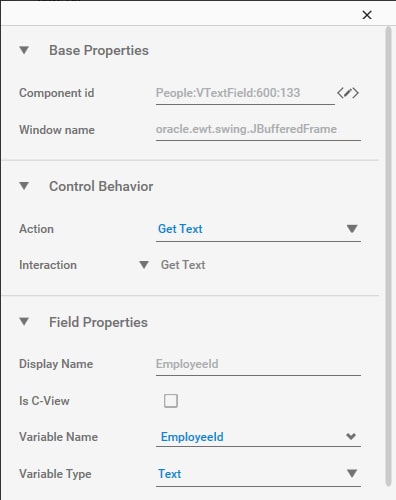
- In the Action list, select Get Text.
- In the Display Name field, enter EmployeeId. You can enter any name of your choice to be displayed.
- In the Variable Name field, enter EmployeeId. The variable gets created and the extracted data gets stored in this variable. You can define a relevant parameter in the Parameter bar and select the same from the Variable Name list.
- Close the dialog box. The Save Confirmation message box appears.
- Click YES to save the entered details.
- In the Properties pane of the added Application Control activity, set the Wait After time as 3000 as the next screen takes time to load.
Follow below steps to configure the subsequent steps of the automation process workflow example.
Activate Window
- Click ADD to add the Application Control activity.
- Click the (Field Configuration) icon of the of the Application Control activity, and then bring the Oracle EBS application window in focus.
- Hover over the Navigator, and the click the window to bring it in focus. A dialog box appears.

- In the Action list, select Activate window.
- In the Display Name field, enter Bring in focus. You can enter any name of your choice to be displayed.
- Close the dialog box. The Save Confirmation message box appears.
- Click YES to save the entered details.
- In the Properties pane of the added Application Control activity, set the Wait After time as 3000 as the next screen takes time to load.
Follow below steps to configure the subsequent steps of the automation process workflow example.
Select Navigate Item By Index
- Click ADD to add the Application Control activity.
- Click the (Field Configuration) icon of the of the Application Control activity , and then bring the Oracle EBS application window in focus.
- Hover over the Navigator window and click the pane where View function is available to extract the Id of that pane. A dialog box appears.
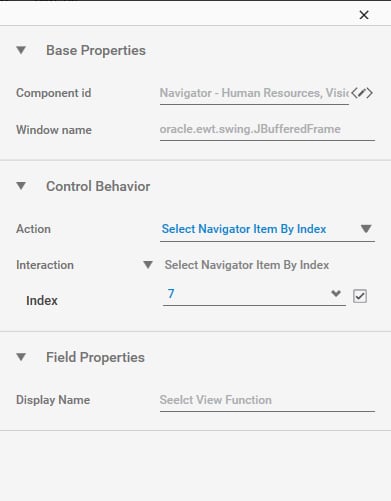
- In the Action list, select Select Navigator Item By Index.
- In the Index field, enter 7. The index of the View function is 7.
- In the Display Name, enter Select Payroll. You can enter any name of your choice.
- Close the dialog box. The Save Confirmation message box appears.
- Click YES to save the entered details.
- Click ADD to add the Application Control activity.
- Click the (Field Configuration) icon of the of the Application Control activity, and then bring the Oracle EBS application window in focus.
- Hover over the Expand button and then click the highlighted area. The dialog box appears.
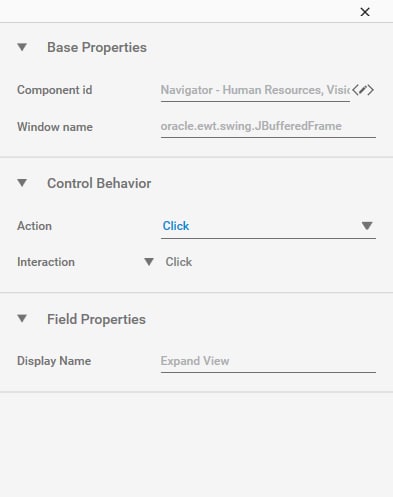
- In the Action list, select Click.
- In the Display Name, enter Expand View. You can enter any name of your choice to be displayed.
- Close the dialog box. The Save Confirmation message box appears.
- Click YES to save the entered details. Since we have to select and expand the first item, we would directly configure the action to expand the History function. If you need to select any other item, configure Select Navigator Item By Index and specify the index number accordingly.
- In the Properties pane of the added Application Control activity, set the Wait After time as 3000 as the next screen takes time to load.
- Click ADD to add the Application Control activity.
- Click the (Field Configuration) icon of the of the Application Control activity, and then bring the Oracle EBS application window in focus.
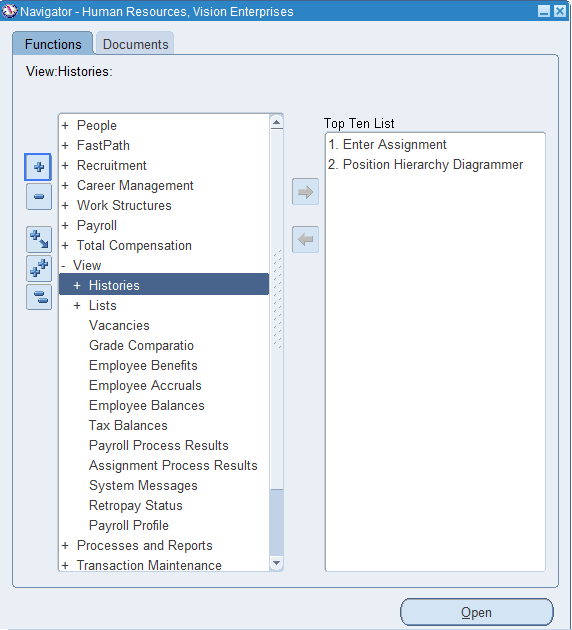
- Hover over the Expand button and then click the highlighted area. The dialog box appears.
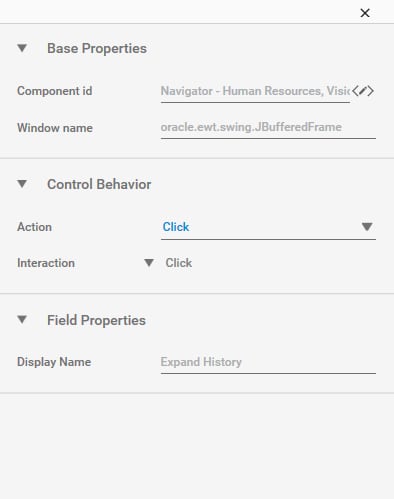
- In the Action list, select Click.
- In the Display Name, enter Expand History. You can enter any name of your choice to be displayed.
- Close the dialog box. The Save Confirmation message box appears.
- Click YES to save the entered details. Since we have to select and open the first item, we would directly configure the action to open the Work Assignment window. If you need to select any other item, configure Select Navigator Item By Index and specify the index number accordingly.
- In the Properties pane of the added Application Control activity, set the Wait After time as 3000 as the next screen takes time to load.
- Click ADD to add the Application Control activity.
- Click the (Field Configuration) icon of the of the Application Control activity, and then bring the Oracle EBS application window in focus.
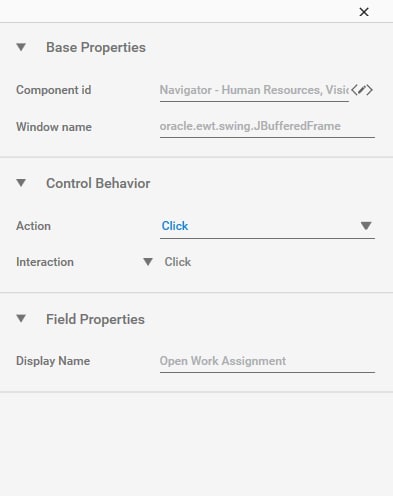
- Hover over the Open button and then click the highlighted area. The dialog box appears.
- In the Action list, select Click.
- In the Display Name, enter Click Open. You can enter any name of your choice to be displayed.
- Close the dialog box. The Save Confirmation message box appears.
- In the Properties pane of the added Application Control activity, set the Wait After time as 3000 as the next screen takes time to load.
- Click ADD to add the Application Control activity.
- Click the (Field Configuration) icon of the of the Application Control activity, and then bring the Oracle EBS application window in focus.
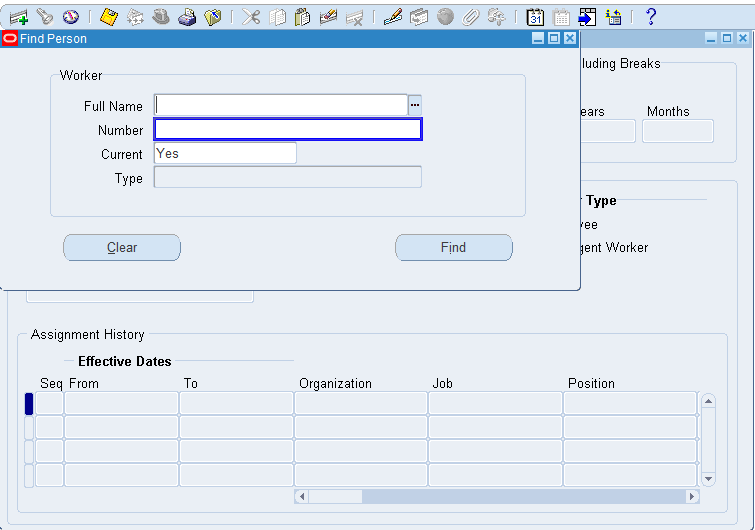
- Hover over the Number field and then click the highlighted area. The dialog box appears.
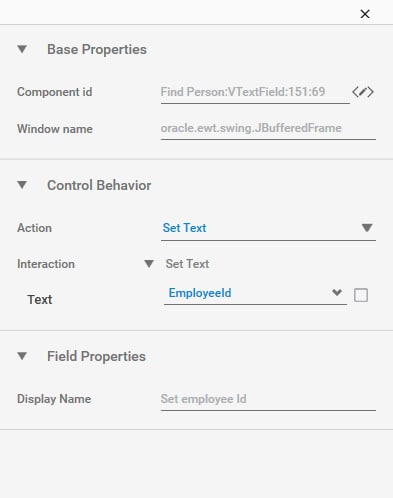
- In the Action list, select Set Text.
- In the Display Name, enter Set employee Id. You can enter any name of your choice to be displayed.
- Close the dialog box. The Save Confirmation message box appears.
- In the Properties pane of the added Application Control activity, set the Wait After time as 3000 as the next screen takes time to load.
- Click ADD to add the Application Control activity.
- Click the (Field Configuration) icon of the of the Application Control activity, and then bring the Oracle EBS application window in focus.
- Hover over the Full Name field and then click the highlighted area. The dialog box appears.
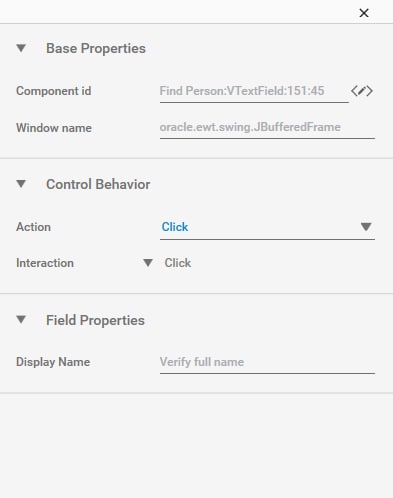
- In the Action list, select Click.
- In the Display Name, enter Click Verify full name. You can enter any name of your choice to be displayed.
- Close the dialog box. The Save Confirmation message box appears.
- In the Properties pane of the added Application Control activity, set the Wait After time as 3000 as the next screen takes time to load.
- Click ADD to add the Application Control activity.
- Click the (Field Configuration) icon of the of the Application Control activity, and then bring the Oracle EBS application window in focus.
- Hover over the Find button and then click the highlighted area. The dialog box appears.
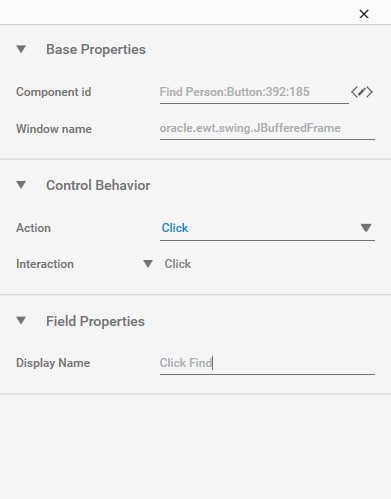
- In the Action list, select Click.
- In the Display Name, enter Click Find. You can enter any name of your choice to be displayed.
- Close the dialog box. The Save Confirmation message box appears.
- In the Properties pane of the added Application Control activity, set the Wait After time as 3000 as the next screen takes time to load.
- Click ADD to add the Application Control activity.
- Click the (Field Configuration) icon of the of the Application Control activity, and then bring the Oracle EBS application window in focus.
- Hover over the Organization field and then click the highlighted area. The dialog box appears.
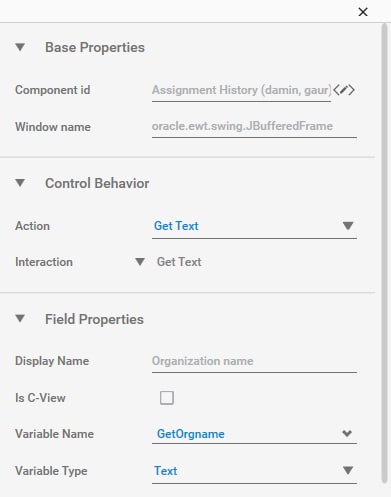
- In the Action list, select Get Text.
- In the Display Name, enter Click Find. You can enter any name of your choice to display to be displayed.
- In the Variable Name field, enter GetOrgname. The variable gets created and the extracted data gets stored in this variable. You can define a relevant parameter in the Parameter bar and select the same from the Variable Name list.
- Close the dialog box. The Save Confirmation message box appears.
- Click YES to save the entered details.
- Close the dialog box. The Save Confirmation message box appears.
- In the Properties pane of the added Application Control activity, set the Wait After time as 3000 as the next screen takes time to load.
To view the organization name in Automation Studio, let's add WriteLine activity. You can assign this process to a robot, if you want to execute this process outside Automation Studio.
- Add a WriteLine activity, and in the Text field, enter GetOrgname to print the organization name that gets saved in this variable.
- Save the process.
- Reset and then set up the environment.
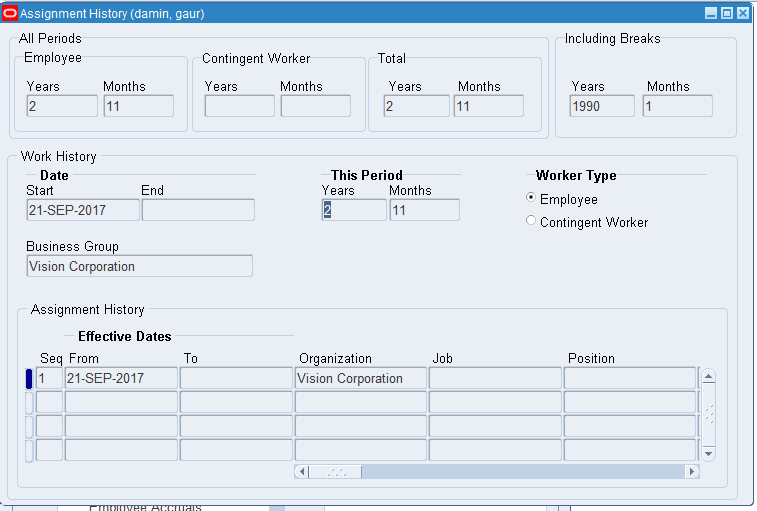
- Perform the test run. Below is the screen shot of how the process workflow looks:
You can view all the actions taking place on the Oracle EBS Form automatically. On the completion of the execution of the process workflow, the Assignment History of Damin Gaur gets displayed.
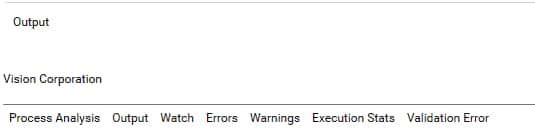
The Output console of Automation Studio displays the organization name retrieved.