Using Web Mode
Automation of a web application using the WEB MODE highlights the area that you can capture for configuration. Once the area is captured, perform the relevant action using the out-of-box interactions available. Scenarios where the WEB MODE does not work as expected, you can even switch between WINDOWS MODE and IMAGE MODE to configure the field. Following are the instructions to perform field configuration using the WEB MODE:
- Use the
 (Settings) icon of the required Application activity to launch Multimodal Interface and the configured application. By default WEB MODE is set. See Web Application automation to know how to use the activity.
 - Click the
 (Play) button to capture the steps that you want to perform within the web application. The application opens and the Play button changes to the
  (Recording) button.

- Hover over the field that you want to capture. The field gets highlighted with red box.

- Click the highlighted area. The Field Properties panel of the Web Mode appears. The fields that are mandatory are highlighted with red box.
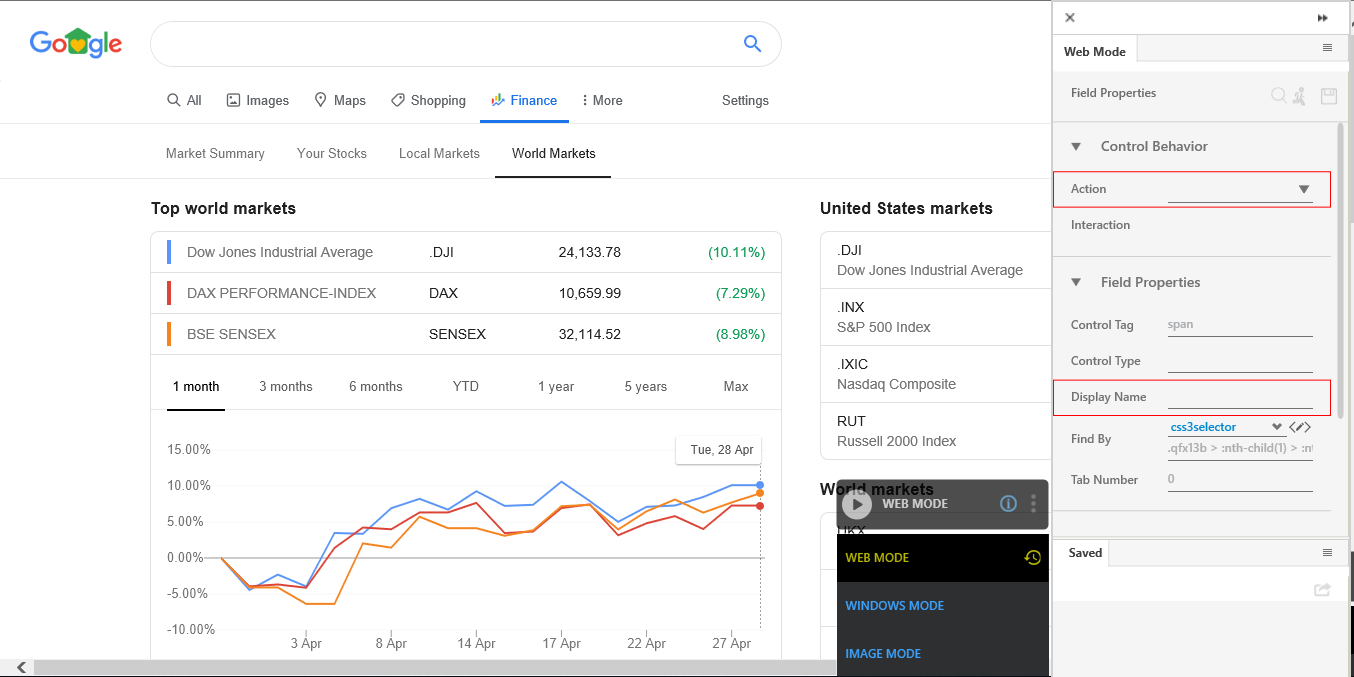
- In the Action list, select the action that you want to perform on the captured area. Other mandatory fields change depending on your selection from the drop down list. Enter the required details. Refer Field Properties table to know more about the available fields and their respective properties.
- Click the
 (Save) icon to configure the actions and other related fields.
 - Repeat step 2 through 6 to capture all the steps involved in the process. The fields configured and saved appears in the Saved pane of the Field Properties panel. You can edit or delete these steps in the Saved pane.
- Click the
 (Save configured field and return to studio) icon to save the field that you configured and return to the Studio menu.
The fields related to Web MODE are configured.
Web Mode Control Behavior and Field Descriptions
The properties of Web Mode fields are listed in the following table:
|
Property Name |
Usage |
|
Control Behavior |
|
|
Action |
It is the action or the interaction that can be performed on a web based application depending on the type of UI element as per the requirement. Available options are:
|
|
Interaction |
The corresponding interaction set against the selected action. |
|
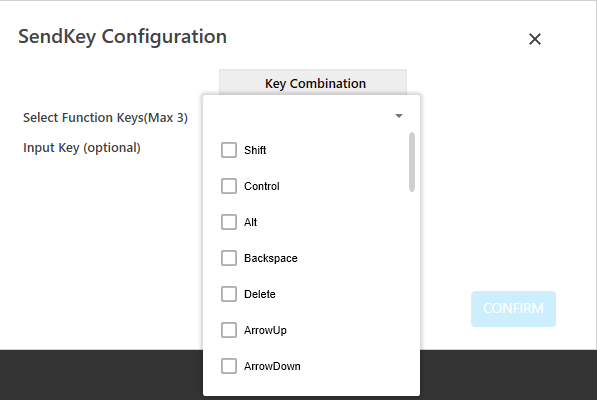
Appears if Action selected is SendKeys. |
|
|
Keys |
The key sent as input from the keyboard. It can be a combination of keys or a text. To configure the keys:
|
|
Appears if Action selected is Get Attribute and Set Attribute. |
|
|
Attribute |
Sub attributes or the properties of the html attribute selected. |
|
Appears if Action selected is Set Value, Set Attribute. |
|
|
Input Source |
The input value that must be provided. You must define a parameter in the Parameter bar to use this option. Select the checkbox beside Input Source, and enter the input value, if you want to set a default value. |
|
Appears if Action selected is Scroll By. |
|
|
XAxis |
Vertical scroll on the web page. The value must be entered in pixels. |
|
YAxis |
Horizontal scroll on the web page. The value must be entered in pixels. |
|
Appears if Action selected is Scroll Into View. |
|
|
Scroll To |
Determines the area till where the scroll must be done. Available options are:
Note: Internet Explorer does not support Centre option, so configuring center for ScrollTo displays exception at runtime. |
|
Dock Window This section appears only when Action selected is Shift Click. |
|
|
Dock Action |
When a link or button on the web page is opened in a new browser window, the Dock Action button enables the new window listed in the multimodal UI. You can select one of the windows in the multimodal UI to configure controls on the intended window. |
|
Interaction Attributes This section appears only when Action selected is Shift Click. |
|
|
Tab Name |
Name of the new window when it is docked in Engage application. |
|
Target Url |
URL of the new window that opens when Shift Click is selected in Action. |
|
Use Mouse |
Performs left click of the mouse on the link or the button to open in the new browser window. |
|
Field Properties |
|
|
Control Tag |
User specified identifier of the selected UI element. |
|
Control Type |
Control type of the UI element as defined by the developer. |
|
Display Name |
User specified display name of the action configured. |
|
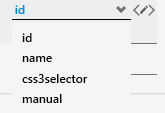
Find By |
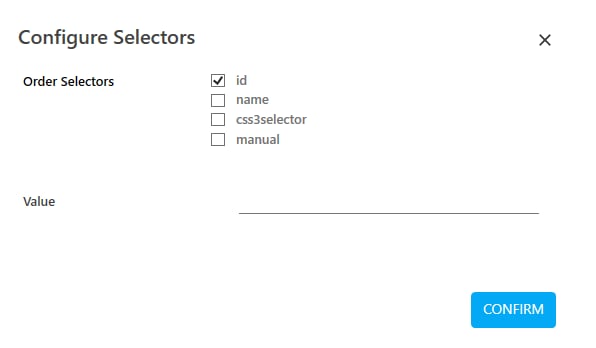
Locator of the UI element on a web application. Identifying the correct element forms one of the first step towards creating an automation workflow. Available options are:
You can configure backup selectors to avoid situations where the automation process is unable to find the primary selector. This is not a mandatory step. Follow the instructions to configure the backup selectors:
|
|
Appears if Action selected is Control Exists, Get Attribute. |
|
|
Is C-View |
Is applicable only for AssistEdge Engage. If selected, the field configuration captured in Automation Studio is visible in the Engage C-View tab. |
|
Tab Number |
The window tab on which you want to perform automation. |
|
Appears if Action selected is Control Exists, Get Attribute. |
|
|
Variable Name |
User defined name of the variable that stores the captured value. You can define the variable name here itself or predefine it in the Parameter bar. |
|
Appears if Action selected is Control Exists, Get Attribute |
|
|
Variable Type |
Type of the variable defined. Available options are:
|
|
Misc |
|
|
FrameNo |
Number of the frame of the web page where you want to perform the action. Automation Studio automatically detects the frame number based on the area selected during configuration. |
|
Item Index |
Index number of the selected item on the web page. |
|
Item Offset |
The distance between the target item and the anchor. |
 (
(
 (
(
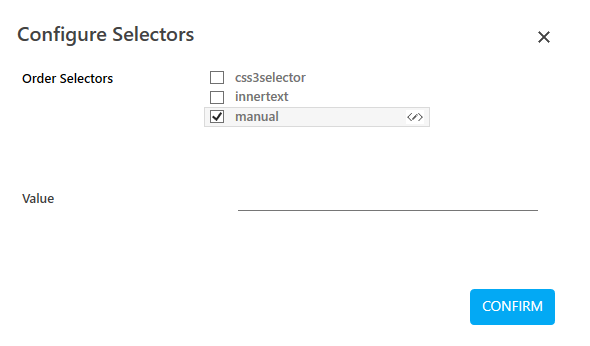
 (pencil) icon to configure the manual selector. The