Step-By-Step Guide to Use Decision Model and Decision Workbench to Predict Whether an Industrial Drilling Machine Requires Maintenance
Let's see an example to predict whether an industrial drilling machine requires maintenance using ML model hosted over the Rapidminer server. If the confidence score received by the ML model is more than the acceptable limit, the automation process workflow sends the status to the Decision Workbench application. The process Subject Matter Expert (SME) accesses Decision Workbench application for taking further action.
Once the process SME takes the decision and submits the response, the subsequent process gets executed.
Before executing the primary process the subsequent process must already be created and deployed, so let's first create the subsequent process. The subsequent process is created to record the drilling machine Id, decision of the process SME and the generated confidence score in a data table which is then exported into an excel sheet. See DataTable activity to know how to use the related activities.
To create the subsequent process:
- Create a new process.
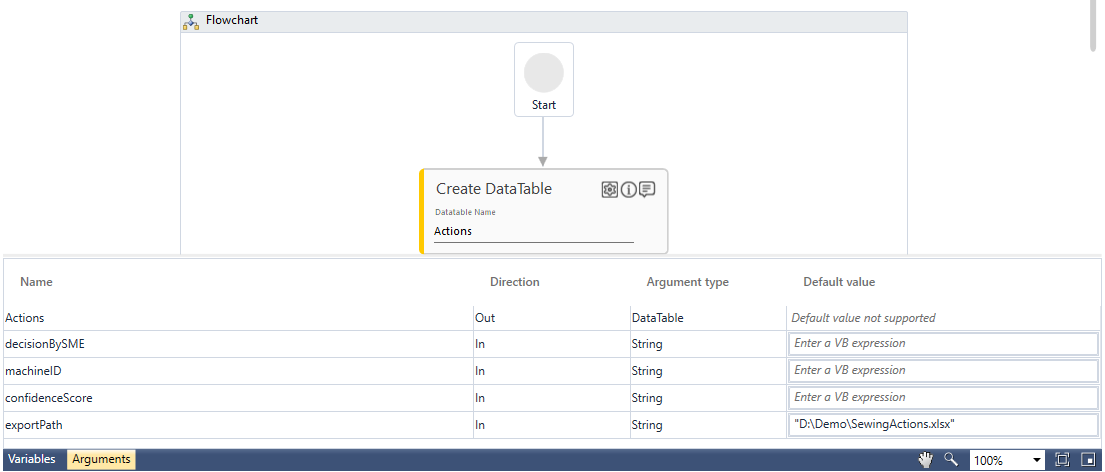
- In the Parameter bar, create In arguments:
- decisionBySME of String type. Its input value is received from the Decision Workbech application after the process SME submits the decision.
- machineID of String data type. Its input value would be mapped with the drilling machine Id specified in the parent process.
- confidenceScore of String data type. Its input value is mapped with the confidenceScore received by the ML model in the parent process.
- exportPath of String data type and assign D:\Demo\SewingAction.xlsx as the default value. It is the folder location where the data table gets exported in the specified excel file. You can use the excel file as per your business need.
- From the Canvas Tools panel, add the Create DataTable activity and enter Actions in the Datatable Name field. A data table gets created with the specified name.
- Click the
 (Settings) icon to add and define the columns in the data table. The Columns Definition dialog box appears. You can define the column headers of the data table in this window.
 - Click Add and enter machineID in the Name column. Select its Data Type as Text. Text is selected for String types as well.
- Click Add and enter confidenceScore in the Name column. Select its Data Type as Text.
- Click Add and enter Decision in the Name column. Select its Data Type as Text.

- Click CONFIRM to save the details.
- Add the Add Row activity to add the respective rows to the created data table.
- In the Datatable Name list, select Actions data table created above.
- Click the (Settings) icon to add a row in the existing data table. The Add Row Mapping dialog box appears. The column headers of the selected data table are displayed by default.
- In the Value column of the headers, align the arguments whose value you want to add to the respective rows.
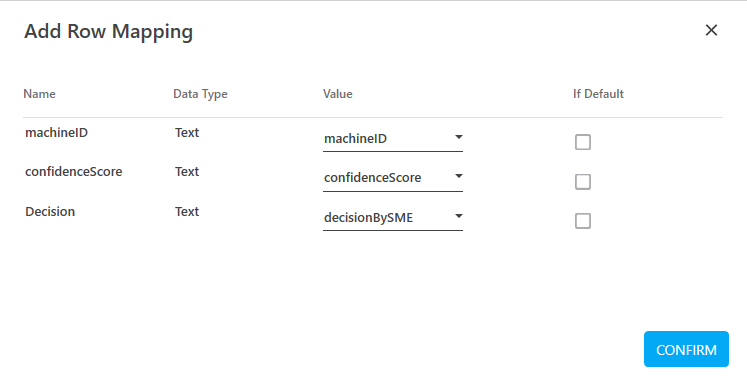
- Click CONFIRM to save the details.
- Add the Export DataTable activity to export the created data table to an excel file to view the values recorded and received from the parent process.
- In the Datatable Name list, select Actions.
- In the Export File Path list, select exportPath argument created above.
- In the File Type list, select Excel.
- Select the Include Headers and Overwrite Files check box.
- Save, publish and deploy the subsequent process so it can be used in the parent process.
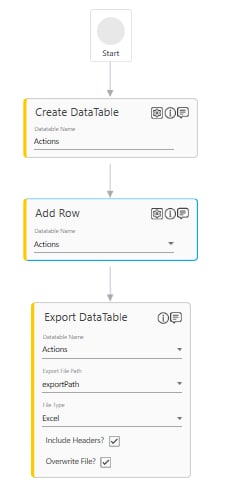
Below is the sample subsequent process workflow created:
To create the parent process workflow:
- In the Admin menu, add an application of Application Type- Contextual Intelligence Apps.
- In the Application Properties panel:
- In the HTTP Method list, select GET to retrieve the confidence score from the ML model JSON response.
- In the Server Url field, enter the URL of the Rapidminer server where the ML models are hosted.
- Select the Signin checkbox as sign in to the Rapidminer server is required.
- In the Display Name, enter MaintenancePrediction as the display name of REST API server.
- Click the
 (Save Properties) icon to save the application details. The Rapidminer server is configured in Automation Studio.
 - In the Studio menu, create a new process.
- In the Parameter bar, create In arguments:
- machineID of String type and set M_0222 as the value of the machine Id.
- mlResponse of String type to store the JSON response of the ML server.
- confidenceScore of String type to retrieve the confidence score from the JSON response of the ML server.
- decisionBySME of String type to store the decision submitted by the process SME in the Decision Workbench application.
- expiryTime of Int32 type and set 10. This is used to define the expiration time of the of the subsequent process transaction.

- From the Canvas Tools panel, add Application activity to the Flowchart designer on the Canvas.
- In the Application Type list, select WebApps.
- In the Select an Application list, select MaintenancePrediction available web application that you configured.

- Double click the Application activity and add the Decision Model activity.
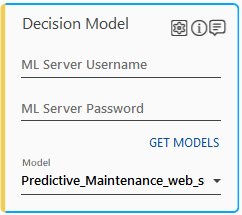
- In the ML Server Username field, enter the username of the configured ML server.
- In the ML Server Password field, enter the password of the configured ML server.
- Click GET MODELS to populate the available ML models in the Model list.
- In the Model list, select Predictive_Maintenance_web_service_with_parameters ML model. This model helps to predict the maintenance of the of the industrial drilling machine. It requires the machineID as the input parameter.
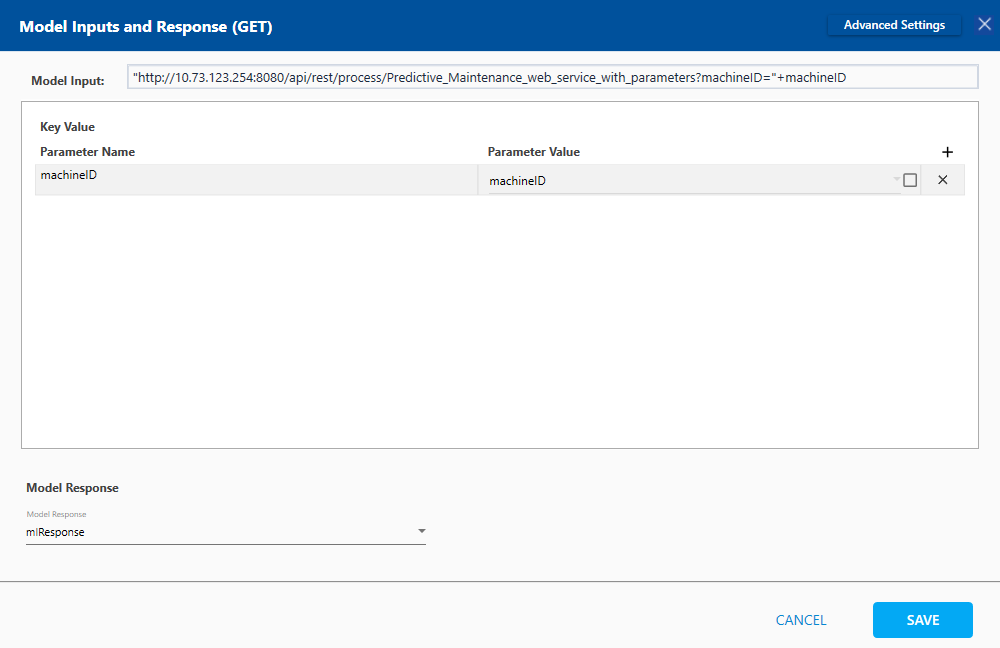
- Click the (Model Input and Response) icon to configure the ML model input and the output. The ML Model Inputs and Response (GET) dialog box appears.
- Click the
 (Add) icon to add input data for the URL query parameters.
 - In the Parameter Name field, enter machineID as the display name of the input parameter.
- In the Parameter Value list, select machineID parameter created above that holds the machine Id of the required machine.
- In the Model Response list, select mlResponse to store the required prediction data received in the JSON response of the ML model.
- Close the ML Model Inputs and Response (GET) dialog box.
- Click SAVE.
- Add the Assign activity and enter mlResponse.Replace(")","").Replace("(","") in the Value field. This removes ( and ) characters from the confidence score returned in the JSON string. Removing unwanted characters from the required JSON string can make the retrieval of the required data easier. If you do not want to remove the characters, make sure to use the relevant JSON path else error related to JSON parsing is received.
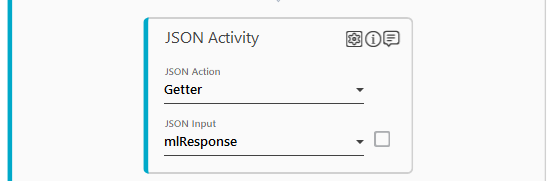
- Add the JSON activity to retrieve the prediction data from the JSON response returned by the ML model.
- In the JSON Action list, select Getter to retrieve the required information.
- In the JSON Input list, select mlResponse parameter that is used to store the JSON response of the ML model.
- Click the (Settings) icon, and then click Output Mapping to assign the fetched data to an argument for further processing. The Output Mapping dialog box opens.
- Click Add to provide details related to the mapping of output parameters. This lets you provide the path to retrieve the data.
- In the JSONPath field, enter $.confidenceno and select confidenceScore parameter in the Mapping Variable list.
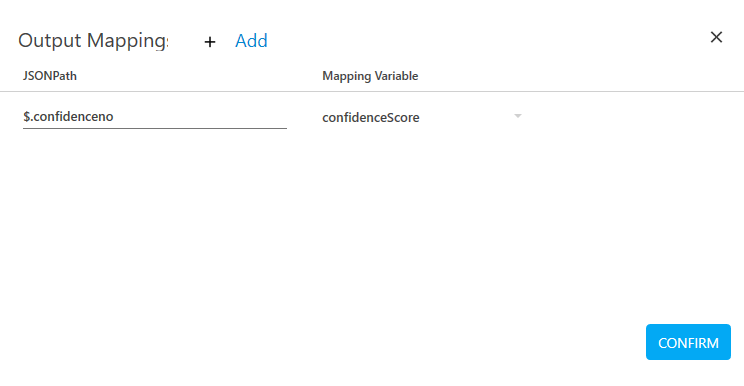
- Click CONFIRM to save the details.
- Add the WriteLine activity, and then enter confidenceScore parameter in the Value field to print the confidence score in the Output console of Automation Studio. This helps to verify the confidence score received in the JSON string. You can skip this step if you do not want to verify the score.
- Add the Write to Log file activity and enter "confidence score is: "+confidenceScore in the Message to Log field. This helps you to log and store the required confidence score in the Automation Studio log file for reference purpose. You can skip this step if you do not want to store the score in the log file.
- In the Level/Severity list, select Information.
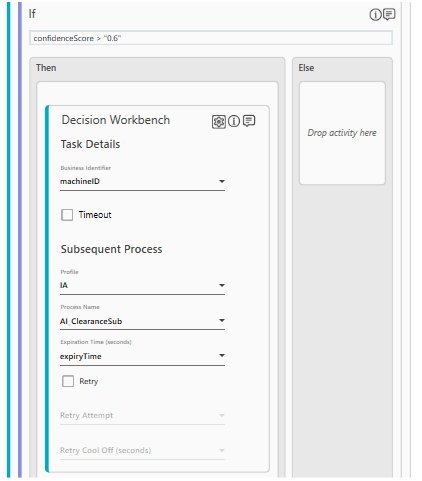
- Add the If activity, and enter confidenceScore > "0.6" expression in the Enter Expression here field.
- In the Then block, add the Decision Workbench activity. This creates a task in the Decision Workbench application if the confidence score is greater than 0.6 which is the acceptable limit based on which the process SME must decide wether maintenance is required.
- Under the Task Details section, select machineID parameter in the Business Identifier list.
- Under the Subsequent Process section, select AI in the Profile list. The subsequent process is published in the AI profile.
- In the Process Name list, select AI_ClearanceSub. AI_ClearanceSub is the subsequent process created above that must be executed after the process SME submits the decision in the Decision Workbench application.
- In the Expiration Time (Seconds) list, select expiryTime parameter that holds the value of the expiration time of the subsequent process transaction.
- Click the (Settings) icon and then click Configuration. The Configuration dialog box appears. Configure the details that must be sent to the Decision Workbench application:
- By default, in the Section column, Decision is available. Set the following details:
- Select decisionBySME in the in the Field column.
- Enter SME Decision in the Display Name column.
- Select confidenceScore in the Confidence Score column.
- Select Edit in the Permission list.
- Select List in the Edit Type column.
- Enter Approve,Reject in the Possible Values column.
- Click Add to add a new row entry. In the Section column, select Reference Data. Set the following details:
- Select machineID in the in the Field column.
- Enter Machine ID in the Display Name column.
- Click Add to add a new row entry. In the Section column, select Reference Data. Set the following details:
- Select confidenceScore in the in the Field column.
- Enter Confidence in the Display Name column.
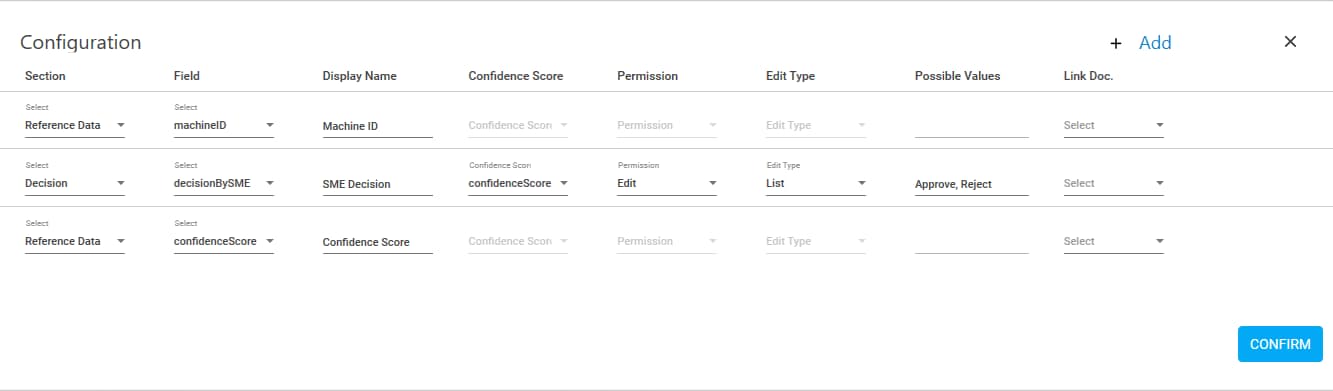
- Click CONFIRM. The fields and information to be displayed in the Decision Workbench application are configured.
- Click the (Settings) icon and then click Subsequent Process Input. The Subsequent Process's Argument Mapping dialog box appears. The list of process inputs of the selected subsequent process is displayed. We need to map the process inputs of the subsequent process with the parameters of the parent process.
- Select the Send Decision Value check box of the decisionBySME process input to indicate that the decision taken by the process SME in the Decision Workbench application must be sent as a process input to the subsequent process.
- In the Map to Parent column:
- Select decisionBySME parameter corresponding to decisionBySME process input of the subsequent process.
- Select machineID parameter corresponding to machineID process input of the subsequent process.
- Select confidenceScore parameter corresponding to confidenceScore process input of the subsequent process.
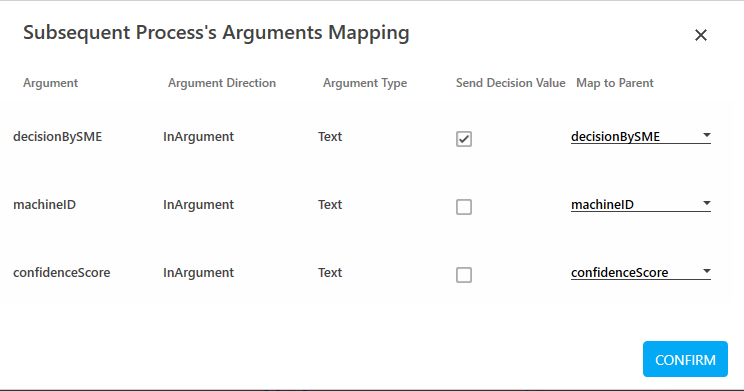
- Click CONFIRM.
- Save the process.
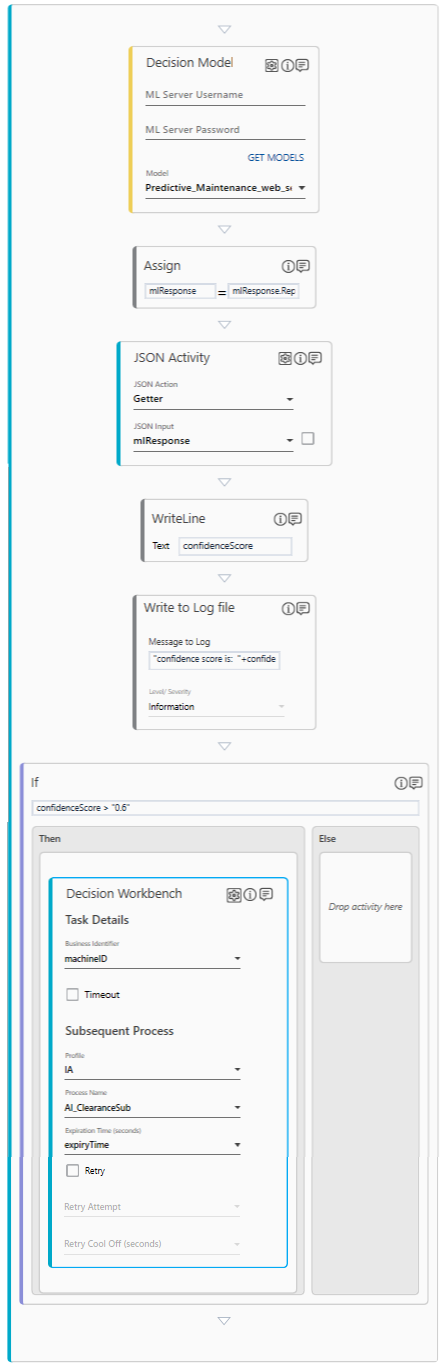
Below is the sample parent process workflow created:
- Setup the environment, enter the ML server login credentials and perform test run to test the activity.
The following output is received in the Output console of Automation Studio:

It displays the confidence score that was extracted from the JSON response of the ML server. Additionally, the JSON that gets created upon successful execution of the Decision Workbench activity during test run, is displayed.
Publish and deploy the parent process and assign it to a robot in control tower to create a task in the Decision Workbench application. Launch the Decision Workbench application and open the respective task. Take appropriate decision as the process SME and submit it. The decision is sent to the subsequent process for further action.
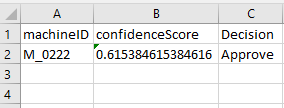
The specified details in the subsequent process gets exported in an excel file. Below is the sample of the excel file exported: