Creating Robot(s)
In the Robot View panel, you can create robot. The creating robot enables you to create two types of robot which includes Default Robot and Super Bot. The creation of multiple robots is supported in AE RPA. For more information about role access and role mapping, see Managing Role section in the RPA Administrator Module.
Role Access to Robot View
Only the role possessing required access can create a robot in the Control Tower.
Following roles can create robots:
- Super user
- Robot Creator
- Manager
- Robot Owner
To create robot in the Control Tower:
- Click Robot View.
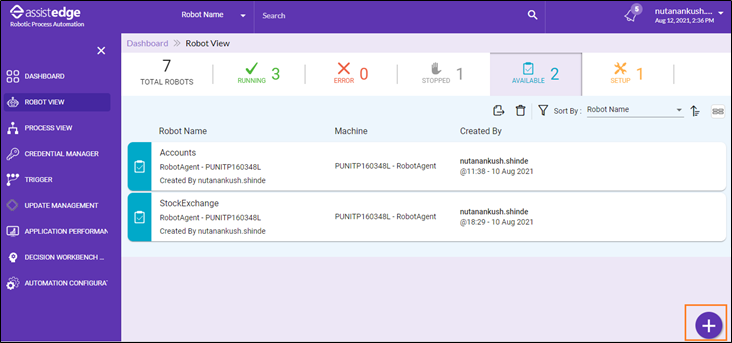
The Robot View page is displayed.
- Click the
 (Add Robot) icon to create a robot.

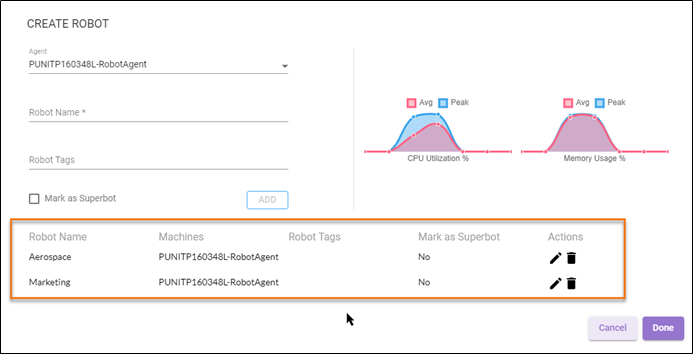
- In the Agent list, select the machine to deploy the robot.
- In the Robot Name, enter the name for robot.
- In the Robot Tags, enter the tags for the robot. Robot tags is an optional field to map relevant tags with the robot.
- Select the Mark as Superbot check box, if robot has to be created as a Superbot.
- Only one robot can be marked as Superbot in a single deployment.
- Superbot has the capability to dynamically reallocate itself to a priority profile depending upon the Queued Requests Volume, Request Expiry Prediction or SLA Scaling Prediction of the priority profile. For more information about dynamically reallocating the profile, see Dynamic Reallocation Criteria.
- Click ADD to add a robot.
Following table displays the robot details:
|
Particulars |
Description |
|
Robot Name |
This column displays the name of the newly added robot. |
|
Machine Name |
This column displays the name of the machine. |
|
Robot tag |
This column displays the tags added for the particular robot. |
|
Mark as Superbot |
This column displays the information whether the bot is marked as superbot. |

-
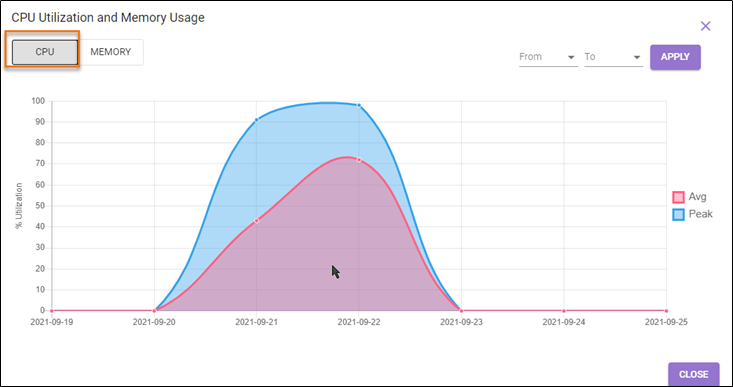
Following are the available trend charts on the create robot page, to decide of whether to continue with the robot creation on the respective machine or not.
-
CPU Utilization %: This trend chart provides the user with the trend of an Average and Peak CPU utilization % over the last 7 days.
-
Memory Usage %: This trend chart provides the user with the trend of an Average and Peak Memory Usage % over the last seven days
-

-
The robots are added to the list of robots to be created.
You can review the details. Additionally, you can edit or delete the robot details as required.- Click the
 (Edit) icon to edit the robot details.
Following table explains the edit robot details fields:Particulars
Description
Robot Name
Specify the name of robot.
Machine
In the Machine list, select the name of machine.
Robot Tags
Specify the new robot tags.
Mark as Superbot
Select the Mark as Superbot check box, if you want to mark the bot as super bot.
 Save
SaveClick Save to save the robot details.
 Close
CloseClick Close to close the robot details window.
- Click the
 (Delete) icon to delete the robot details.

- Click the
- Validate the details and then, click DONE to initiate robot creation on the respective machines.

A message appears as Robot <Robotname> created successfully.

The newly created robot moves to Available robot view.