Uploading Patches
Every patch is uploaded into the database with the help of Vanguard. Following are the two different actions that Vanguard performs during launch as part of patch upload.
· Once you start Vanguard, it checks for the available patches through the patch folder path available in the Web.config file of Vanguard.
· Continuously monitors the patch folder path for new patches. If found, it waits for a given duration mentioned in the Web.config file to allow the patch to get copied completely.
To upload a patch:
Access the Patch Path mentioned in the web.config file above. The default path of the folder is RPA_18.1 > patch-upload > patch.
Create a folder hierarchy patch-upload > patch folder under RPA_18.1 , if not already created by Vanguard.
Save the patch folder received from EdgeVerve Product Team, at RPA_18.1 > patch-upload > patch folder.
NOTE: |
For authenticity of the patch and security purpose, Vanguard can upload patches available within the support portal only. Patches that are available on the support portal are tested by the EdgeVerve Product Team. |
Once the received patch is saved in the Patch Path folder, Vanguard locates Client Path folder hierarchy, mentioned in the web.config file, within the PatchFiles.zip. It then searches for individual component folders within.
For each component folder found with files, Vanguard zips them and creates a zip folder for the patch, within the Zip Path mentioned in the Web.config file. Any existing folder for the same patch is deleted and created again. All the component .zip files that are created and then, saved in the zip folder.
The functionality verifies the size of each .zip file as per the value set in the Web.config file. If the .zip file does not exceed the maximum size mentioned, Vanguard uploads the component .zip files into the database; else, the .zip file is not uploaded.
If the zip file doesn’t get created in the Zip Path mentioned in the Web.config file, you need to provide access to the patch-upload folder to Vanguard IIS Application Pool.
To provide access:
1. Right click the patch-upload folder
2. Click Properties > Security > Edit. The Permissions for patch-upload window appears.
3. Click Add
4. The Select User, Computers, Service Accounts or Group window appears. Click Locations, select your server system name and then, click OK. Your server system name should appear in the From this Location field.
5. Enter IIS AppPool\<Your IIS Vanguard Application Pool Name> in the Enter the Object Name to select field.
6. To know your Vanguard application pool, open IIS Manager > Application Pool and search your Vanguard pool name.
7. For example, during installation, if you entered your site name as AssistEdgeSite, your Vanguard application pool is AssistEdgeSite-Vanguard-Pool, and you need to enter IIS AppPool\AssistEdgeSite-Vanguard-Pool in the Enter the Object Name to select field.
8. Click Check Names.
9. Click OK.
10. In the Permissions for patch-upload window, select the Vanguard application pool, and grant Full control
11. Click Apply, and then click OK to close the window.
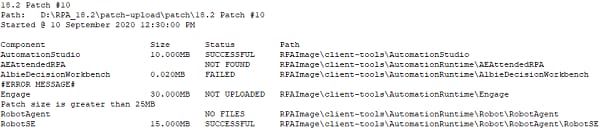
Along with the .zip files, an upload.log file is also created within the zip folder for the patch to track the upload status of each component, the size of created .zip file, and the path for each component within the patch. Below are the various status messages that are received in the log file:
Status |
Description |
SUCCESSFUL |
Signifies that the patch for the component is successfully uploaded. |
NOT FOUND |
Signifies that the component was not found at the path specified within the patch. |
NO FILES |
Signifies that the file for the component was not found at the specified path. |
NOT UPLOADED |
Signifies that the .zip file of the component exceeds the threshold limit set in the web.config file. |
FAILED |
Signifies that the patch upload failed due to an error. |
An example of a created upload.log file is shown below:
NOTE: |
· To re-upload a patch, delete the existing patch folder from Patch Path, and then save the relevant patch at the same location. · In High Availability (HA) environment, patches must be placed inside the Patch Path folder on all servers. |
Related Topics