Credential Manager
Credentials are a secure repository wherein the details used while logging into the applications are stored. These details are encrypted in the AssistEdge database and are accessible to only the authorized users.
Credentials Manager determines which profile, processes, users and roles have permission to access the information. Additionally, you can store the data in a third party application (CyberArk) which is integrated with RPA database.
As Super Admin, you can manage the credentials for profiles through the credential vault. A credential vault is a repository that holds the credentials, such as user Ids and passwords, for the profiles. Only, Robot Creator, Super User, Manager or Robot Owner can access the Credential Manager.
Following are the steps to be followed to trigger the automation request in the Control Tower:
1. Check the prerequisites to access Credential Manager tab
2. Login to Credential Manager with valid user name and password
3. Credential Manager comprises of two tabs, which includes:
§ CyberArk
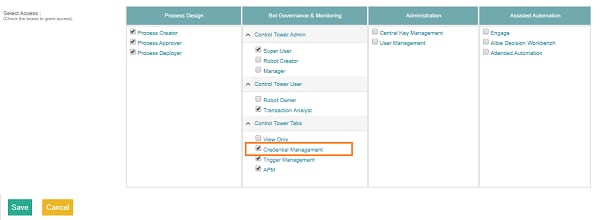
Prerequisites to access Credential Manager
Credential Manager tab is accessible only to the users with relevant access.
· Ensure that logged-in user role has page access to the Control Tower.
· Logged-in user should be mapped to <RPA_Trigger Management> access in the RPA Admin Module > Specify Role access. For more information about user role mapping, see Managing Roles.
Starting with Credential Manager
In the Credential Manager, you can update and save the credentials for applications mapped to the profiles assigned to a particular user Id.
To start with credential manager:
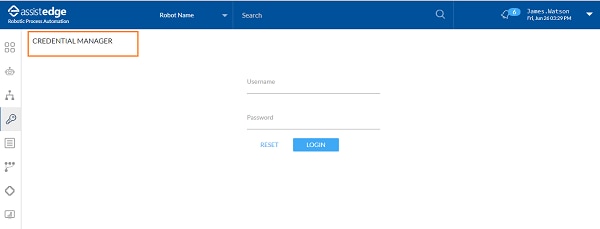
1. From
the Navigation panel,
click the  (Credential
Manager) icon.
(Credential
Manager) icon.
The CREDENTIAL MANAGER main page is displayed.
2. Enter the valid user name and password and then, click LOGIN.
|
NOTE: |
Click RESET to reset the login details of an application. |
A message appears as Authentication Successful. Then, logged-in user is logged in to the Credential Manager page.
3. You can update the credentials for all the applications under different profiles. Credential Manager comprises of two tabs, which includes:
o CyberArk
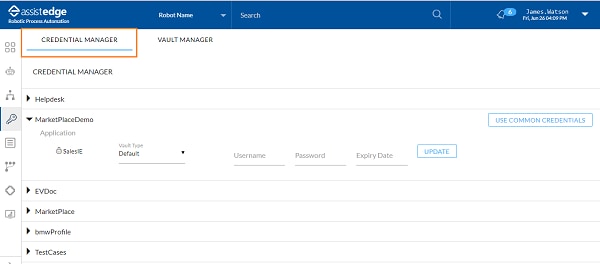
Credential Manager
Credential Manager enables you to update the application credentials depending upon the Vault Type. This tab displays all the linked profile with the applications. The available two vault types are:
Default (LDAP)
If the credentials are already saved in the vault manager, you can use Default type.
To start with default vault type in credential manager:
1. Click Credential Manager.
2. Click the Application profile for which the sign-in to application is required.
|
NOTE: |
The Non Sign In Applications field displays the applications for which the sign-in process is not required. |
3. In the Vault Type list, select the Default vault type.
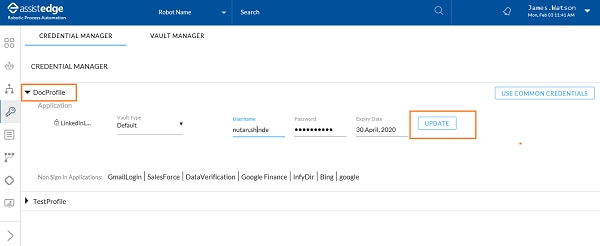
4. In the Username field, enter the username required to log into the application.
5. In the Password field, enter the password required to log into the application.
6. In the Expiry Date, select the expiry date for the default vault type. This field is optional and is relevant in case the e-mail alerts are to be sent days before password expiry.
· E-mail notifications are managed from the: <build folder path>\app\Modules-xxx\Vanguard\Monitor\Xml\MonitorAlerts.xml
7. Click UPDATE to update the credentials of the applications.
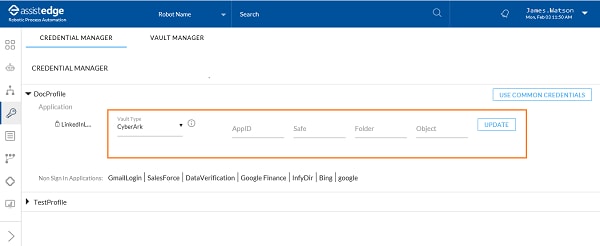
CyberArk
CyberArk Enterprise Password Vault is independent application which maintains application credentials. For more details about CyberArk, see https://www.cyberark.com/.
If you are using CyberArk Enterprise Password Vault to save the credentials, you can select the CyberArk type.
To integrate application, sign-in with CyberArk:
1. In the Vault Type list, select the CyberArk Vault type.
2. In the AppID field, enter the AppID that is authorized to provide access to CyberArk and retrieve credentials.
3. In the Safe field, enter the CyberArk safe ID that contains the credentials for the assets required to be scanned.
4. In the Folder field, enter the CyberArk folder ID that contains the credentials for the assets required to be scanned. The default folder is Root.
5. In the Object field, enter the name of the object that stores the credentials.
6. Click UPDATE.
|
NOTE: |
· These values are provided by the Integration partner and required to be filled in Credential Manager to fetch credential from CyberArk. · In case, you are not able to fetch credentials from CyberArk Vault then, you must perform certain configuration to fetch the credentials from CyberArk Valult. For more information, see Configurations to fetch credentials from CyberArk Valut section in the AE-RPA-Troubleshooting Guide. |
Use Common Credentials
Use Common Credentials enables you to store the credentials for multiple profiles at a time.
To use common credentials:
1. Click the Application profile for which the sign-in to application is required.
2. Click Use Common Credentials.
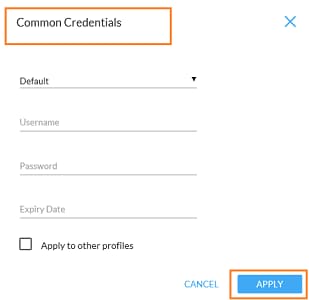
The Common Credentials window is displayed.
3. In the Select Vault list, select the preferred vault option.
4. In the Username field, enter the username required to log into the application.
5. In the Password field, enter the password required to log into the application.
6. In the Expiry Date, select the expiry date for the default vault type. This field is optional and is relevant in case the e-mail alerts are to be sent days before password expiry.
7. Select Apply to other profiles check box, to apply the same credentials for all the other profiles.
8. Click APPLY to apply all the changes to the profiles or else click CANCEL to discard the changes.
Vault Manager
Vault Manager enables you to set the default values of a particular vault. When the values are set in the credential manager, they directly populate all the application configured for the first time or are using vault type as Default .
To set value in Vault Manager:
1. In the Select Default Vault Configuration list, select the vault type.
2. In the AppID field, enter the AppID that is authorized to provide access to CyberArk and retrieve credentials.
3. In the Safe field, enter the CyberArk safe ID that contains the credentials for the assets required to be scanned.
4. In the Folder field, enter the CyberArk folder ID that contains the credentials for the assets required to be scanned. The default folder is Root.
5. Click SET DEFAULT, to save the credentials as default for CyberArk. The default credentials saved are prompted in the credentials manager.
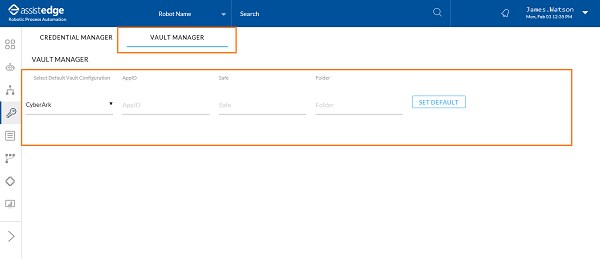
A message appears as Default Vault Values Set Successfully.
On This Page Hide