Import a Process
Process in Automation Studio can be imported from one environment to other environment as a zip file package. You can import one or multiple processes in a single package. The file package contains details related to the process like the dependent applications, code editors, microbots, search criteria and others.
Backward Compatibility of a Process
Below are some of the important points to know when you are importing a process from any of the previous versions of AE RPA to 18.1:
· The Ignore Error field of all the activities in the automation process workflow is set to NA in following scenarios:
§ While importing processes that does not have mechanism to handle exception.
§ During migration of the AE RPA versions prior to 17.5 (which is 17.0, 17.2, 17.3 and 17.4) to the latest version.
This ignores any error that might occur while running the process and ensures that the automation is completed. This makes the processes from earlier versions compatible with the latest versions.
Setting Ignore Error to NA bypasses the exception (if any) to let the automation flow continue; however, it marks the automation status as failure, in case of an exception.
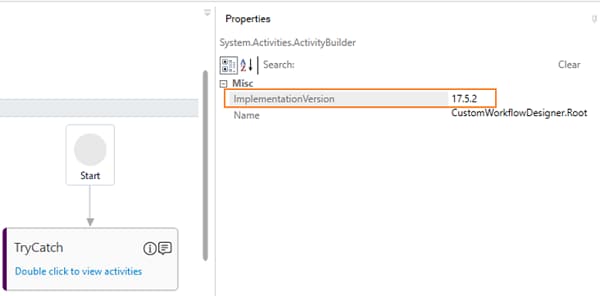
· While editing a process which is migrated from AE RPA version 17.5.2 to 18.1, if the implementation version of process is set to 17.5.2, it indicates that the exception handling for process is in compatibility mode. To update the exception handling to latest behavior, update the value of implementation version to 18.1 as shown in image below.
NOTE: |
· Implementation version is available in the Properties grid as shown in the image above. · Change Implementation version to 18.1, do not add alphabets in the implementation version as alphabets are not recognized by the system. · After the implementation version is changed to 18.1, change the generic exception message, “one of the child activity failed” with the specific message displayed by the activity. |
To import a process:
1. In the Migration tab, click Import.
2. Click Browse. The Import Package dialog appear.
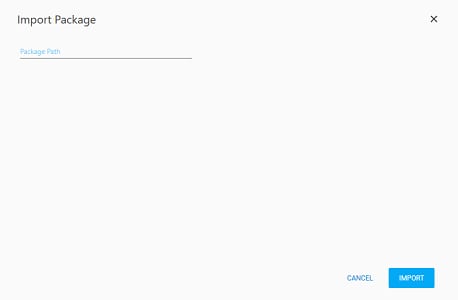
3. Click the Package Path field. Browse and select the process package zip folder to import.
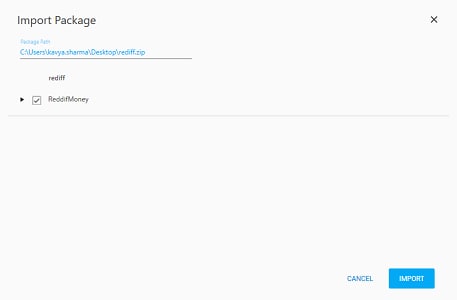
4. Click Open. The Import Package dialog box appears.
5. Select the process to be imported. You can import single or multiple processes contained in the process zip folder. You can click the arrow beside the process to view the details related to the process selected. If multiple processes are imported, following options and screens appear for each process.
6. Click IMPORT. The Import Process dialog box appears. Following options appear based on the duplicity of the process:
· If the process does not exist in the current environment, you can either rename the process (if required) or proceed with the same name. To rename the process:
a. Select the Rename the imported process check box. The Verify field appears.
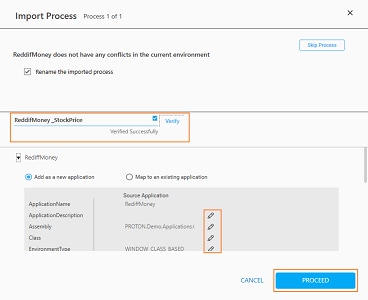
b. Enter a name of your choice and click Verify to check duplicity of the process name. If no process exists in the environment with name entered, a message for successful verification appears.
c. Click PROCEED.
· If a process or a profile already exists in the current environment, you can select any of the available options as per your requirement:
§ Overwrite in the existing profile- creates a copy of the existing process
§ Rename in the existing profile- renames the process, and then imports the package
§ Re-map process to different profile- maps the process with another profile
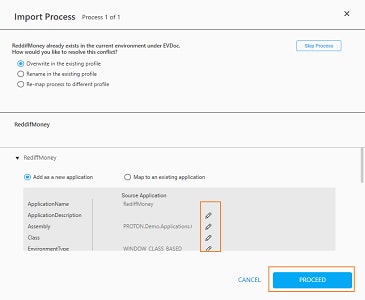
7. Click the arrow next to application name to view the details of the process being imported. Available options are - Add a new application and Map to an existing application.
· Add as a new application - This option lets you add the application involved in the process to be imported to the current environment as a new application. Additionally, you can edit the properties of the associated application. To edit the properties:
§ Click the  (pencil)
icon and edit the properties of the application involve
(pencil)
icon and edit the properties of the application involve
· Map to an existing application - This option lets you map the application involved in the process to be imported with the application that already exits in the current environment. You cannot edit the properties of the existing applications. To align the existing application with the process being imported:
§ In the ApplicationName list, select the existing application.
8. You can click Skip Process or CANCEL, if you do not want to proceed with the specified details. Repeat steps 2 through 6 to initiate a fresh process import or skip this step to proceed with the specified details.
9. Click PROCEED. The Import Package Summary with details process imported is displayed.
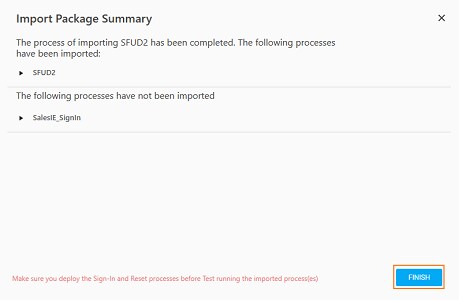
10. Click FINISH.
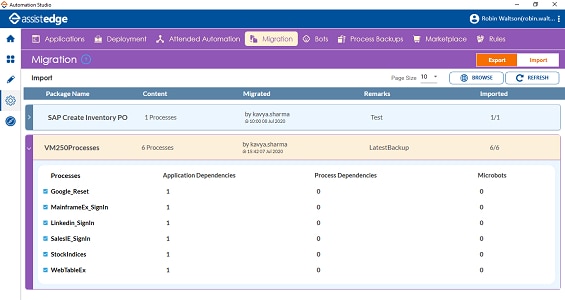
The process package is imported. The imported process starts appearing under the Import page.
Once process is imported, you can expand the process and view the number of process imported in the package. Additionally, you can view the associated applications, microbots and process dependencies of the expanded process.
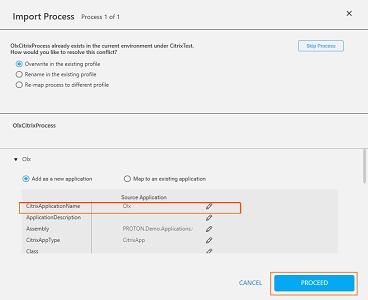
Importing a Process in Citrix Environment
Only those process can be imported that are exported from a Citrix environment.
The process to import an automation process deployed in the Citrix environment remains same as described above.
If any conflict occurs while importing the process:
· Map the application to a Citrix application in the target environment.
· If the required application is not available to map, you can rename the application by editing the CitrixApplicationName property.
NOTE: |
In case there is a conflict with the application name and the application name drop-down list does not show any application to map, it could possibly be because the application with same name belongs to a non-Citrix application type. In this case, rename the CitrixApplicationName property and then click PROCEED. |
Related Topics