Deployment
An automation process workflow must be deployed to send it to the server. From server, the deployed process is assigned to a robot for execution.
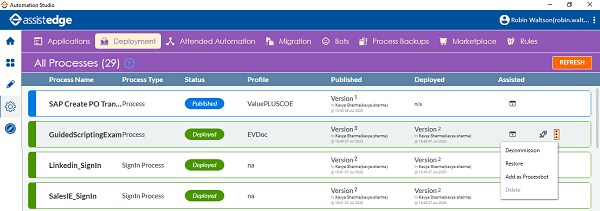
The Deployment tab allows you to deploy the published processes in Automation Studio. It also enables you to decommission the current version, restore the previous version and add a process as a processbot. Published as well as deployed processes are available in this tab. You can view details related to the process such as name of the process, its type, assigned profile, version and so on.
The version of the process displayed in the Deployment tab is the version that gets created while publishing the process. If you edit a deployed process, save and publish the deployed process again. The version of the saved and published process post deployment, gets incremental by 1. Every version of the saved process that you publish is available for deployment.
NOTE: |
· Only a published process can be deployed. · A deployed process cannot be deleted. |

By default, all the processes in Deployment tab are available in the Attended Automation tab of the Admin menu for configuration regarding attended automation. This makes the process available for search in Engage and AEAttendedRPA application but is not available for one click automation.
However, you can use the  (Viewable in Attended
Automation) icon to make it unavailable in the Attended
Automation tab in Automation Studio. Additionally, this
makes the process unavailable in Engage and AEAttendedRPA for
search but available for one click automation.
(Viewable in Attended
Automation) icon to make it unavailable in the Attended
Automation tab in Automation Studio. Additionally, this
makes the process unavailable in Engage and AEAttendedRPA for
search but available for one click automation.
NOTE: |
· A SignIn process is not viewable in the Attended Automation tab. · Refer AE-Engage-Cutomization Guide.pdf to know how to view a process for one click automation. |
Deploy a Process
1. In the Deployment tab, select the process
you want to deploy and then click the  (Deploy) icon . The dialog box
appears where you can enter details related to the deployment.
(Deploy) icon . The dialog box
appears where you can enter details related to the deployment.
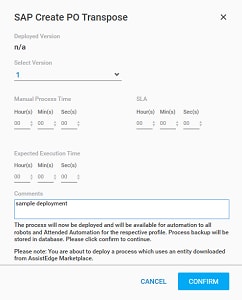
2. In the Select Version list, select the version of the process to deploy. By default, only 1 is available for deployment for the first time you are deploying the process.
3. Enter the following details:
· Manual Process Time- when a request in the process is executed manually, enter the expected process execution time in HH:MM:SS format. Hour(s) is in the range of 0-99 while Min(s) and Sec(s) are in the range 0-59. Manual Process Time is the average time taken by the process to be manually executed. This information is utilized at the reporting platform level, as a baseline, to gauge the saving on the process execution time due to automation.
· SLA- when a process is executed by a robot, enter the expected SLA for the process in HH:MM:SS format. Hour(s) is in the range of 0-99 while Min(s) and Sec(s) are in the range 0-59 . This information is used to calculate the service level (proportion of automation qualified requests which get executed within the SLA duration limit) of each process.
· Expected Execution Time- the time that is expected for a robot to complete each transaction of the process. This information is used to notify the configured e-mail ID in case robot takes more time than expected execution time to execute the transaction.
4. In the Comments box, provide additional information related to the deployment.
5. Click CONFIRM.
A message for successful deployment is displayed. Status of the published process changes to deployed. While status of the deployed process remains unchanged.
A process backup is created automatically after deployment and appears in the Process Backups tab of Admin menu. It helps to retrieve data or review previous versions. It lets you save time taken in creating manual backups.
Use the  (More) icon to:
· Decommission- decommissions the selected process
· Add as a Processbot- creates a processbot
· Restore- restores a previous version of the published or deployed process
· Delete- deletes the selected process
Decommission and Delete a Process
Decommissioning a process temporarily or permanently removes a process from the server. Once you decommission a process, you can delete the process to permanently remove it. Deleting an used or irrelevant process helps to maintain sanctity of data in the system.
To decommission a process:
1. In
the Deployment tab, select
the process you want to decommission, and then click the (More) icon.
2. Click Decommission. A confirmation message to decommission the process appears.
3. Click OK.
Status of the process changes to Decommissioned in the Deployment tab. In the Home tab, a decommissioned process appears with a red dot.
You can click the (Deploy)
icon again to make a decommissioned process active and available
for use.
To delete a decommissioned process:
1. In
the Deployment tab, select
the deployed process you want to delete, and then click the (More) icon
.
2. Click Delete. A confirmation message to delete the process appears.
3. Click OK.
The process is permanently deleted from the database.
Add as Processbot
It allows you to create a processbot of the selected process that helps you to migrate the processbot from one environment to another. This is another way of migrating a process.
The processbot created in the Deployment tab appears in the Bots tab under Processbots pane. See Processbots section in the Bots tab to know more about processbots.
NOTE: |
Only a deployed process can be added as a processbot until it is decommissioned. |
To add as processbot:
1. In
the Deployment tab, select
the process you want to add as a processbot, and then click the
(More)
icon .
2. Click Add as Processbot. The Add as Processbot dialog box appears.
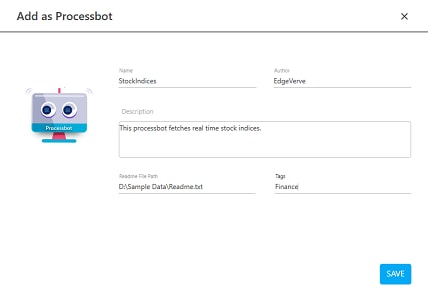
3. In the Author field, enter a name of the creator of the processbot.
4. In the Description box, enter information related to the processbot.
5. In the Readme File Path , browse the file that includes instruction related to usage of the processbot.
6. In the Tags field, enter a label of the processbot for identification. You can assign multiple processbot under same tag to keep them under one group for the ease of identification and access.
7. Click SAVE.
The process along with other sub-processes that are re-used in the primary process are added as a processbot.
Restore a Process
You can roll back a published or a deployed process to one of the earlier version in the Deployment tab.
NOTE: |
The latest version of the published or deployed process cannot be restored. |
To restore a process to previous version:
1. In
the Deployment tab, select
the process you want to restore to its previous, and then click
the (More) icon .
2. Click Restore. The Process version history dialog box appears.
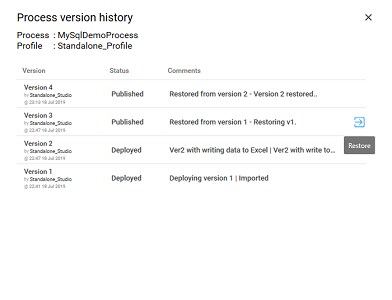
3. Click
the  (Restore)
icon. A confirmation box appears.
(Restore)
icon. A confirmation box appears.
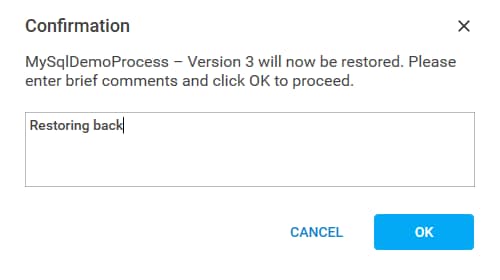
4. Enter a comment and the click OK.
The process is restore to the selected previous version.
On This Page Hide
Related Topics