Step-By-Step Guide to Use SAP Recorder to View the Vendor Details on SAP Thick Client Application
Let's see an example to view the vendor details of the specified vendor. The SAP Recorder activity captures and automates all the steps to navigate to the required page of the SAP thick client application and entering of the vendor name.
To navigate to the purchase order creation page of the SAP application:
1. Save the following assembly files in the Automation Studio folder saved on your system:
Component |
Version |
Interop.SAPFEWSELib.dll |
SAP ECC 6/ECC 4 and above |
Interop.SapROTWr.dll |
SAP ECC 6/ECC 4 and above |
stdole.dll |
SAP ECC 6/ECC 4 and above |
2. Download the mentioned assembly files from SAP website.
3. Save Interop.SAPFEWSELib.dll, Interop.SapROTWr.dll and stdole.dll in client-tools > AutomationStudio > bin > ThirdPartyDLLs folder. If you download/access Automation Studio from the Admin module, you must save the required DLLs at %localappdata% > EdgeVerve > AutomationStudio > bin > ThirdPartyDLLS folder.
4. Save Interop.SAPFEWSELib.dll, Interop.SapROTWr.dll and stdole.dll in client-tools > AutomationStudio > bin > Plugins > SAP folder. If you download/access Automation Studio from the Admin module, you must save the required DLLs at %localappdata% > EdgeVerve > AutomationStudio > bin > Plugins > SAP folder.
5. Save Interop.SAPFEWSELib.dll and Interop.SapROTWr.dll in the client-tools > AutomationStudio > bin > ProtonFiles > Dllrepository folder. If you download/access Automation Studio from the Admin module, you must save the required DLLs at %localappdata% > EdgeVerve > AutomationStudio > bin > ProtonFiles > Dllrepository folder.
6. Save Interop.SAPFEWSELib.dll and Interop.SapROTWr.dll in the client-tools > AutomationStudio > bin > SAPEngine folder. If you download/access Automation Studio from the Admin module, you must save the required DLLs at %localappdata% > EdgeVerve > AutomationStudio > bin > SAP folder.
7. In the Admin menu of Automation Studio, add an application of Application Type- SAPApps.
8. In the Application Properties panel:
· In the Connection Name field, enter the name of the active enterprise SAP connection.
· In the Display Name field, enter SAPDemo.
9. Click
the  (Save
Properties) icon to save the application details. The SAPApps application is configured.
(Save
Properties) icon to save the application details. The SAPApps application is configured.
10. Create a SignIn Process for the configured SAP application. Publish and Deploy the Sign In process to use it in the relevant automation process workflow created for the configured SAP application.
11. Create a new process.
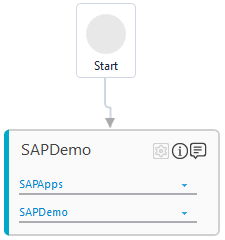
12. From the Canvas Tools panel, add an Application activity to the Flowchart designer on the Canvas.
13. In the Application Type list, select SAPApps.
14. In the Select An Application list, select SAPDemo.
15. Double click the Application activity, drag the SAP Recorder activity and drop inside the Application activity.
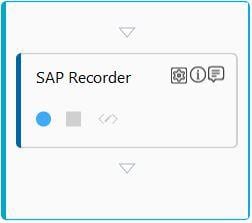
16. Click the  (Start Recording) icon to record
the steps performed in the SAP application. Keep the SAP application
page open before you start using the activity else the Start
Recording icon remains disabled. The SAP application window
appears.
(Start Recording) icon to record
the steps performed in the SAP application. Keep the SAP application
page open before you start using the activity else the Start
Recording icon remains disabled. The SAP application window
appears.
17. Navigate to the List Displays node of the SAP menu and then set the required value in the Vendor field. Click the Execute button to display the list of related vendors with other details.
18. In the SAP
Recorder activity, click the  (Stop Recording) icon to stop
capturing the steps. As a result of recording the steps in the
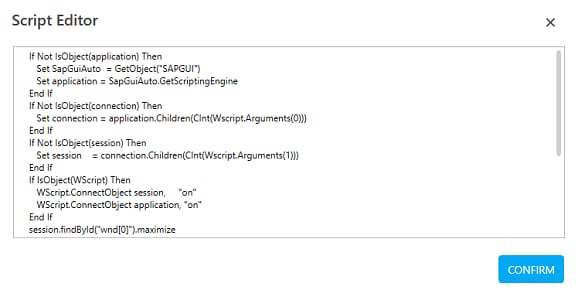
SAP application , related scripts are created in the Script
Editor of the Automation Studio. Below is the sample script
that gets created post the recording:
(Stop Recording) icon to stop
capturing the steps. As a result of recording the steps in the
SAP application , related scripts are created in the Script
Editor of the Automation Studio. Below is the sample script
that gets created post the recording:
19. Save the process.
20. Setup and perform test run. You can publish, deploy and assign this process to a robot, if you want to execute this process outside Automation Studio.
Observe that the SAP application gets launched by Automation Studio. The application automatically gets signed in and the purchase order creation page opens.
Related Topics