Rest API Activity
This activity allows you to utilize services of a REST API over http(s) protocol hosted at a given endpoint. You can define the actions performed by an API using the http methods - Get, Post, Put and Delete.
Using Automation Studio configure the information for the request made through an API such as the input path, URL parameters, http method, list of headers and body.
Prerequisite
Configure the REST API web service in Automation Studio where you want to perform the automation. Below are the minimum required properties for configuring the intended API. Remaining fields are auto populated with the default values already configured in Automation Studio . If you want to change the default values, refer WebAPI in Admin Capabilities section.
1. In the Admin menu, add an application of Application Type- WebAPI.
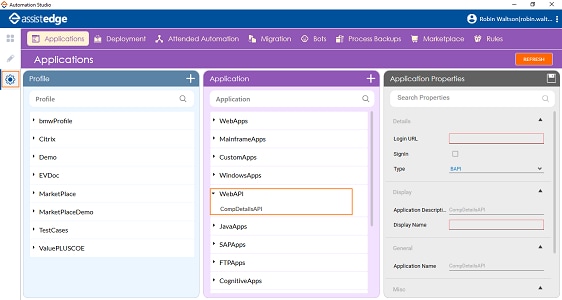
2. In the Application Properties panel:
· In the Login URL field, enter the base URL of the REST API you want to access.
NOTE: |
Do not provide the input path or the query parameter to the URL of the WebAPI application added to Automation Studio. It must be added in the automation process workflow using the Rest API activity. |
· In the Type list, select REST. By default, the value set is BAPI.
· In the Display Name, enter a desired name of the REST API application.
3. Click
the  (Save
Properties) icon to save the application details
(Save
Properties) icon to save the application details
The WebApps application is configured.
Using REST API Activity
You can use the REST API Activity by forming the complete API URL that includes configuring the endpoint, header and body as per the request type selected.You can use the REST API Activity by forming the complete API URL that includes configuring the base URL, input path, URL parameters, header and body as per the request type selected.
Configure Input Path and URL Parameters
You can pass the required resource as:
· Path Parameters: the actual value that returns the information requested. For example, in the REST API request URL, http://app-sample.com/v2/test/:parametervalue, /test forms the input path and prametervalue is the actaul value of the variable.
· Query Parameter: the key- value pair that must be passed as a parameter to return the request. For example, in the REST API request URL, http://app-sample.com/v2/test?parameter=value, /test forms the input path and parameter=value forms the query parameter.
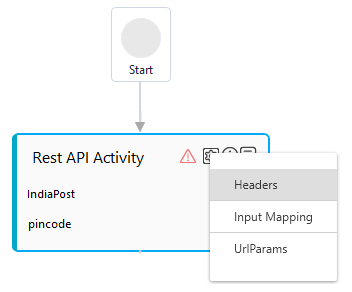
1. In the Canvas Tools pane, click Process Components to expand the tool and view the associated activities.
2. Drag the Rest API Activity and drop on to the Flowchart designer on the Canvas.
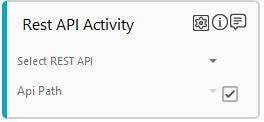
3. In the Select Rest API list, select the available WebAPI application of type REST.
4. In the Api Path, do one of the following:
· If path parameters form the part of the API URL:
§ Select the Manual API Name check box and then enter the input path of the API URL along with the required value of the variable to set as default value that is passed as a string. Alternatively, clear the Manual API Name checkbox, and then select the available parameter holding the value of the input path and the required variable. You must define the parameter in the Parameter bar to use this option.
· If query parameter forms the part of the API URL:
a. Select the Manual API Name check box, and then enter the input path of the API URL to set as default value that is passed as a string. Alternatively, clear the Manual API Name checkbox, and then in the API Path list, select the parameter holding the value of the input path of the API URL. You must define the parameter in the Parameter bar to use this option.
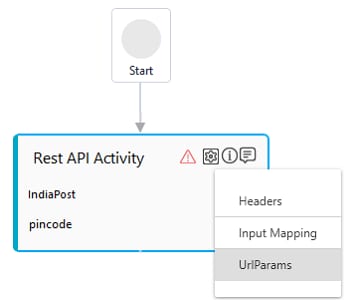
b. Click
the  (Settings)
icon, and then click UrlParams.
The API Params dialog
box appears.
(Settings)
icon, and then click UrlParams.
The API Params dialog
box appears.
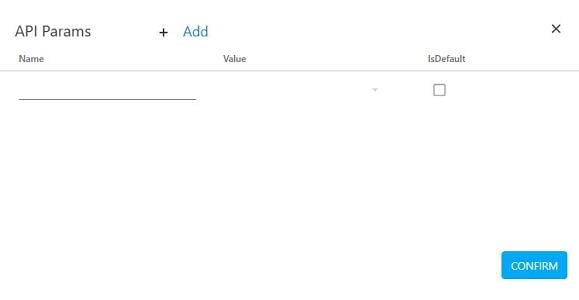
c. Click Add to provide the url parameters.
d. In the Name field, enter the name of input parameter that you want to map with the key-value pair of the query parameter. It is passed as an argument.
e. In the Value field, select the parameter to map with the key. You must define the parameter and its corresponding value in the Parameter bar to use this option. Alternatively, select the IsDefault checkbox to set the value entered as the default value.
5. In the Properties pane, select the type of action performed by the API in the Method list. Depending upon the method selected, configure Header and Request Body:
Configure Header
It allows you to authenticate the client for the resource being requested. It also provides information related to the API request and response. Headers are property-values pair such as Content-Type, Accept and others.
If the REST API authorization is default sign-in to the API, you can define it in the Admin menu of Automation Studio by selecting the Signin checkbox. Refer WebAPI for more details.
The default authorization configures an authorization header that cannot be overridden. You can override the default behavior by defining the custom authorization such as passing the required token by selecting CUSTOM in the Authorization field available in the Properties pane of the selected REST API activity.
To define the request/response and authorization header:
1. Click
the
(Settings) icon, and then click
Headers. The Header
Window appears.
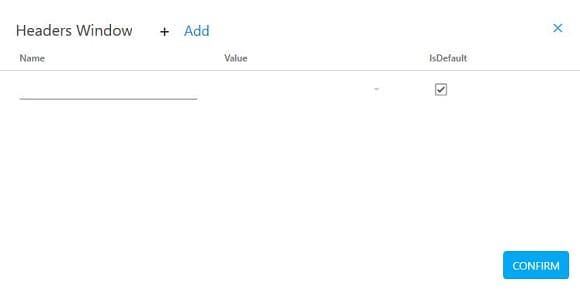
2. Click Add to provide the details related to the request/response and authentication headers.
3. In the Name field, enter a name of the property of the header.
4. In the Value field, select the parameter to map with the property. You must define the parameter in the Parameter bar to use this option. Alternatively, select the IsDefault checkbox to set the value entered as the default value.
5. Click CONFIRM.
The header is configured.
Configure Request Body
Contains information that you want to send to the server. The body can be in the JSON, or any multi-lingual string format. It is used with methods that update or insert a resource such as PUT, POST, and DELETE requests.
This section defines the body content of request type- PUT, POST and DELETE.
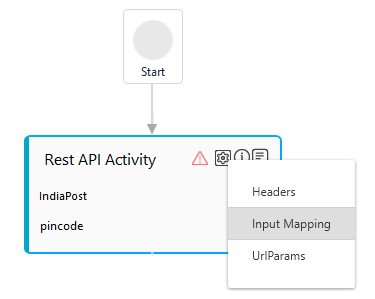
1. Click
the (Settings)
icon, and then click Input Mapping.
The Rest API
Input Screen appears.
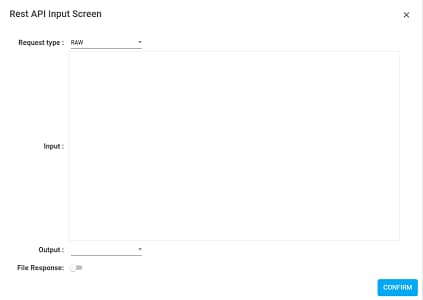
2. In the Request type list, select the request format. Available options are, RAW and BINARY. If selected Request type is:
· RAW- request is of JSON or html format :
a. In the Input text box, enter string, html or json object.
b. In the Output list, select the parameter to map the return value of the API. You must define the parameter in the Parameter bar use this option.
c. If the return value is a file, select the File Response button. The output parameter must contain the location with the filename where file needs to be downloaded.
· BINARY- request is of Binary file upload type, the Rest API Input Screen appears.

a. In the Binary File list, select the parameter that contain the location of the binary file to be uploaded . You must define the parameter in the Parameter bar use this option.
b. In the Output list, select the parameter to map the return value of the API. You must define an out parameter in the Parameter bar to use this option.
c. If the return value is a file, select the File Response button. The output parameter must contain the location with the filename where file needs to be downloaded.
NOTE: |
The file upload is not multipart/form data. It is binary file upload only. |
d. Click CONFIRM. The Request Body is configured.
The automation process workflow for the REST API is created.
REST API Activity Properties
The properties of a REST API Activity are listed in the following table and can be edited in the Properties grid on the right panel.
Property Name |
Usage |
Control Execution |
|
Ignore Error |
When this option is set to Yes, the application ignores any error while executing the activity. If set to NA, it bypasses the exception (if any) to let the automation flow continue; however, it marks the automation status as failure, in case of an exception. By default, this option is set to No. |
Delay |
|
Wait After |
Specify the time delay that must occur after the activity is executed. The value must be in milliseconds. |
Wait Before |
Specify the time delay that must occur before the activity is executed. The value must be in milliseconds. |
Misc |
|
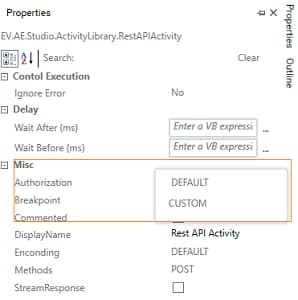
Authorization |
Signifies the type of API authentication configred. Available options are: · DEFAULT - Indicates the configured default authorization of the REST API is used for authentication. If the Signin checkbox is selected in the Admin menu at the time of configuring the REST API in Automation Studio, the basic authentication (username-password) is used even if the authorization header is present.While, if the Signin check box is not selected in the Admin menu and authorization header is required for the authentication, an error is recieved. · CUSTOM – Indicates the custom authorization is used for the authentication. If the Signin checkbox is selected in the Admin menu at the time of configuring the REST API in Automation Studio, the basic authentication (username-password) is taken into consideration and it cannot be overridden. If authorization header is present, you can override the values. Refer Configure Header section for more details. While, if the Sigin checkbox is not selected in the Admin menu and the authorization header is present, it is left unmodified. |
Breakpoint |
Select this option to mark this activity as the pause point while debugging the process. At this point, the process freezes during execution allowing you to examine if the process is functioning as expected. In large or complex processes, breakpoints help in identifying the error, if any. |
Commented |
Select this option to mark this activity as inactive in the entire process. When an activity is commented, it is ignored during the process execution. |
DisplayName |
The display name of the activity in the flowchart designer. By default, the name is set as REST API Activity. You can change the name as required. |
Encoding |
Specifies the type of character/content encoding used by the request body. Available options are - DEFAULT, UTF8 and ASCII. The DEFAULT option supports UTF8 encoding. |
Methods |
The request made by the API for retrieving or sending data to the server. Available options are: · GET- retrieves data from the server. · POST-sends data to the server for creating new resource. · PUT- updates an existing resource. · DELETE- deletes data or resource from the server. · OPTIONS- requests information about the communication options available for the target resource. |
StreamResponse |
Signifies if the output of the web request is a file. |
On This Page Hide
Related Topics