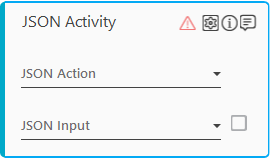
JSON Activity
This activity allows you to modify, form request, or retrieve data of the JSON response received from a REST API or other activities in Automation Studio.
Additionally, you can parse the existing JSON string by manually passing the JSON string using the in-built JSON editor.
It helps you to extract a relevant part of the response as per your requirement. You can even update the JSON object and the JSON array by using this activity. Refer https://www.json.org/json-en.html to understand the concept of JSON format in detail.
Using JSON Activity
1. In the Canvas Tools pane, click Process Components to expand the tool and view the associated activities.
2. Drag the JSON Activity and drop to the Flowchart designer on the Canvas.
3. The instructions related to JSON activity differs depending upon the supported JSON request method selected in the JSON Action list. Click the appropriate link to know the details:
· Setter- Modifies or adds a new property into a JSON Object as per the location provided.
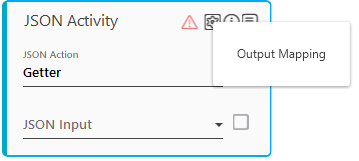
· Getter- Retrieves data from the JSON data file.
· Push- Adds new object into the JSON array.
NOTE: |
You must Close Environment and then Reset Environment every time you want to Test Run a process workflow, else, error is received or the test run fails. |
Setter
You can pass the JSON input for processing the request in two different ways. Click any of the following link to know the details:
· Pass data as JSON file - the data is passed as a JSON file for the update to be done.
· Pass data Manually - the data is passed manually in the editor available in Automation Studio for the update to be done.
Passing Data as JSON File
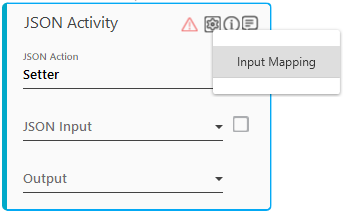
a. In the JSON Action list, select Setter.
b. In the JSON Input list, select the available parameter holding the JSON received JSON for further processing.
c. Click
the  (Settings)
icon, and then click Input Mapping.
The Input Mapping dialog
box opens where you can align the key-value pair with a parameter
to set in the JSON input.
(Settings)
icon, and then click Input Mapping.
The Input Mapping dialog
box opens where you can align the key-value pair with a parameter
to set in the JSON input.
d. Click Add. The fields and row appear where you can enter the relevant data.
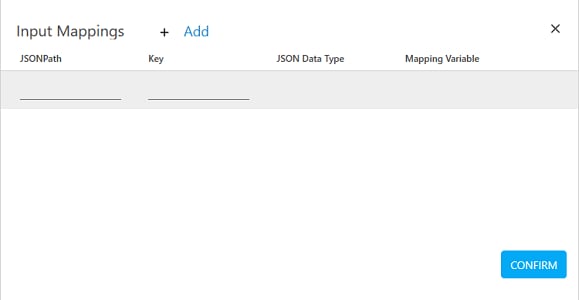
e. In the JSONPath field, enter the JSON path expression where you want to set the key-value pair. Refer https://goessner.net/articles/JsonPath/ to know the JSON path expression in detail.
f. In the Key field, enter the key that you want to insert in the JSON data file.
g. In the JSON Data Type list, select the data type of the value. Available options are:
§ Number - a double- precision floating-point format of an integer, fraction and exponent type such as digits 1-9, 0, positive integer, negative integer, .3, .6, e, e+ and so on.
§ String - a sequence of characters or a string literal.
§ Boolean - a datatype used for making decision. Can have only two values- true or false.
§ JSONArray - an ordered sequence of values.
§ JSONObject - an ordered collection of key-value pair.
§ Null - an empty value.
h. In the Mapping Variable list, select the parameter holding the value you want to align with the key. You must define a parameter in the Parameter bar to use this option.
i. Click CONFIRM to save the input mapping configuration. You are directed back to the JSON activity in the Canvas.
j. In the Output list, select the available parameter to store the output. You must define the parameter in the Parameter bar to use this option.
Passing Data Manually
a. In the JSON Action list, select Setter.
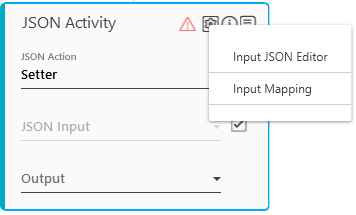
b. Select the check box beside JSON Input field to provide the JSON data manually.
c. Click
the (Settings)
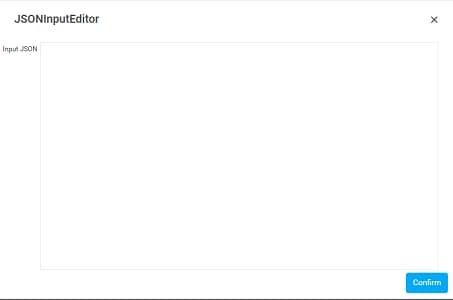
icon, and then click Input JSON
Editor. The JSONInputEditor
dialog box appears where you can enter the JSON data manually.
d. Enter the data in JSON format and then click Confirm.
e. Click
the (Settings)
icon, and then click Input Mapping
to map the key-value pair witha parameter to set in the JSON input. The Input
Mapping dialog box appears.
f. Click Add to provide details related to the mapping of input parameters. This lets you add the key of the key-value pair of the JSON input.
g. In the JSONPath field, enter the JSON path expression where you want to set the key-value data. Refer https://goessner.net/articles/JsonPath/ to know the JSON path expression in detail.
h. In the Key field, enter the key that you want to insert in the JSON data.
i. In the JSON Data Type list, select the data type of the value. Available options are:
§ Number - a double- precision floating-point format of an integer, fraction and exponent type such as digits 1-9, 0, positive integer, negative integer, .3, .6, e, e+ and so on.
§ String - a sequence of characters or a string literal.
§ Boolean - a datatype used for making decision. Can have only two values- true or false.
§ JSONArray - an ordered sequence of values.
§ JSONObject - an ordered collection of key-value pair.
§ Null - an empty value.
j. In the Mapping Variable list, select the parameter holding the value you want to map with the key.
k. Click CONFIRM to save the input mapping configuration. You are directed back to the JSON activity in the Canvas.
l. In the Output list, select the available parameter to store the output. You must define the parameter in the Parameter bar to use this option.
The key-value data is set in the JSON input.
Getter
You can pass the JSON input for processing the request in two different ways. Click any of the link to know the details:
· Passing data as JSON file - the data is passed as a JSON file is passed for the update to be done.
· Passing data Manually - the data is passed manually in the editor available in Automation Studio for the update to be done.
Passing Data as JSON File
a. In the JSON Action list, select Getter.
b. In the JSON Input list, select the available parameter to pass the JSON input file. The file gets stored in the selected parameter. You must define the parameter in the Parameter bar to use this option.
c. Click the (Settings) icon, and then click
Output Mapping to assign
the fetched data to a parameter for further processing. The Output Mapping dialog box opens.
d. Click Add to provide details related to the mapping of output parameters. This lets you provide the path to retrieve the data.
e. In the JSONPath field, enter the JSON path expression from where you want to retrieve the data. Refer https://goessner.net/articles/JsonPath/ to know the JSON path expression in detail.
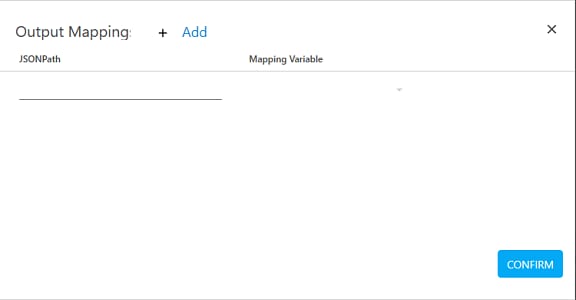
f. In the Mapping Variable list, select the parameter to map with the retrieved data . You must define the parameter in the Parameter bar to use this option.
g. Click CONFIRM to save the output mapping configuration.
Passing Data Manually
a. In the JSON Action list, select Getter.
b. Select the check box beside JSON Input field to provide the input manually.
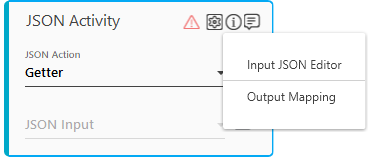
c. Click
the (Settings) icon, and then click Input JSON Editor to enter the
JSON data manually. The JSONInputEditor
dialog box appears.
d. Enter the input data in JSON format and then click Confirm. You are directed back to the JSON activity in the Canvas.
e. Click
the (Settings)
icon, and then click Output Mapping
to map the JSON path and the data fetched with a parameter. The
Output Mapping dialog
box opens.
f. Click Add to provide details related to the mapping of the output parameters.
g. In the JSONPath field, enter the JSON path expression from where you want to retrieve data. Refer https://goessner.net/articles/JsonPath/ to know the JSON path expression in detail.
h. In the Mapping Variable list, select the parameter to map with data retrieved.
i. Click CONFIRM to save the output mapping configuration.
The data is retrieved from the provided JSON input.
NOTE: |
Only single value can be fetched using Getter action. If multiple tokens are returned, system displays an error. |
Push
You can pass the JSON input for processing the request in two different ways. Click any of the link to know the details:
· Passing data as JSON file - the data is passed as a JSON file is passed for the update to be done.
· Passing data manually - the data is passed manually in the editor available in Automation Studio for the update to be done.
Passing Data as JSON File
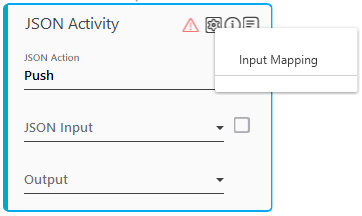
a. In the JSON Action list, select Push.
b. In the JSON Input list, select the available parameter to pass the JSON input file. The file gets stored in the selected parameter. You must define the parameter in the Parameter bar to use this option.
c. Click
the (Settings)
icon, and then click Input Mapping.
The Input Mapping
dialog box appears where you can map the value you want to add
at the end of the JSON array.
d. Click Add. The fields row appears where you can to enter the relevant data.
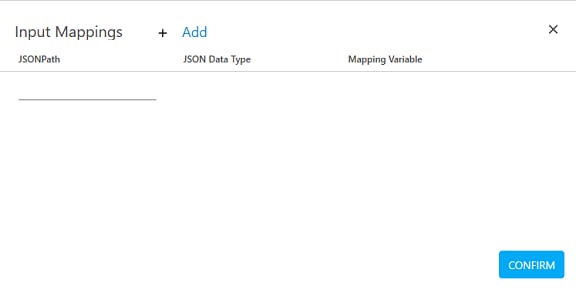
e. In the JSONPath field, enter the JSON path expression (that is path of the JSON array) where you want to set the value. Refer https://goessner.net/articles/JsonPath/ to know the JSON path expression in detail.
f. In the JSON Data Type list, select the data type of the value. Available options are:
§ Number - a double- precision floating-point format of an integer, fraction and exponent type such as digits 1-9, 0, positive integer, negative integer, .3, .6, e, e+ and so on.
§ String - a sequence of characters or a string literal.
§ Boolean - a datatype used for making decision. Can have only two values- true or false.
§ JSONArray - an ordered sequence of values.
§ JSONObject - an ordered collection of key-value pair.
§ Null - an empty value.
g. In the Mapping Variable list, select the parameter to map with value you want to add. You must define the parameter in the Parameter bar use this option.
h. Click CONFIRM to save the input mapping configuration. You are directed back to the JSON activity in the Canvas.
i. In the Output list, select the available parameter to store the output. You must define the parameter in the Parameter bar to use this option.
Passing Data Manually
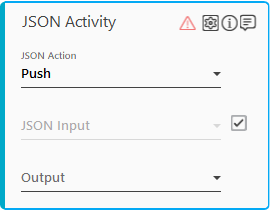
a. In the JSON Action list, select Push.
b. Select the check box beside JSON Input field to provide the JSON input as default value.
c. Click
the (Settings)
icon, and then click Input JSON
Editor to enter the JSON input manually. The JSONInputEditor
dialog box appears.
d. Enter the data in JSON format and then click Confirm. You are directed back to the JSON activity in the Canvas.
e. Click
the (Settings)
icon, and then click Input Mapping
to map the value you want to add at the end of the JSON array. The Input
Mapping dialog box appears.

f. Click Add to provide details related to the mapping of input parameters.
g. In the JSONPath field, enter the JSON path expression (that is location of the JSON array) where you want to add the value. Refer https://goessner.net/articles/JsonPath/ to know the JSON path expression in detail.
h. In the JSON Data Type list, select the data type of the value. Available options are:
§ Number - a double- precision floating-point format of an integer, fraction and exponent type such as digits 1-9, 0, positive integer, negative integer, .3, .6, e, e+ and so on.
§ String - a sequence of characters or a string literal.
§ Boolean - a datatype used for making decision. Can have only two values- true or false.
§ JSONArray - an ordered sequence of values.
§ JSONObject - an ordered collection of key-value pair.
§ Null - an empty value.
i. In the Mapping Variable list, select the parameter whose value you want to map. You must define the parameter in the Parameter bar use this option.
j. Click CONFIRM to save the input mapping configurations.
k. In the Output list, select the available parameter to store the output. You must define the parameter in the Parameter bar to use this option.
The data is added at the end of the JSON array.
JSON Activity Properties
The properties of a JSON Activity are listed in the following table and can be edited in the Properties grid on the right panel.
Property Name |
Usage |
Control Execution |
|
Ignore Error |
When this option is set to Yes, the application ignores any error while executing the activity. If set to NA, it bypasses the exception (if any) to let the automation flow continue; however, it marks the automation status as failure, in case of an exception. By default, this option is set to No. |
Delay |
|
Wait After |
Specify the time delay that must occur after the activity is executed. The value must be in milliseconds. |
Wait Before |
Specify the time delay that must occur before the activity is executed. The value must be in milliseconds. |
Misc |
|
Breakpoint |
Select this option to mark this activity as the pause point while debugging the process. At this point, the process freezes during execution allowing you to examine if the process is functioning as expected. In large or complex processes, breakpoints help in identifying the error, if any. |
Commented |
Select this option to mark this activity as inactive in the entire process. When an activity is commented, it is ignored during the process execution. |
DisplayName |
The display name of the activity in the flowchart designer. By default, the name is set as JSON Activity. You can change the name as required. |
On This Page Hide
Related Topics