Excel Applications
This activity allows you to automate the redundant and tedious task performed on an excel application such as reading and writing data, data extraction and migration, comparing data in columns or rows, executing analysis reports, integrating with other applications and databases and so no.
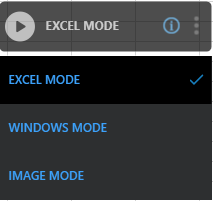
You can automate the cells and worksheet of the excel file using the EXCEL MODE of the Multimodal Interface. Additionally, WINDOWS MODE and IMAGE MODE are available which is useful to automate the ribbon and menu controls of the excel file.
Configuring Excel Application
Configure the excel application in Automation Studio where you want to perform the automation. Below are the minimum required properties for configuring the intended excel application. If you want to define remaining properties, refer ExcelApps in the Admin Menu.
1. In the Admin menu, add an application of Application Type- ExcelApps. The Add Application dialog box opens.
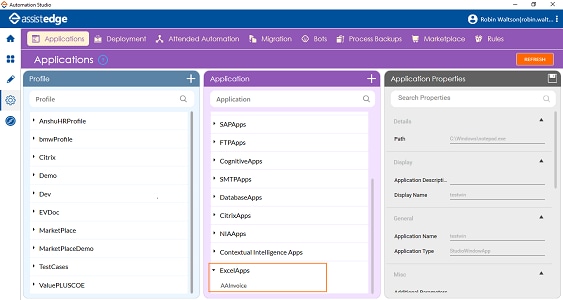
2. In the Application Name field, enter a desired name of excel application you want to add. The name must not contain any special character or space.
3. Click ADD and browse for the excel file you wan to configure. Click Open.
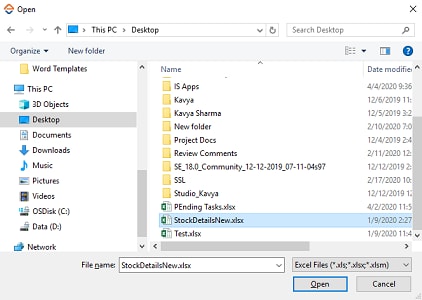
The excel application is configured.
Using Excel Application Activity
1. In the Canvas Tools pane, click Process Components to expand the tool and view the associated activities.
2. Drag the Application activity and drop on to the Flowchart designer on the Canvas.
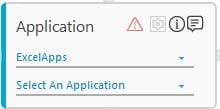
3. From the Application Type list, select ExcelApps. You must have at least one application added for it to appears in the list. See Admin Capabilities to know how to add application before using an activity.
4. In the Select An Application list, select the configured excel file that you want to automation. Alternatively, you can a add a new excel application at this point of time. To add an excel file:
a. In the Select An Application list, click Add New Application. The Add New Application dialog box appears.
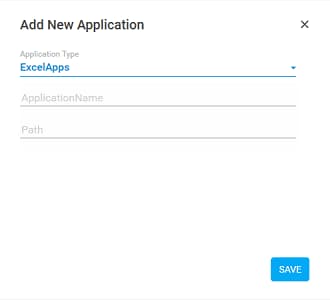
b. In the Application Name field, enter a desired name of the application.
c. In the Path field, enter the path of the excel file (along with the file name) available on the system.
d. Click SAVE. The excel file is added.
5. Click
the  (Settings)
icon to launch the EXCEL MODE interface.
The configured excel file appears along with the EXCEL
MODE interface.
(Settings)
icon to launch the EXCEL MODE interface.
The configured excel file appears along with the EXCEL
MODE interface.
6. Click
the  (Play) icon,
to start capturing the automation steps that you want to perform
within the excel file. The Play
icon changes to the
(Play) icon,
to start capturing the automation steps that you want to perform
within the excel file. The Play
icon changes to the  (Recording)
icon. You can switch among EXCEL
MODE, WINDOWS MODE
and IMAGE MODE based on
the requirement.
(Recording)
icon. You can switch among EXCEL
MODE, WINDOWS MODE
and IMAGE MODE based on
the requirement.
7. Click the area that you want to capture as part of the automation process workflow. The Field Properties panel of the Excel Mode appears. The fields that are mandatory are highlighted with red box.
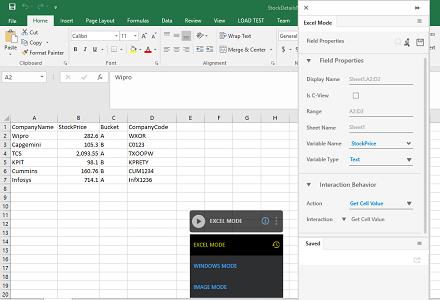
8. In the Action list, select the action that you want to perform on the captured area. Other mandatory fields changes depending on your selection from the drop down list.
9. Enter details of all the mandatory fields and other relevant fields as per your requirement.
10. Click
the  (Save) icon to configure
the fields.
(Save) icon to configure
the fields.
11. Repeat
steps 6 through 10 to capture all the steps involved in
the automation process workflow. With the help of  (Run
Now)icon, you can perform the action related to the configured
field to see if the intended configuration is done.
(Run
Now)icon, you can perform the action related to the configured
field to see if the intended configuration is done.
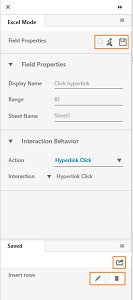
The field that you configured and saved appears in the Saved pane of the Field Properties panel. You can edit or delete these steps in the Saved pane.
12. Click
the  (Save
configured field and return to studio) icon to save the
field that you configured and return to the Studio
menu.
(Save
configured field and return to studio) icon to save the
field that you configured and return to the Studio
menu.
The fields are configured and the Application activity for Application Type- ExcelApps is created.
Excel Mode Field Properties
The properties of Excel Mode fields are listed in the following table:
Property Name |
Usage |
Field Properties |
|
Display Name |
User specified display name of the excel element selected. |
Range |
A single cell or the collection of cells where the intended action must be performed. It can be collection of two or more cells and not necessarily to be adjacent to each other. |
Sheet Name |
The name of the excel sheet to perform the action. |
Interaction Behavior |
|
Action |
Actions that can be performed on the excel application. Available options are: · Copy - Copies the selected area from the excel to the clipboard. · Run Macro - Runs the required macro in the selected area. · Get Cell Value - Extracts the value of the selected cell. · Hyperlink Click - Clicks the hyperlink available in the excel. · Paste - Pastes the copied content or the content available in the clipboard to the selected area. · Search - Searches for the required value corresponding to a defined search content. · Set Text - Sets value in the specified area. Define the cell range in the Range field. · Insert Column - Inserts column at the preferred location in the excel. · Insert Row - Inserts column at the preferred location in the excel. · Remove Duplicate - Removes the duplicates from the selected range. · Rename Worksheet- Renames the defined worksheet. · Merge Cells - Merges the selected range cells in an Excel sheet. In case there is data available in selected cells, then content of the top left cell appears in the merged cell. The content of the remaining cells are deleted at the time of merging. · Get Cell Formula - Retrieves the formula from the specified cell. · Delete Worksheet - Deletes the specified sheet from Excel file. · Add Worksheet - Creates a new worksheet in Excel file. · Refresh Pivot - Refreshes the pivot table in Excel file. · Sort Data - Sorts the specified column data in ascending/descending order. · Autofill Data - Auto-populates the data in the cell. · Copy Worksheet - Copies the specified sheet in Excel file. · Delete Operations - Deletes cells, rows, or columns at the specified location in Excel file. · Add DataTable - Adds data table in an Excel worksheet or adds data from the data table at a specified location in Excel file. · Apply Filter- Applies filter in the specified column in Excel file. |
Interaction |
The corresponding interaction set against the selected action. |
Appears if Action selected is Get Cell Value and Search. |
|
Is C-View |
If selected, the field configuration captured in Automation Studio is visible in the C-View tab of Engage application. |
Variable Name |
User defined name of the variable that stores the captured value. |
Variable Type |
Type of the variable defined. Available options are: · Text - A sequence of character, either as a constant or a variable. · Numeric - An integer type that range from negative through positive. · Decimal - An exact numeric value defined by its precision and scale. · Boolean - A data type used for making decision. Can have only two values- true or false. · DataTable - A data type that stores tabular data. |
Appears if Action selected is Run Macro. |
|
Macro Argument |
The arguments which you need to pass to the macro to execute. |
Macro Name |
The name of the macro that you want to run. You must define a parameter in the Parameter bar if you want to pass the macro as an argument or as a variable. Select the check box beside the Macro Name field and then enter the name of the macro if you want to pass the macro as a default macro. |
Appears if Action selected is Paste. |
|
Paste Option |
The options to paste content in the excel sheet. Available options are: · Paste - Pastes the entire content. · Paste Formulas - Pastes only the formulas without any formatting of the copied content. · Paste Formulas and Number Formats - Pastes the formulas and number formatting of the copied content. · Paste Values and Number Formats - Pastes values and formatting of the copied content. |
Appears if Action selected as Search. |
|
Search Type |
The type of search you want to perform in excel sheet. Available options are: · ColumnLookup - Searches for the required content in the specified column range. · RowLookup - Searches for the required content in the specified row range. |
Search Range |
The criteria to select the range to search for the required content. Available options are: · ConfiguredRange - Searches for the required content based on the cells defined in the Range field. · UsedRange - Searches for the required content based on the row or column name specified in the Search Location field. |
Search Value |
The content for which the corresponding value must be searched based on the Search Range field. |
Search Location |
The row or column name where the search must be done. |
Fetch Result From |
The row or the column name corresponding to the Search Location field from where the search value must be retrieved. |
Appears if Action selected is Set Text. |
|
Column Separator |
The separator to insert the values in the column. |
Data to insert |
The value that you want to set in the selected cell or range of cells. The values are inserted based on the defined Column Separator or Row Separator. You must define a parameter in the Parameter bar if you want to pass the values as an argument or as a variable. Select the check box beside the Data to insert field and then enter default values with a defined separator. |
Row Separator |
The separator to insert the values in the rows. |
Appears if Action selected is Insert Column. |
|
Column |
The default column name where the new column would be inserted. |
Appears if Action selected is Insert Column. |
|
Row number |
The number of the row where the new row would be inserted. |
Appears if Action selected is Remove Duplicate. |
|
Column |
Define the index of the required column. For multiple columns, separate the indexes with delimiters. By default, the delimiter is defined as comma (,). Note: The indexing of the column is dependent on the Range selected in Field Properties. If the range is selected as C:E and you want to remove duplicates from column D, then the indexing for column D is 2. You must define a parameter in the Parameter bar if you want to pass the column index as an argument or as a variable. Select the check box beside the Column field, and then enter pivot column index if you want to pass the column as default. |
Has Headers |
Select the required option from the list. The available options are: · Guess- Select this option if headers availability is not confirmed in an Excel sheet. · No- Select this option if headers are not available in Excel sheet. · Yes- Select this option if headers are available in Excel sheet. |
Index Delimiters |
Delimiters are used to separate multiple indexes defined in the Column field. By default, the delimiter is defined as comma (,). You can change a predefined delimiter if required. |
Appears if Action selected is Rename Worksheet. |
|
Rename Sheet as |
Specify the new name for the worksheet. You must define a parameter in the Parameter bar if you want to pass the name as an argument or as a variable. Select the check box beside the Rename Sheet as field, and then enter the name of the sheet if you want to pass the sheet name as default. |
Appears if Action selected is Refresh Pivot. |
|
Refresh All |
Select this option to refresh all the available pivot tables in Excel file. |
PivotTable Name |
Specify the pivot table name. You must define a parameter in the Parameter bar if you want to pass the pivot table name as an argument or as a variable. Select the check box beside the PivotTable Name field, and then enter pivot table name if you want to pass the pivot table name as default. |
Appears if Action selected is Sort Data. |
|
Has Header |
Select the required option from the list. By default, it is set as Guess. The available options are: · Guess- Select this option if headers availability is not confirmed in Excel sheet. · No- Select this option if headers are not available in Excel sheet. · Yes- Select this option if headers are available in Excel sheet. |
Sort Order |
Select the sorting order for a specified column from the list. By default, it is set as Ascending. The available options are: · Ascending · Descending |
Sort Worksheet |
Select this option if you want to move the entire row with the specified column. This option retains the data intact in specified Excel sheet. |
Sorting Column |
Define the column name for sorting. You must define a parameter in the Parameter bar if you want to pass the sorting column as an argument or as a variable. Select the check box beside the Sorting Column field and then enter the column name if you want to pass the column as default. |
Appears if Action selected is Auto-fill Data. |
|
Autofill Type |
Select the auto-fill type from the list. By default, it is set as Default. The available options are: · Default - Maintains the default auto-fill functionality. · Copy Value & Formats - Copies the value with formatting. · Fill Series - Auto-fills the defined series in the selected cell. · Fill Values - Auto-fills the values in the cell. If the formula is defined, then auto-fills the value as the defined formula. · Fill Formats - Copies the format and auto-fills the copied format in the selected cell. · Fill Days - Auto-fills the days/date in the selected cell. · Fill Months - Auto-fills the months in the selected cell. · Fill Weekdays - Auto-fills the weekdays in the selected cell. · Fill Year - Auto-fills the year in the selected cell. |
Destination Range |
Define the cells start point and endpoint. You must define a parameter in the Parameter bar if you want to pass the destination range as an argument or as a variable. Select the check box beside the Destination Range field and then enter the required range if you want to pass the destination range as default. |
Appears if Action selected is Copy Worksheet. |
|
Copied SheetName |
Define a name for the copied sheet or use as default. If named as default, then the functionality will work as per Microsoft Excel. You must define a parameter in the Parameter bar if you want to pass the sheet name as an argument or as a variable. Select the check box beside the Copied SheetName field, and then enter the name of the sheet if you want to pass the sheet name as default. |
Target Workbook |
Define the path of the targeted Excel file if you want to copy the sheet in a different workbook. You must define a parameter in the Parameter bar if you want to pass the targeted workbook as an argument or as a variable. Select the check box beside the Target Workbook field, and then enter the path of the targeted Excel file if you want to pass the targeted workbook as default. |
Appears if Action selected is Delete Operations. |
|
Delete Row |
Deletes entire row at the specified location in Excel sheet. |
Delete Column |
Deletes entire column at the specified location in Excel sheet. |
Delete Range |
Deletes cells at the specified location in Excel sheet. Select the behavior which is executed after deleting the selected range. There are two types of behavior available in the Shift Action list. · Shift cells up- Shifts all the available cells up after deleting the selected range. · Shift cells left- Shifts all the available cells towards the left after deleting the selected range. |
Appears if Action selected is Add DataTable. |
|
DataTable |
Define the data table name. You must define a parameter in the Parameter bar if you want to pass the data table name as an argument or as a variable. Select the check box beside the DataTable field, and then enter the data table name if you want to pass the data table as default. |
Include Headers |
Select this option if headers need to be copied in the specified Excel sheet. |
Data Type |
Select the data type from the list. By default, it is set as Number. The available options are: · String- A sequence of characters, either as a constant or a variable. · Number- An integer type that ranges from negative through positive. |
Number Filter |
Select the filter from the list for the number data type. By default, it is set as Equal. The available options are: · Equal - Retains the cell based on the exact match. · Does Not Equal - Retains the cell if value does not match. · Greater Than - Retains the cell if the value is greater than the defined filter value. · Greater Than Or Equal - Retains the cell if the value is greater than or equal to the defined filter value. · Less Than - Retains the cell if the value is less than the defined filter value. · Less Than Or Equal - Retains the cell if the value is less than or equal to the defined filter value. · Between - Retains the cell if the value lies within the defined range. · Top10 - Retains the 10 highest value cells in the specified column. · Above Average - Calculates the column average and retains the above-average cells. · Below Average - Calculates the column average and retains the below-average cells. |
String Filter |
Select the filter from the list for string data type. The available options are: · Equal - Retains the cell based on the exact match. · Does Not Equal - Retains the cell if value does not match. · Begins With - Retains the cell if starting string matches to the defined filter value. · Ends With - Retains the cell if ending string matches to the defined filter value. · Contains - Retains the cell if defined filter value is present in the string. · Does Not Contains - Retains the cell if defined filter value is not present in the string. |
Column Number |
Specify the required column number to apply filters in that particular column. The column number starts from 0. You must define a parameter in the Parameter bar if you want to pass the value as an argument or as a variable. Select the check box beside the Column Number field, and then enter the column number if you want to pass the column number as default. |
Filter Value |
Define a value for the filter. You must define a parameter in the Parameter bar if you want to pass the filter value as an argument or as a variable. Select the check box beside the Filter value field and then enter filter value if you want to pass the filter value as default. |
Excel Application Properties
The properties of an excel application are listed in the following table and can be edited in the Property grid on the right pane.
Property Name |
Usage |
Control Execution |
|
Ignore Error |
When this option is set to Yes, the application ignores any error while executing the activity. If set to NA, it bypasses the exception (if any) to let the automation flow continue; however, it marks the automation status as failure, in case of an exception. By default, this option is set to No. |
Delay |
|
Wait After |
Specify the time delay that must occur after the activity is executed. The value must be in milliseconds. |
Wait Before |
Specify the time delay that must occur before the activity is executed. The value must be in milliseconds. |
Misc |
|
Breakpoint |
Select this option to mark this activity as the pause point while debugging the process. At this point, the process freezes during execution allowing you to examine if the process is functioning as expected. In large or complex processes, breakpoints help in identifying the error, if any. |
Commented |
Select this option to mark this activity as inactive in the entire process. When an activity is commented, it is ignored during the process execution. |
DisplayName |
The display name of the activity in the flowchart designer. By default, the name is set as the name of the selected application. You can change the name as required. |
On This Page Hide
Related Topics