Launch and Sign In to Engage
You can download and launch the Engage application from the Client Tools section in the Admin Module. For more information, see to User Interface section in the Administrator Guide.
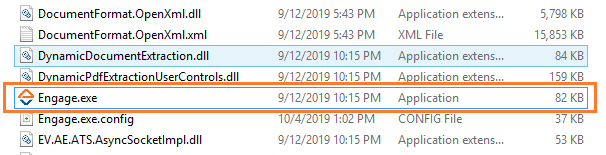
- Double-click Engage.exe to launch Engage.
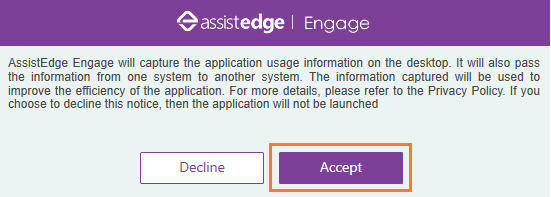
- The data privacy notice/privacy disclaimer pop up window appears.
- Click Accept to continue.
- Click Decline to abort the launch.
The Signin Manager screen appears.

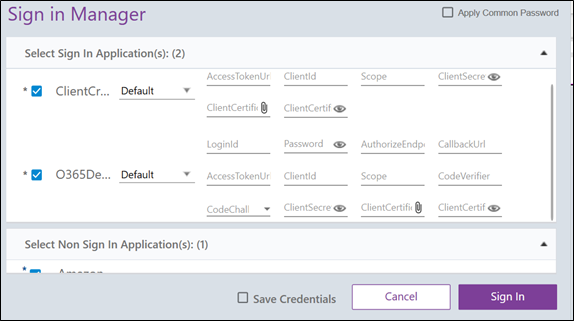
- The profiles that are mapped to your username are visible in the left panel. Select the required profiles. Based on the selected profiles, both the Sign In and Non Sign In applications assigned to the profile are automatically displayed.
- Select the check boxes next to the listed applications you need to launch. By default, all applications are selected.
|
NOTE: |
An asterisk (*) against an application indicates that it is a part of a process. |
- If you are signing in for the first time, you need to enter the credentials for the sign in applications. For the Sign in Applications, you are required to enter the details as per the configurations performed for Oauth activity type which includes Authorization Code, Authorization Code with PKCE, Client Credentials, Implicit Grant and Resource Owned Password Protected, TOTP, and Auth Manager. For more information, see Automation Studio. Click Save Credentials to save the credentials for automatic login to the applications again.
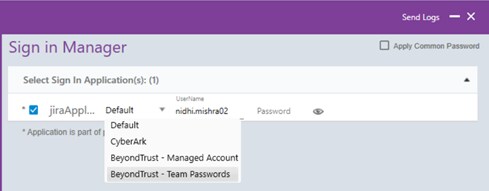
There are multiple ways to login to Sign In Applications:
- Default
- CyberArk
- BeyondTrust
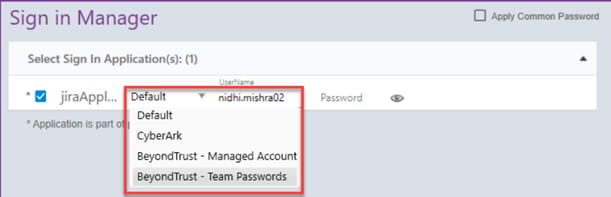
- Default: The Sign in Manager is set to Default when you launch Engage. Enter the authentication details and sign in as a regular process.
NOTE:
Based on whether the application is using OAuth activity (modern authentication) and the authentication flow type configured in Automation Studio, the authentication details vary. For Example, an application not using modern authentication needs only username and password while an application using modern authentication of Client Credential OAuth flow type needs Client ID, Access Token Url, Client Secret (or Client Certificate related details) and Scope to login to the required application. For more information, see Auth Types activity section in AutomationStudio-CanvasTools-Volume 1.
By default, the credentials of different applications are stored in product database and are saved in encrypted form in the JSON files.
NOTE:
- Either Client Certificate details or Client Secret value can be updated at a time. If client certificate related details are provided, the Client Secret field gets disabled and vice-versa. Ensure to provide the correct client certificate details or the Client Secret, else error is received.
- You can either provide path of the client certificate saved on the local machine or upload it from the Sign In Manager screen. The file size of the client certificate must not exceed 5 kb. The supported client certificate file formats are .pfx and .p12.
- CyberArk: AssistEdge Engage is CyberArk compliant. With CyberArk, you get an enhanced security for your applications. CyberArk Enterprise Password Vault is independent application which maintains application credentials. For more details on CyberArk, see https://www.cyberark.com/.
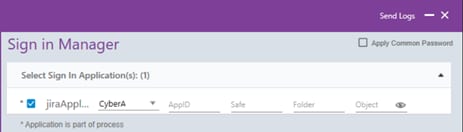
If you are using CyberArk Enterprise Password Vault to save the credentials, select the CyberArk type and follow the below steps:
- In the AppID field, enter the AppID that is authorized to provide access to CyberArk and retrieve credentials.
- In the Safe field, enter the CyberArk safe ID that contains the credentials for the applications which is required to be scanned.
- In the Folder field, enter the CyberArk folder ID that contains the credentials for the applications which is required to be scanned. The default folder is Root.
- In the Object field, enter the name of the object that stores the credentials.
Based on these 4 values, it fetches the credentials from CyberArk. These values are configured in CyberArk vault by the administrator. For more information, contact your system administrator.
Click Save Credentials to save the credentials for automatic login to the applications again. If you select CyberArk and click Save Credentials, then values configured in App Id, Safe, Folder and Object get saved for automatic login to the applications again.
- Select Apply Common Password on the top-right if you have the single password for all the applications. You need not type the password for each application separately. This is applicable only for default type. For CyberArk, you need to enter the parameters.
- Click Sign In to view the launch of all the applications in Engage.
|
NOTE: |
Click Send Logs on the upper-right, if there is an error during sign in. The system composes an email with the logs as an attachment and Engage application screenshot as an email body. Send it to the system administrator or the support team. |
- BeyondTrust - BeyondTrust is the worldwide leader in Privileged Access Management, offering the most seamless approach to preventing data breaches related to stolen credentials, misused privileges, and compromised remote access. For more details about BeyondTrust, see https://www.beyondtrust.com/.
BeyondTrust PasswordSafe has two methods for storing credentials: - BeyondTrust – Managed Accounts: BeyondTrust – Managed Accounts are user accounts that are local accounts or active directory accounts on the managed system.
- BeyondTrust – Team Passwords: BeyondTrust – Team Passwords enables teams to easily store and manage shared credentials for accounts that are commonly held and managed within specific teams in a fully auditable and controlled environment.
If you are using BeyondTrust Vault to store the credentials securely, you can either select the BeyondTrust – Managed Accounts or the BeyondTrust – Team Passwords. - To sign in with BeyondTrust – Managed Accounts:
- In the Vault list, select the BeyondTrust – Managed Accounts type.
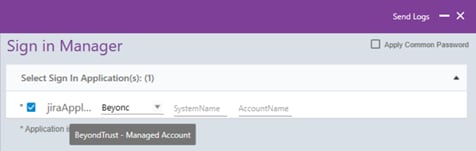
- In the SystemName field, enter the SystemName (Managed System) for which BeyondTrust credentials are to be retrieved.
- In the AccountName field, enter the authorized AccountName (Managed Account) for which BeyondTrust credentials are to be retrieved.
- Click Sign In.
To sign in with BeyondTrust – Team Passwords:
- In the Vault list, select the BeyondTrust – Team Passwords type.
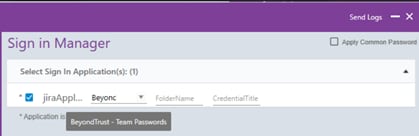
- In the FolderName field, enter the FolderName of the teams folder used to organize and store the credentials.
- In the CredentialTitle field, enter the authorized CredentialTitle to allow a set of specified users to authenticate using credentials retrieved from BeyondTrust.
- Click Sign In.
Click the User Interface link to get the overview of the tool and its features.