Configuring Business Application for Web Engage Features
On the Web Engage dashboard, end users or customer service agents can access a variety of functional features. These functionalities are created by developing the business applications based on business requirements.
360° Customer Information View
The 360° Customer Information View feature integrates several applications across technologies, providing ONE single 360° customer information view. Out of the box dashboard templates build rich and appealing dashboard using the comprehensive list of hand-picked, frequently used component repository.
For more information about developing the 360° Customer Information View feature, see Developing Business Application.
Sentiment Analysis
The Sentiment Analysis feature provides an overall visual representation of customer’s sentiment, based on previous feedback by the customer, that makes you more equipped to interact with the customer.
Prerequisite
To get a customized sentiment analysis, two output arguments, Sentiment and Score, are required to be configured in Automation Studio. This involves creating a process for sentiment analysis, in Automation Studio, and checking the Default Parsing checkbox, which automatically creates the two output arguments, Sentiment and Score. For more information, on configuring the arguments, refer to Language.
Once the process is deployed, the Sentiment Analysis, based on these arguments, is displayed in WebEngage.
For more information about developing the Sentiment Analysis feature for Web Engage, see Developing Business Application.
One Click Automation
The One Click Automation feature helps agent execute customer requests across multiple applications with just one click.
Knowledge Base
With the Knowledge Base feature, you can easily search for and refer to documents, from SharePoint. This allows the end user or the customer service agents to respond to customer queries more efficiently.
Prerequisites
Before you proceed ensure the following:
- In the Automation Studio, an application of type Office 365, with KnowledgeManagement checkbox enabled, must be mapped to an accessible profile. For more information, refer Configure Office 365 application under OAuth section.
- The application must be configured with modern authentication flow of type OAuthAuthorizeFlow. The user should have details of Access Token URL, Authorize Endpoint, Callback URL, ClientId, ClientSecret, Username, Password, and Scope, for successful authentication. For more information, see OAuthAuthorizeFlow.
Step-by-Step creation of Knowledge Base Feature
To be able to access the Knowledge Base in WebEngage, you are required to develop an application, which can be utilized to search for the desired documents.
Designing the Knowledge Base Application
The first step to developing the Knowledge Base application is to design the application. For more information about designing a new application see section Designing the Application.
Creating the Knowledge View Form
For the Knowledge Base application to be developed you must create the Knowledge View form. For more information about creating the form see section Creating the Form.
Selecting the Controls
To create the Knowledge View form, you must select the controls. These controls serve as the fields and components of the form, allowing users to access the Knowledge Base application.
For more information about selecting the controls see Selecting and Configuring the Controls.
The following table describes the controls used for the Knowledge View form:
| Control | Control Type | Configured As Field (name) | Input Type | Action Expected |
| Text Field | Input | Search Text | Text | User to use the field to enter text as an input to search the KnowledBge Base |
| Select Box (1) | Input | File Type | Drop-Down | User to use the File Type drop-down to filter the Knowledge Base as per the file type |
| Select Box (2) | Input | Modified On | Drop-Down | User to use the Modified On drop-down to filter the Knowledge Base as per the date the file is modified on |
| Automation | Processing | Search | Button | User to click the button, which triggers the process binder to carry out the process to search and list the documents from the Knowledge Base |
| Form Grid | Output | Details | Grid | User to use this grid to view the displayed the list of documents based on the criteria |
Configuring the Controls
Once the controls are selected and placed in the required order, you must configure the controls. For more information about configuring the selected controls, see Selecting and Configuring the Controls.
The steps to configure the Automation control for the Search button are as given below:
To configure the Search Button:
- Click on the Automation control. The Automation Configuration screen appears. For more information on editing the fields on the Automation Configuration screen, see section Configuring Automation Control.
- Click Invoke Automation Configuration. The Invoke Automation Configuration screen appears.
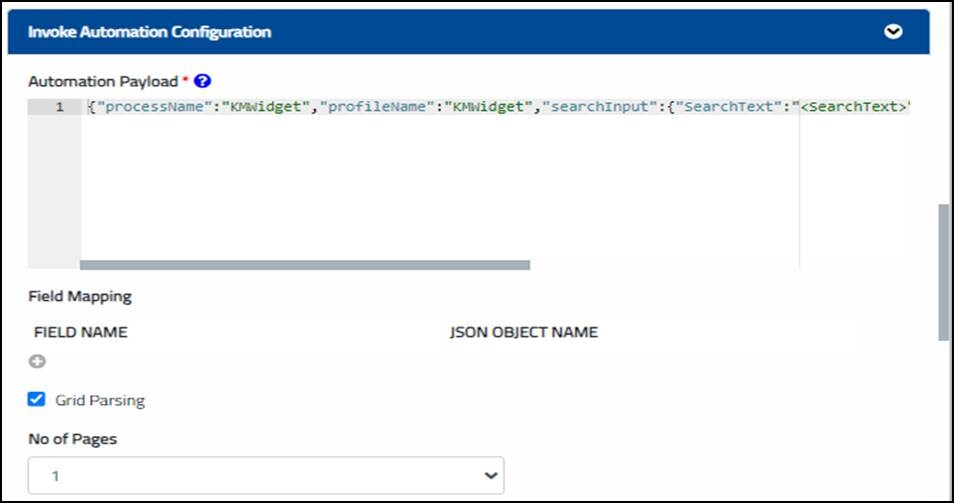
- Add the process binder in the Automation Payload field. {"processName":"KMWidget","profileName":"KMWidget","searchInput":{"SearchText":"<SearchText>","File":"<FileType>","index":"0","size":"1000","lastModified":"<ModifiedOn>"}}.
NOTE:
ProcessName, ProfileName and search parameters, like Search Text, File Type and Modified On, are default parameters and cannot be edited. You need to map the input parameters with the control unique identifiers.
- Check the Grid Parsing checkbox and click Page 1. The Page 1 screen appears.
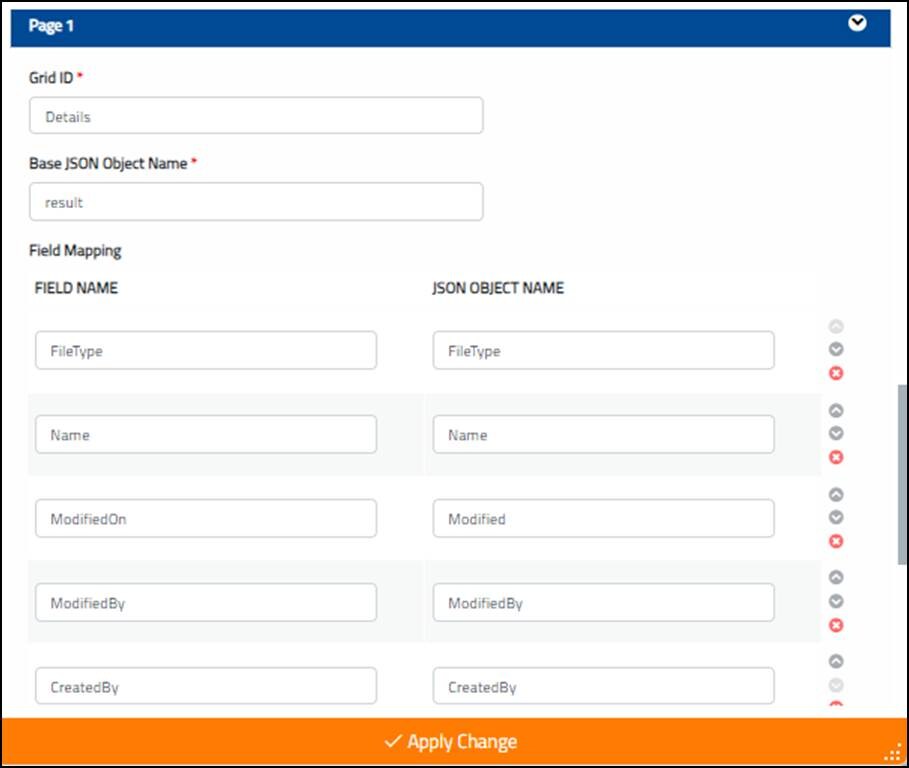
- Enter the details for the Grid ID <Details> and Base JSON Object Name <result> fields.
- Grid ID is a mandatory field and is used as a unique identifier to map the input parameter execute the process to access the Knowledge Base
- Base JSON Object Name is a mandatory field and is the default knowledge base table name, used as a unique identifier for that control.
- Click Apply Change.
NOTE:
Result is the default Knowledge Base table name and the JSON OBJECT NAME values are the column names and cannot be edited.
The Search button is configured.
Once the fields are configured, you must proceed with the next steps. For information about next steps, see Saving and Previewing the Form.