Developing Business Application
For the Web Engage dashboard, you must develop and leverage the business application to pull data from the automation process by using a trigger function. For more information about developing a business application, see Developing Business Application.
Selecting and Configuring the Automation Control
To leverage the business application, you must select and configure the Automation control used to trigger the automation process. This can be done while designing the business application form. For more information about designing the form, see Designing the Form.
To select and configure the Automation control:
- Drag and drop the Automation control on the canvas.
- Click the Automation control. The Automation Configuration editing window appears.
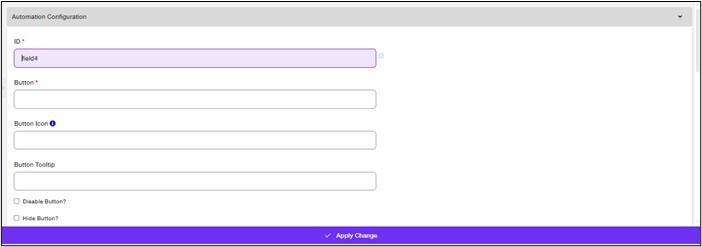
- On the Automation Configuration screen:
- In the ID field enter the <Button ID>.
ID is a mandatory field and is used as an unique identifier to map the input parameter to execute the process and access the application. - In the Button field, enter <Button Name>.
Button is a mandatory field and is used as the display name for the Automation Button control on the form in the UI. - Verify the auto-populated details in the Height and Width fields and edit if required.
- In the Actions field, select the option Invoke Automation.
- In the ID field enter the <Button ID>.
- Enter the other required details (optional) and click Invoke Automation Configuration.
The Invoke Automation Configuration screen appears.
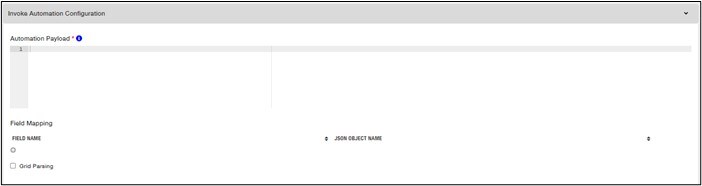
- On the Invoke Automation Configuration screen:
- In the Automation Payload field, add the process binder {"processName":"<Process Name from Automation Studio> ","profileName":"<Profile Name Mapped to>","searchInput":{"<Input":"<InputID>"}}.
NOTE:
ProcessName, ProfileName and searchInput parameters are parameters with unique identifiers that you have provided to the controls selected, based on your automation process. - Click the (
 ) icon to add new field details to map required output details.

- In the Field Mapping section, enter the required details.
- In the Field Name field enter <OutputMappingCriteria>.
Field Name is a mandatory field and is used as an unique identifier to map the output on the existing control from the automation process. - In the JSON Object Name field enter Output.citytemp.
JSON Object Name is a mandatory field and is mapped to return an output parameter value on triggering the process.
- In the Automation Payload field, add the process binder {"processName":"<Process Name from Automation Studio> ","profileName":"<Profile Name Mapped to>","searchInput":{"<Input":"<InputID>"}}.
- Click Apply Change.
The Automation button control is configured.