Proctor
- Proctor log is present under the path <<Proctor installation path>>\Proctor\logs\Proctor.log.
- After installing Proctor, if the Proctor machine fails to appear in Control Tower under the Machines View, check the logs available at the path mentioned above. If the log contains an error related to the certificate, it could be that the certificate is not installed or correct certificate is not installed, or multiple copies of the certificate are present in the manage user certificate.
- In the Update Agent screen, if you are updating the username, release all the robots associated with the agent before updating the agent. In case only the password or domain is being updated, this step is not required.
- If Add/Update Agent fails, perform the following steps:
- Check if the user details entered in the Add/Update Agent screen are correct and that the user has remote login access on the machine where Proctor is running. In this case, the Connection failed error appears in the log file.
- Check if the number of allowed concurrect active user sessions on the machine where Proctor is running has exceeded.
- You can update the configuration such as SecurityPromptinterval, Logininterval, ExecuteCmdinterval, and so on using Control Tower UI. Navigate to ControlTower-> Runtime Configuration-> Proctor-> Remote Connection Settings.
NOTE:
Ensure to restart the Proctor service after you update any configuration
- LoginInterval: By default, the time required to log in to the Proctor machine is set to 40000 milliseconds in the configuration file. If the actual time required to login is more, make the changes accordingly from Control Tower UI as shown in above step.
Below error usually appears in above case:
"srcmodule":"EV.Digital Worker.RemoteDesktop.RemoteConnection","method":"ConnectUser","message":"User 'XXX' connected successfully"
"srcmodule":"EV.Digital Worker.Proctor.Command.CommandHelper","method":"ConnectUser","message":"User 'XXX' session id is '-1'"
Or
"srcmodule":"EV.Digital Worker.RemoteDesktop.RemoteConnection","method":"ConnectUser","message":"User 'xxx' connected successfully"
"srcmodule":"EV.Digital Worker.Proctor.Command.CommandHelper","method":"ConnectUser","message":"User 'xxx' session id is '5'"
"srcmodule":"EV.Digital Worker.RemoteDesktop.RemoteConnection","method":"ExecuteCommand","message":"Executing command Robocopy /S /E D:\\XXX\\Robot\\RobotAgent D:\\XXX\\Robot\\Robot\\Proctor\\Agents\\a8479d28-1c4b-4d34-b15f-7973d7e3a7c6 /XF
"srcmodule":"EV.Digital Worker.Proctor.Command.CommandHelper","method":"CreateAgent","errormessage":"Error occurred while creating agent" - SecurityPromptInterval: If add or update agent fails due to non-handling of security prompts then, following exception gets logged into proctor log file.
{"MachineName":"EVOSEDGEW721","ProcessId":"5004","ProcessName":"D:\\ProctorTest\\Robot\\Robot\\Proctor\\EV.Digital Worker.Proctor.exe","workspacekey":"Default","datetime":"2022-05-06T11:09:53.158+05:30","level":"Error","priority":"0","srcmodule":"EV.Digital Worker.Proctor.Command.CommandHelper","method":"ConnectUser","errormessage":"Error occurred while connecting user 'seuser3'","exceptiondetails":"Error occurred while connecting user 'seuser3'","userid":"NT AUTHORITY\\LOCAL SERVICE","ipaddress":"10.73.91.89","LogType":"Default"}
{"MachineName":"EVOSEDGEW721","ProcessId":"5004","ProcessName":"D:\\ProctorTest\\Robot\\Robot\\Proctor\\EV.Digital Worker.Proctor.exe","workspacekey":"Default","datetime":"2022-05-06T11:09:53.158+05:30","level":"Error","priority":"0","srcmodule":"EV.Digital Worker.Proctor.Common.AddAgent","method":"Add","errormessage":"Error occurred while adding agent for user 'seuser3'","exceptiondetails":"User 'seuser3' is not connected","userid":"NT AUTHORITY\\LOCAL SERVICE","ipaddress":"10.73.91.89","LogType":"Default"}
Verify, whether you are getting any security prompt when connected to the Proctor machine. If yes, a corresponding configuration is available in the configuration file available at: <<Proctor Installation Path>>\Proctor\securityPromptSequence.json.
While manually logging into Proctor machine, observe the security prompt behavior and make the required entries in securityPromptSequence.json file.
The securityPromptsequence.json configuration file emulates the keystrokes required to bypass the prompt screen. This configuration allows the proctor to establish a successful connection with the remote machine.
There are two types of prompt sequence, which includes:
- Connect Prompt: When you perform fresh login, security prompt appears which must be handled efficiently to login successfully. To handle such prompts, provide proper key sequence in ConnectPrompt object.
- Disconnect Prompt: When the session is disconnected then, security prompt appears which must be handled properly. To handle such prompts, provide proper key sequence in DisconnectPrompt object. For example, Single Prompt Screen.
- Single Prompt Screen may contain single option to select, and you can navigate using tab. When the prompt screen appears, you will have to click either Ok or Cancel to proceed.
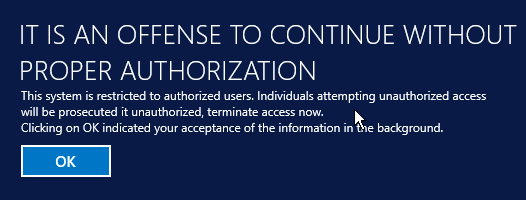
- For example, when you login in to your VM machine, and below prompt screen appears i.e., Click OK or press enter. In such scenario, the default array sequence will work.

Following is the array sequence:{
"Sequence": [
["Enter"]
]
}
By default, the time required to successfully dismiss/close a security prompt is set to 5000 milliseconds. If the actual time required to login is more, make the changes accordingly from Control Tower UI as shown in above step.
- ExecuteCmdInterval: Increase the time required to execute commands on the Proctor machine. Default value is 15000 milliseconds. You can make the changes from Control Tower UI in above step. For more information about Runtime Configuration > Proctor, see Control Tower Guide.
- If Stop Agent fails, follow the below steps:
- Sometimes, user is in a disconnected state, and the stop command tries to create the session again and execute the command. In such cases, send the command again or stop the agent manually.
Generating FreeRDP logs Via Proctor
FreeRdp enables you to create the user session. You can view the user session and the task under each user in the Task Manager/Users tab. If you are unable to create the User session, see the Proctor.log file. In case if you are not able to identify the issue from Proctor.log file, you can check the FreeRdp.log to rectify the issue.
- FreeRdp log is present under the path <<Robot Download path>>\Proctor\logs\FreeRdp.log.
- To generate FreeRdp.log:
- Stop Proctor.
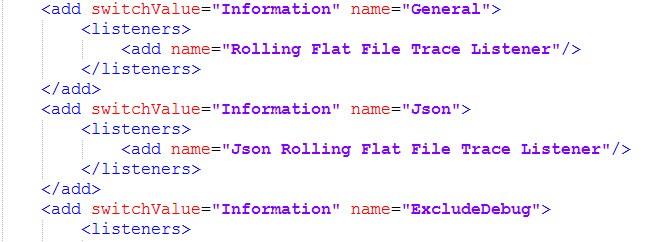
- open <<Robot Download path>>\Proctor\EV.Digital Worker.Proctor.exe.config.
- Enable the debug level logs, to do this replace Information to All.

- Save the file.
-
Start Proctor.
-
Perform the action from Control Tower and check FreeRdp log files for any exception.
The Free RDP logs are created.