Defining Roles and Access
Create a role to define access to modules and the functions which users will be able to perform within RPA. The role can then be assigned to individual users where appropriate.
You can define individual application roles for users for more granular control of user permissions within RPA – Admin module and Automation Studio. Rather than assigning individual permissions directly to each user, permissions are grouped into roles. Any user with Super_Admin role can define one or more roles on the admin module, and then grant permissions to each role. The permissions granted to authenticated users are contained in the user roles.
Upon defining the roles, administrator can create, edit, or delete roles for various features and functionalities in the RPA tenant-specific Admin module and Automation Studio for that tenant.
AssistEdge RPA Tenant-specific Admin module enables you to assign two types of roles:
- Default Role: These roles are preconfigured and available by default.
- Managing Roles (Customized Role): These roles are created and managed by users as per specific requirement.
You can manage the roles and access successfully.
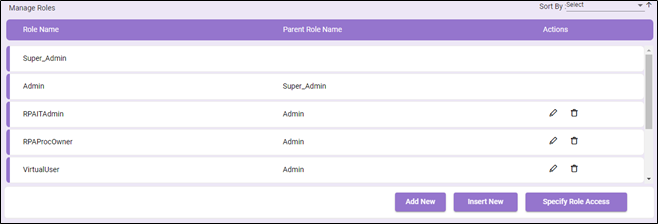
Default Roles
Roles enables you to assign specific permissions to a group and manage permission to modules. Users assigned to the role are granted those permissions as assigned to the role. The system provides some predefined roles by default, configured in AssistEdge Tenant.
While tenant onboarding, users configured with specific roles like super admin is assigned as super admin for that tenant.
The table lists the predefined roles in the AE Admin module.
| Roles | Description |
| Super_Admin |
|
| Admin |
|
| RPAITAdmin |
|
| RPAProcOwner |
|
| Virtual User |
|
| Business Analyst |
|
| Business Leader |
|
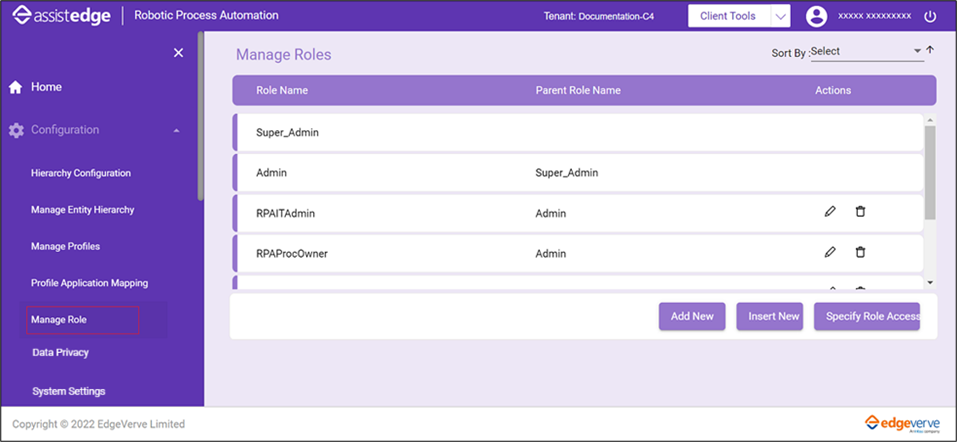
Manage Roles
You can define a role and provide access to different user in-order to access various features of the Admin module. Additionally, you can define a role and assign permissions to access various features of the Control Tower, Automation studio, and other components.
Using this page, you can manage the following:
Adding New Roles
To add a new role:
- Go to Configuration > Manage Roles
- Click Add New.

The Role Details section appears. The default role is listed on the page.
- In the Role Name field, enter the desired name for the role.
- From the Parent Role drop-down, select the parent role for the new role. When roles are associated with parent roles, it creates a role hierarchy. Additionally, it provides an option to grant varied and controlled access to users through this new role.
|
NOTE: |
When you select a parent role, it inherits the permissions from the parent role. However, role access can be edited later. |
- Click Add. The new role is added to the list of roles.
Inserting New Roles
You can create a new role by inserting a role in between two existing roles, the parent and child roles. This helps in creating a new role hierarchy or build on the existing role hierarchy, associated with the parent role. Each role in the hierarchy represents a level of access that a user or group of users need.
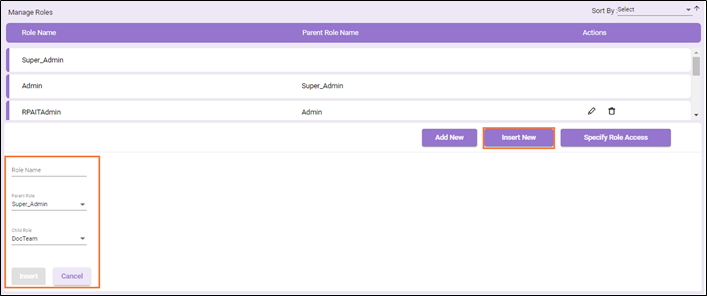
To insert new roles:
- Go to Configuration > Manage Roles.
- Click Insert New.
- In the Role Name field, enter the desired name for the role.
- Select the parent and child role between which you would like to include the new role.
- From the Parent Role drop-down, select the parent role.
- From the Child Role drop-down, select the child role associated with the selected parent role.
|
NOTE: |
The Child Role drop-down contains the list of all roles associated with the selected parent role. |
- Click Insert to save the role. The new role is added to the list of roles.
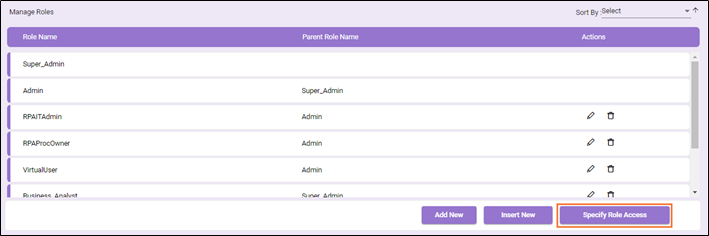
Specifying New Access
Roles must be given explicit access to manage activities in Admin module and Automation Studio. The Super_Admin can provide role-based access to users. The role permissions make it simple to perform user assignments. For each role, you can set up access individually.
User permissions are dictated by access control roles. These groups provide the ability to define capabilities and restrictions to a set of users at either the System or Organization level. Permissions are defined within each access control group and leverage predefined roles as the input for allowing or restricting capability within the system.
Types of access
Following are the types of access:
To specify new access to roles:
- Go to Configuration > Manage Roles
- Click Specify New Access. By default, Admin is selected in the Select Role drop-down. The page displays the access enabled for admin.
- In the Select Role list, select the role to which access needs to be granted.
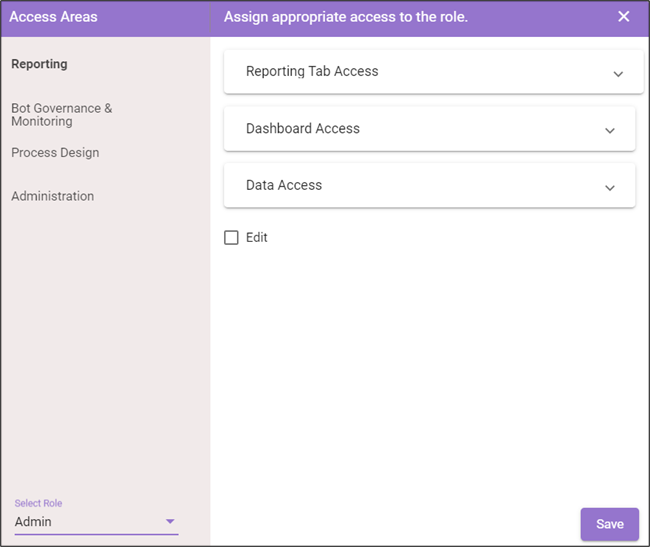
- In the Access Areas, select the type of access and in the Assign appropriate access to the role., select the check box corresponding to which you want to assign access for the user role.
- Click Save.
A message appears as Role accesses saved successfully on the page.
Reporting
To assign the reporting access to the preferred role:
- In the Select Role, select the preferred role.
- Then, select the Reporting Tab Access or Dashboard Access or Data Access and assign the access.
| Access Label | Access Description | ||
| Reporting Tab Access: Using Reporting Tab Access, you can assign access to the particular user role for the reporting dashboard which includes Discover, Visualize, Dashboard and Management. |
|||
| Discover | By selecting Discover check box, user is assigned to access Discover Tab in the Reporting page. | ||
| Visualize | By selecting Visualize check box, user is assigned to access Visualize Tab in the Reporting page. | ||
| Dashboard | By selecting Dashboard check box, user is assigned to access Dashboard Tab in the Reporting page. | ||
| Management | By selecting Management check box, user is assigned to access Management Tab in the Reporting page. | ||
| Dashboard Access: Using Dashboard Access, you can provide access to preferred OOB dashboards as well as Custom Dashboard. When you log in for the first time, there is no dashboard visible. The OOB dashboards are shown in the Dashboard Access tab as per the JSON file imported. You can also assign access to Masked or Unmask the PII data in the Dashboard. |
|||
| OOB Dashboard Access |
|
||
| Data Access: Data Access enables you to assign profile-based access or complete data access the selected or particular user role. In case, you perform any irrelevant or system breaking changes in the fields such as Document Level Permission, Field Level Permission or select Index permission then, reporting and control tower data might not appear as expected. |
|||
| Select Index Name | Select the preferred Index Name from the list such as <tenantname>-rpa-trans. Additionally, you can create a custom index pattern to data access. | ||
| Index Name | Specify the name of index. | ||
| Select Index Permission | Select the Index permission from the available option:
|
||
| Document Level Permission |
Document level permission is mentioned in this field, if you require then, you can edit the code. Additionally, if you have created any custom role then, you will have to modify the document level permission accordingly. |
||
| Field Level Permission | Displays the field level permission like excluded or included to access the data for the particular dashboard. If user has created new query and migrating to 19.0 then, user will be required to modify the document level permission accordingly. Additionally, if you have created any custom role then, you will have to modify the document level permission accordingly. |
||
| Type in Field Name | Specify the name of field for the particular dashboard. | ||
| Edit | By selecting Edit check box, super admin user role can access and perform all the activities on all the reporting tabs and dashboard such as create dashboard, edit existing dashboard, create new visualization, updating the existing visualization and so on. | ||
 (Create) (Create) |
Click the  (Create) icon to add new data access. (Create) icon to add new data access. |
||
| |
Click the  (Delete) icon to delete the data access. (Delete) icon to delete the data access. |
||
Bot Governance and Monitoring
| Access Label | Access Description |
|
Control Tower Tabs |
|
| View Only | By selecting View Only check box, user is assigned to only view the particular tabs of the Control Tower. |
| Credential Management |
By selecting Credential Management check box, user is assigned to access credential manager. This access is used along with one of the four accesses, such as: RobotCreator, SuperUser, Manager or RPA_ControlTower_ProcessOwner |
| Trigger Management |
By selecting Trigger Management check box, user can do following:
Currently, this access must be used along with one of the four accesses, such as, RobotCreator, SuperUser, Manager or RPA_ControlTower_ProcessOwner |
| APM | By selecting APM Dashboard check box, user is assigned to access APM Dashboard in Control Tower. |
| Automation Configuration Statistics | By selecting Automation Configuration Statistics check box, user is assigned to access Automation Configuration Statistics page in the Control Tower. |
|
Control Tower Admin |
|
| Super User |
By selecting this check box, user is assigned super user access for Control Tower. Super User can do following:
|
| Robot Creator | By selecting this check box, user is assigned Robot Creator access for Control Tower. Robot Creator can do following:
|
| Manager | By selecting this check box, user is assigned Manager access for Control Tower. Manager can do following:
|
|
Control Tower User |
|
| Robot Owner | By selecting Control Tower Robot Owner check box, user can do following:
|
| Transaction Analyst | By selecting Transaction Analyst check box, user can do following:
|
Process Design
This access allows users in a specific role to access AssistEdge Automation Studio and Low code orchestrator designer.
| Role | Process Design Access |
| Automation Studio | |
| Process Creator | By selecting Process Creator access, users in a specific role is allowed to create, test, and publish processes in the Automation Studio. |
| Process Approver | By selecting Process Approver access, users in a specific role is allowed to create, test, and publish processes in the Automation Studio. |
| Process Deployer | By selecting Process Deployer access, users in a specific role is allowed to deploy processes in the Automation Studio. |
| Process Tester | By selecting Process Tester access, user in a specific role is allowed to create and execute the test cases for a process in the Automation Studio. Users can also export and import process packages containing the test cases with this access. Role without this access can only view the test cases and cannot export and import process package with test cases. |
Administration
| Access Label | Access | |
|
Configuration |
Access | Description |
| Hierarchy Configuration | By selecting the Hierarchy Configuration checkbox, the user is allowed to add, edit or delete entities on the Hierarchy Configuration page. | |
| Manage Entity Hierarchy | By selecting the Manage Entity Hierarchy check box, the user allowed to view and manage the entities. | |
| Manage Profiles |
By selecting the Manage Profiles check box, user is allowed to:
|
|
| Profile Application Mapping | By selecting the Profile Application Mapping check box, the user is allowed to view, map or unmap applications to profiles on the Profile Application Mapping page. | |
| Manage Role | By selecting the Manage Roles check box, the user is allowed to add new roles, insert a role or specify a role on the Manage Roles page. | |
| System Settings | By selecting the System Settings check box, the user is allowed to edit the settings for different modules on the System Settings page. | |
| SMTP Setting | By selecting the SMTP Settings check box, the user is allowed to enter the details for SMTP settings on the SMTP Settings page. | |
| Data Retention Policy | By selecting the Data Retention Policy check box, the user is allowed to edit the details for various indexes on the Data Retention Policy page. | |
| User Management | View Users | By selecting the View Users check box, the user is allowed to search for users and view Hierarchy Tree. |
| Manage Users | By selecting the Manage Users check box, the user is allowed to add or edit users. | |
| User Mappings | By selecting the User Mappings check box, the user is allowed to map the profile, process or roles for users. | |
| Product Usage | By selecting the Product Usage check box, the user is allowed to view the product usage for users. | |
| Central Key Management |
By selecting Central Key Management check box, user is assigned access to the Central Key Management page in Admin module. | |
| License Management | By selecting License Management check box, user is assigned access to the License Management page in Admin module. | |
| Tenant Repository | By selecting Tenant Repository check box, user is assigned access to the Tenant Repository page in Admin module. The user can view the tenant details on the Tenant Repository page. | |
| Data Sharing Summary Portal | By selecting Data Sharing Summary Portal check box, user is assigned access to the Data Sharing Summary Portal in Admin module. Super admin will be able to see data summary of tenant’s data sharing and get URL to download the archived transactional data. | |