Configuring OpenAI Application
To configure an OpenAI application:
- Click Admin Menu
 and select the Applications tab.
 - Add an application of OpenAI Apps. The mandatory fields are highlighted with red box.
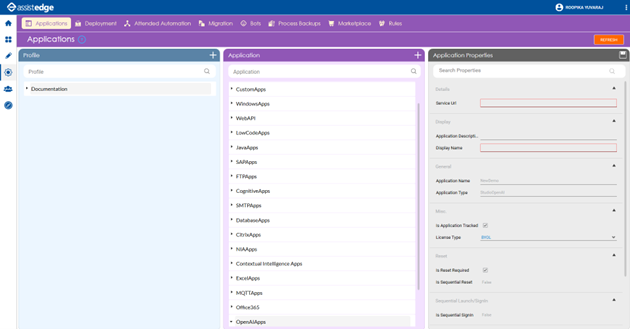
- In the Application Properties panel:
- In the Service Url field, enter the URL of the openai. For example, https://openai.com/v1.
- In the Application Description field, add a small description of the added web application.
- In the Display Name, enter a desired name of the application.
- In the License Type, select BYOL from the drop down. The other option available is EVOL which is currently not supported for OpenAIApps.
- In the Is Reset Required checkbox, select the checkbox if you want the application to reset after each automation is executed. If it is not selected, the application does not reset.
- In the Login Type, select Key from the drop down. The other option available is Credentials which is currently not supported for OpenAIApps.
- The values of other fields in the Application Properties are auto populated you cannot edit the values.
- Click the
 (Save Properties) icon to save the application details.
The OpenAI application is configured in Automation Studio.
Using OpenAI Activity
- In the Canvas Tools pane, click Process Components to expand and view the associated activities.
- Drag the Application activity and drop on to the Flowchart designer area on the Canvas.
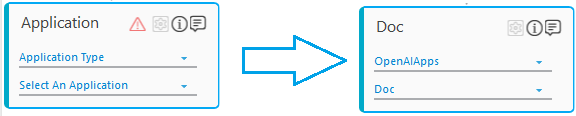
- In the Application Type list, select OpenAIApps.
- In the Select An Application list, select application.
- Double-click the Application activity to add OpenAI activity as OpenAI activity needs to be placed inside the application activity.
- In the Canvas Tools pane, click Cognitive Services to expand the tool and view the associated activities.
- Drag the OpenAI activity and drop on to the Flowchart designer area on the Canvas.

- In the Select Model list, select the model, the supported models of OpenAI for GPT-3 and Codex are listed.
- In the Prompt list, select the checkbox if you wish to set the input as default value, else provide the input parameter by creating argument in the Argument pane, and then select the created argument in the Prompt list.
- In the OutputMapping list, select a string argument holding the JSON response for output from the OpenAI application.
- Post execution, the relevant output is generated. You can use the JSON activity to retrieve the results from the output. For information on JSON activity, see JSON Activity section in AutomationStudio.
- Save and Test Run the process.
OpenAI Properties
The properties of OpenAI activity are listed in the following table and can be edited in the Properties grid on the right pane.
|
Property Name |
Usage |
|
Control Execution |
|
|
Ignore Error |
When this option is set to Yes, the application ignores any error while executing the activity. If set to NA, it bypasses the exception (if any) to let the automation flow continue; however, it marks the automation status as failure, in case of an exception. By default, this option is set to No. |
|
Delay |
|
|
Wait After |
Specify the time delay that must occur after the activity is executed. The value must be in milliseconds. |
|
Wait Before |
Specify the time delay that must occur before the activity is executed. The value must be in milliseconds. |
|
Misc |
|
|
Best of |
Generates the optimal server-side completion, with the highest log probability per token. |
|
Breakpoint |
Select this option to mark the activity as a pause point during debugging of the process. |
|
Commented |
Select this option to mark the activity as inactive during the process. |
|
DisplayName |
Specify the display name. |
|
Frequency penalty |
Positive values penalize new tokens based on how frequently they have previously appeared in the text, reducing the possibility that the model would repeatedly use the same line of phrase. Value can be between -2.0 and 2.0. |
|
Maximum length |
The maximum number of tokens to generate in the completion. Make sure the maximum tokens are not more than the context length of the model. |
|
Presence penalty |
Positive values penalize new tokens based on whether they have already appeared in the text, increasing the likelihood that the model will talk about new topics. Value can be between -2.0 and 2.0. |
|
Stop sequences |
Specify the sequence value, Value can be upto 2, the API stops generating tokens after the specified value. |
|
Temperature |
Specify the sampling temperature to use between 0 and 2. Higher values like .8 makes the output more random whereas lower values like .2 makes output more focused and deterministic. |
|
Top p |
An alternative to sampling with temperature called nucleus sampling where the model considers the results of the tokens with top_p probability mass. Here, .01 means only the tokens comprising the top 10% probability mass are considered. |
|
NOTE: |
For more information on the OpenAI specific properties in the Misc section, see the OpenAI documentation at https://platform.openai.com/docs/api-reference/completions. |
See Also
The following listed models of OpenAI for GPT-3 and Codex are supported for the OpenAIApps application.
- GPT-3
- text-davinci-003
- text-curie-001
- text-babbage-001
- text-ada-001
- davinci-instruct-beta
- davinci
- curie-instruct-beta
- Babbage
- ada
- Codex
- code-davinci-002
- code-cushman-001
In case the OpenAI platform has additional models having similar properties, you can add them in the activity by updating the modelconfig.xml file placed at <<Installation Directory>>\AutomationStudio\bin\Activities\OpenAI\Resources.
You can add the new models to the list in the .xml file.
|
<?xml version="1.0" encoding="UTF-8"?> -<configuration> -<Models> -<Model Type="GPT-3"> <Names>text-davinci-003, text-curie-001, text-babbage-001, text-ada-001, davinci-instruct- </Model> -<Model Type="Codex"> <Names>code-davinci-002, code-cushman-001 </Names> </Model> </Models> </configuration> |
After you update the modelconfig.xml file with the new supported models, ensure to close the OpenAI process and relaunch it from the Automation Studio to use the newly added models.