Runtime Configuration
Runtime Configuration helps to edit the configuration settings related to Robots, Proctor, and Agent.
|
NOTE: |
You need to have Super Admin Privileges to access the Runtime Configurations. |
To access runtime configuration:
- Login to Admin Module > Control Tower.
- Click the
 (Runtime Configuration) icon. The Runtime Configuration page appears.
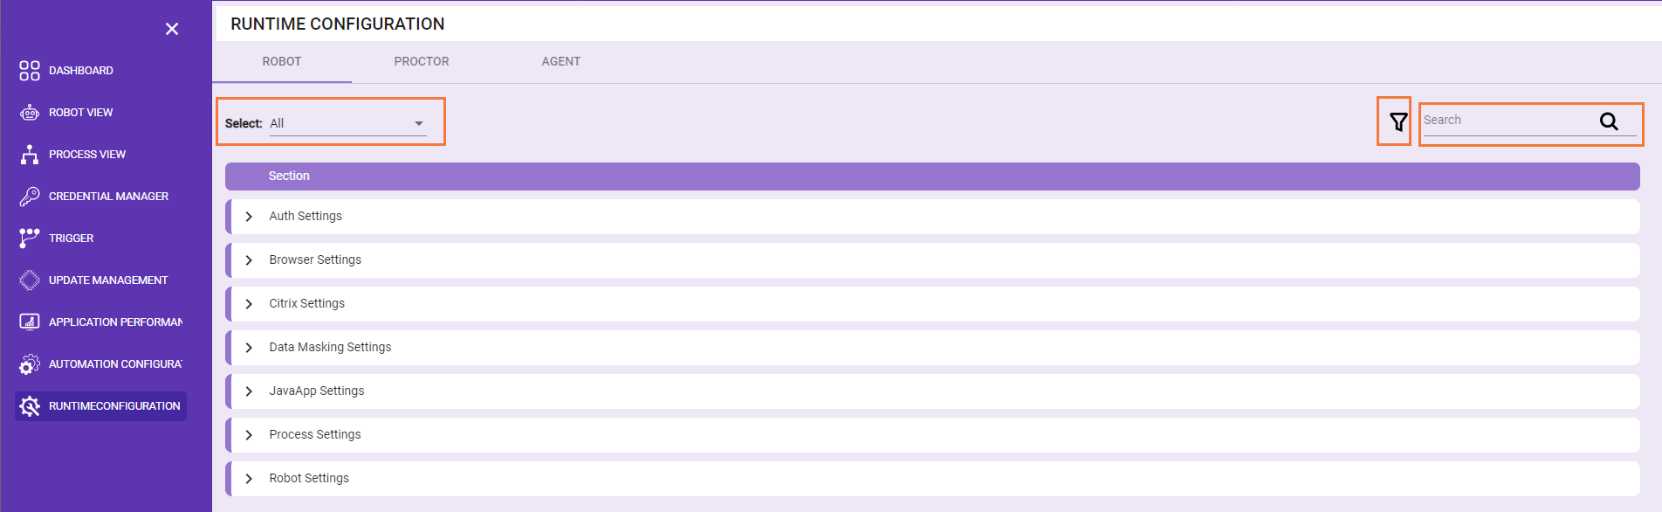
- Click on Select to choose the Robot or Agent whose configurations you want to modify or choose All to modify the settings of all the available Robot or Agent.
NOTE:
All the available Robots are listed in the Select list, irrespective of the Robot state you can modify the configurations. The updated configuration is applied to the Robot when you restart the Robot.
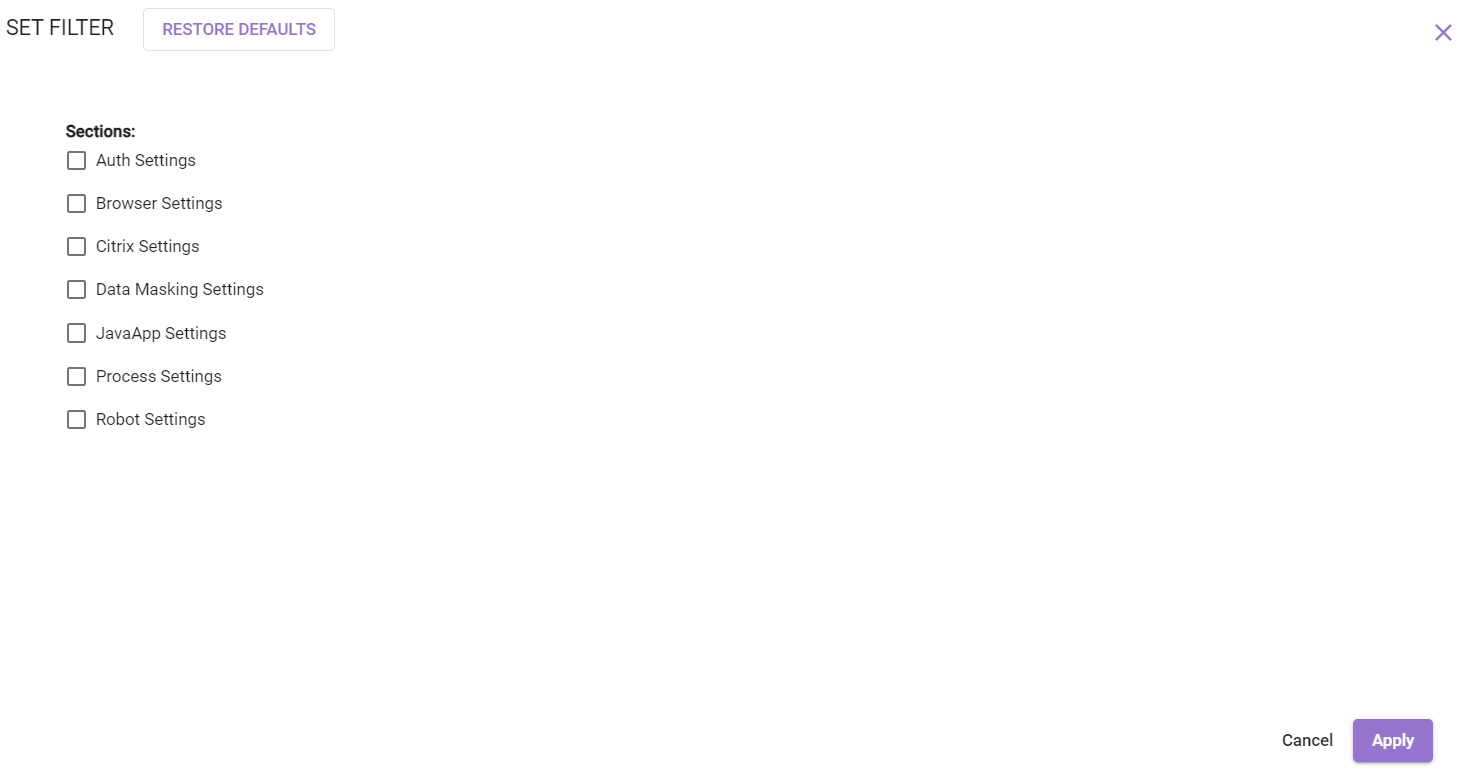
- Click on
 to filter based on the section, the available sections are listed in the SET FILTERS window.
- Click on
 to search based on the Key present across the settings under the sections. The search function displays the Key with the searched word under different settings.
Select the specific configuration settings for the more details.
|
NOTE: |
When you modify a setting for all the Robots and the same setting is modified for an individual Robot, the setting done at the individual Robot level takes precedence. |
Robot
You can edit the configuration settings related to Robot.
To modify the Robot settings:
- Login to Admin Module > Control Tower.
- Click the (Runtime Configuration) icon. The Runtime Configuration page Robot tab appears.

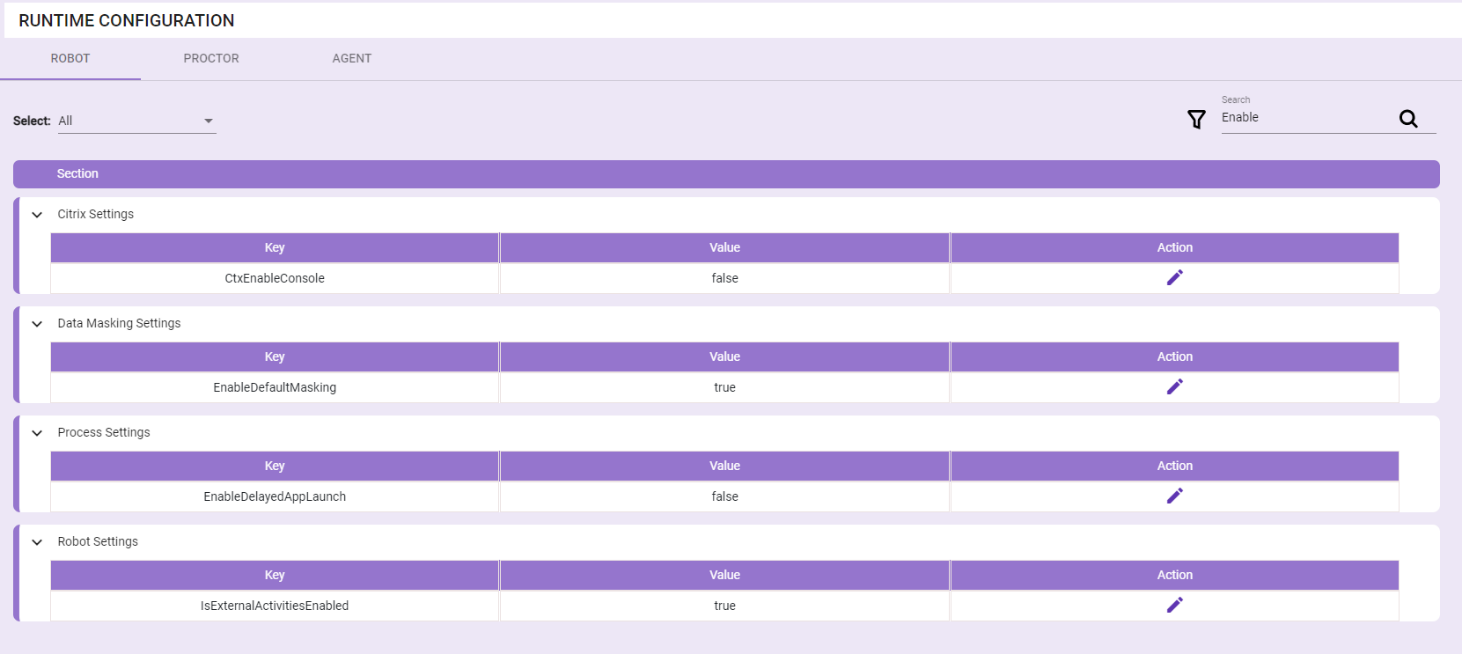
- Click the
 to expand the required Section. The associated Key and Value fields are displayed. The table below lists the Key description for each settings.
 - Click the
 edit icon of the Key whose value you want to modify.
|
Key |
Description |
| Auth Settings | |
| CredentialManager | You can edit the custom credential manager for the Robot authentication. |
| DomainName | You can edit the domain name used for the Robot authentication. |
| AutomateLogin | The Robot secure authentication flow with IDP applicable for SAML and OIDC flow. In case of any IDP restriction, you can provide custom DLL. |
| AutomateLoginClass | The Robot secure authentication implementation class applicable for SAML and OIDC flow. |
| AutomateBrowser | You can specify the browser used for Robot secure authentication. The allowed browsers are Chrome and IE. |
| SSOLoginWaitTime | You can specify the wait time for authentication to complete. |
| Browser Settings | |
| ChromeForceAccessibility | You can specify if you want the user accessibility in the Chrome browser only. |
| WaitBeforeAttachWatinToBrowser | You can specify the wait time in milli seconds before reattaching Watin to the browser. |
| RetryCount | You can specify the maximum retry count when the web element is not found. |
| AutoTurnOffPopupBlocker | You can turn the popup blocker on or off for the browser. |
| EdgeForceAccessibility | You can specify if multi window session is allowed, in which more than one Microsoft Edge can be opened simultaneously. |
| EdgeProxyServer | You can specify the proxy server address to be used by the Edge driver to disable the Auto Detect LAN setting. You have to set the value to blank in case you want to allow Detect LAN settings for the Edge browser. |
| Data Masking Settings | |
| EnableDefaultMasking | You can set the value to true, in case an error occurs while applying configured masking pattern default masking is done. |
| JavaApp Settings | |
| AutomationWay | Option to attach automation agent with java application. If you are using fire eye service, you need to set the value as JAVA_OPTION. |
| javaAppMaxLaunchTime | You can specify the maximum time the Java application can take to launch. |
| Process Settings | |
| StudioSignInTime | You can specify the time out for each signin process. |
| StudioResetTime | You can specify the time out for each reset process. |
| StudioSearchTime | You can specify the time out for each process. |
| ExcelloopValuePre176Behaviour | This value has to enabled for the processes before 17.6 and has an excel loop. |
| ResetTimeInterval | You can specify the reset time out value in milli seconds. |
| SearchOnResetFail | You can specify if you like to call the search option even after the reset fails. |
| SearchOnProcessLevelResetCompletion | You can specify to trigger search after the reset is complete for a process. |
| EnableDelayedAppLaunch | You can enable or disable the option to delay an application launch. |
| SyncSignInWebApps | You can specify the list of application names to be launched and signedin sequentially separated by comma. |
| TimerInterval | You can specify the time interval to launch and signin all the applications. |
| CallTimeCounter | You can specify the search time out value for all the applications. |
| ReloadTimerInterval | You can specify the time interval to reload all the applications. |
| ResponseTransferTime | You can specify the response transfer time for each process. |
| Robot Settings | |
| isTrueFCFS |
The Robot may be configured to operate on a first come, first served basis. |
| UserInstanceDirectory | You can specify the Robot instance directory. |
| RobotAutoRecoveryCount | You can specify the number of times Robot should try to recover itself from frozen state during the start process. |
| IsExternalActivitiesEnabled | You can enable or disable the external activities. |
| RootDirectory | You can specify the Robot root directory. |
- Make the necessary changes and click Save to save the changes.
Proctor
You can edit the configuration settings related to Proctor.
To modify the Proctor settings:
- Login to Admin Module > Control Tower.
- Click the (Runtime Configuration) icon. The Runtime Configuration page appears, go to Proctor tab.
- Click the to expand the required Section. The associated Key and Value fields are displayed. The table below lists the Key description for each settings.
- Click the edit icon of the Key whose value you want to modify.
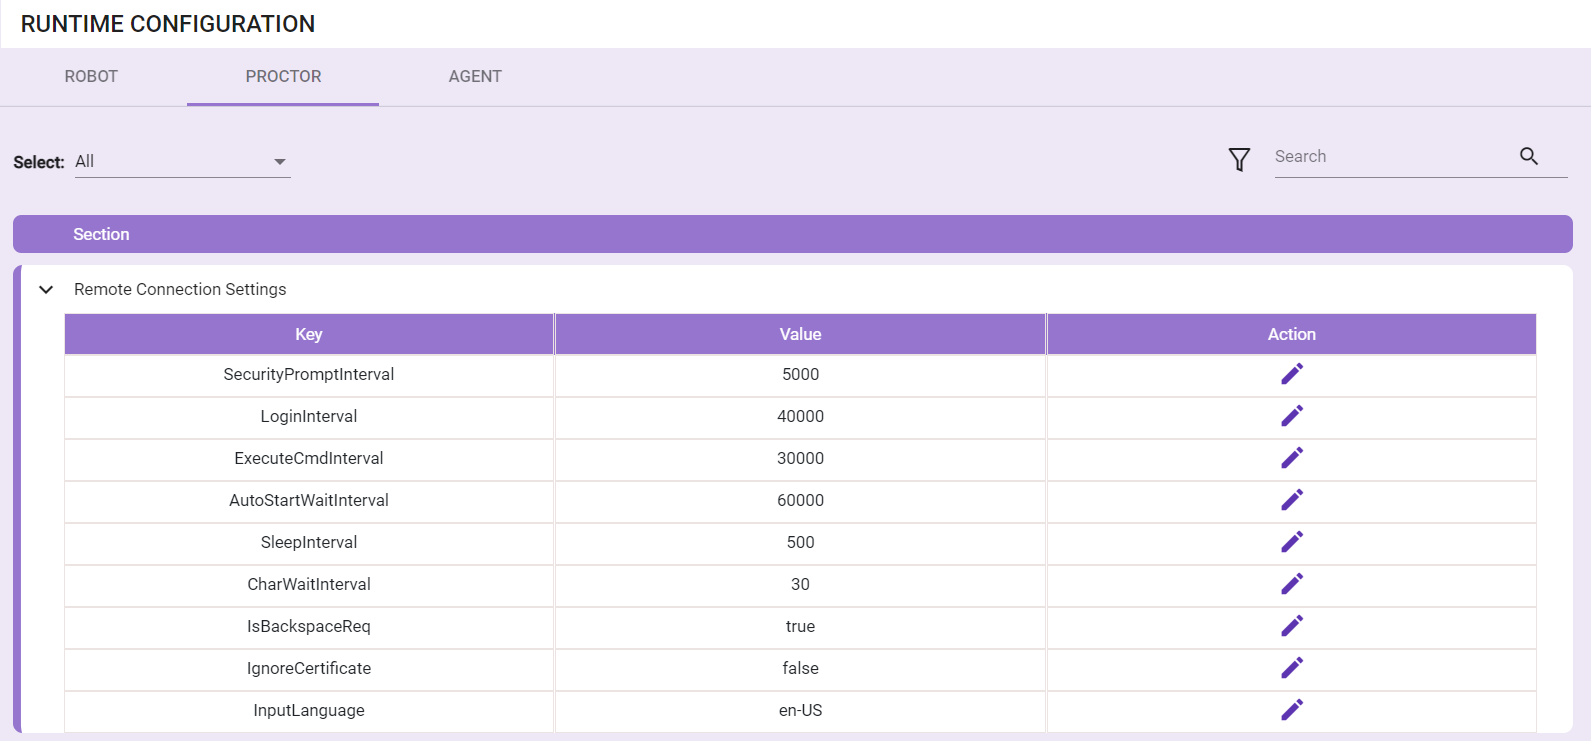
Key
Description
Heartbeat_Timer The time interval in which Proctor sends its heartbeat.
It is recommended not to change the default value.SecurityPromptInterval It signifies the interval of security prompts specified in milliseconds. LoginInterval It signifies the time interval that is required for user session to get created i.e. time required for you to login to your system. ExecuteCmdInterval It signifies the time interval required by the Proctor to complete the actions and then start the agent.
When a new agent is added, Proctor has to perform certain actions on the system such as, making a new copy of the Robot Agent folder for the particular user.
APMClientRelativePath It signifies the folder path of the APM client along with the APMClinet.exe file name. APMClinetRunCheckInterval It Signifies the time interval to check if the APM client is running. By default, this value is set to 5 minutes. ConnectRMQMessenger It Signifies if the cloud messaging gateway is connected. By default, it is set to FALSE. AutoStartWaitInterval It signifies the time interval to wait before the agents start after Proctor restart. It must be specified in milliseconds. By default, it is set to 60000 milliseconds. SleepInterval It signifies the wait time until the Run window is open, command is written and the Enter key is pressed. CharWaitInterval It signifies the wait time while typing each character in the Run window. IsBackspaceReq It signifies if backspace must be provided prior to writing command in the Run window. By default, it is set to true. IgnoreCertificate It signifies if the freerdp certificate check must be ignored or not. By default, it is set to false. Change this value to true if you want to apply the check. PreviousVersionProctorPath It signifies the Proctor installation path. This property is used in the migration. Previous proctor version It signifies the previous version of proctor. This property is used in the migration. SecurityPromptHandlerDll Signifies the DLL name to handle connect and disconnect the prompts using the EV.AE.DefaultSecurityPopupsHandler.dll file at the location- Robot > Proctor InputLanguage Signifies the Keyboard Language of the system. The default value is en-US. This represents the English(United States) language. Out of the box support is also available for English (United Kingdom) keyboard. In case, you are using the English(United Kingdom) keyboard then, change the value of this property to “en-UK”.
<add key=”InputLanguage” value= “en-UK”
- Click the
- Make the necessary changes and click Save to save the changes.
Agent
You can edit the configuration settings related to Agent.
To modify the Agent settings:
- Login to Admin Module > Control Tower.
- Click the (Runtime Configuration) icon. The Runtime Configuration page appears, go to Agent tab.
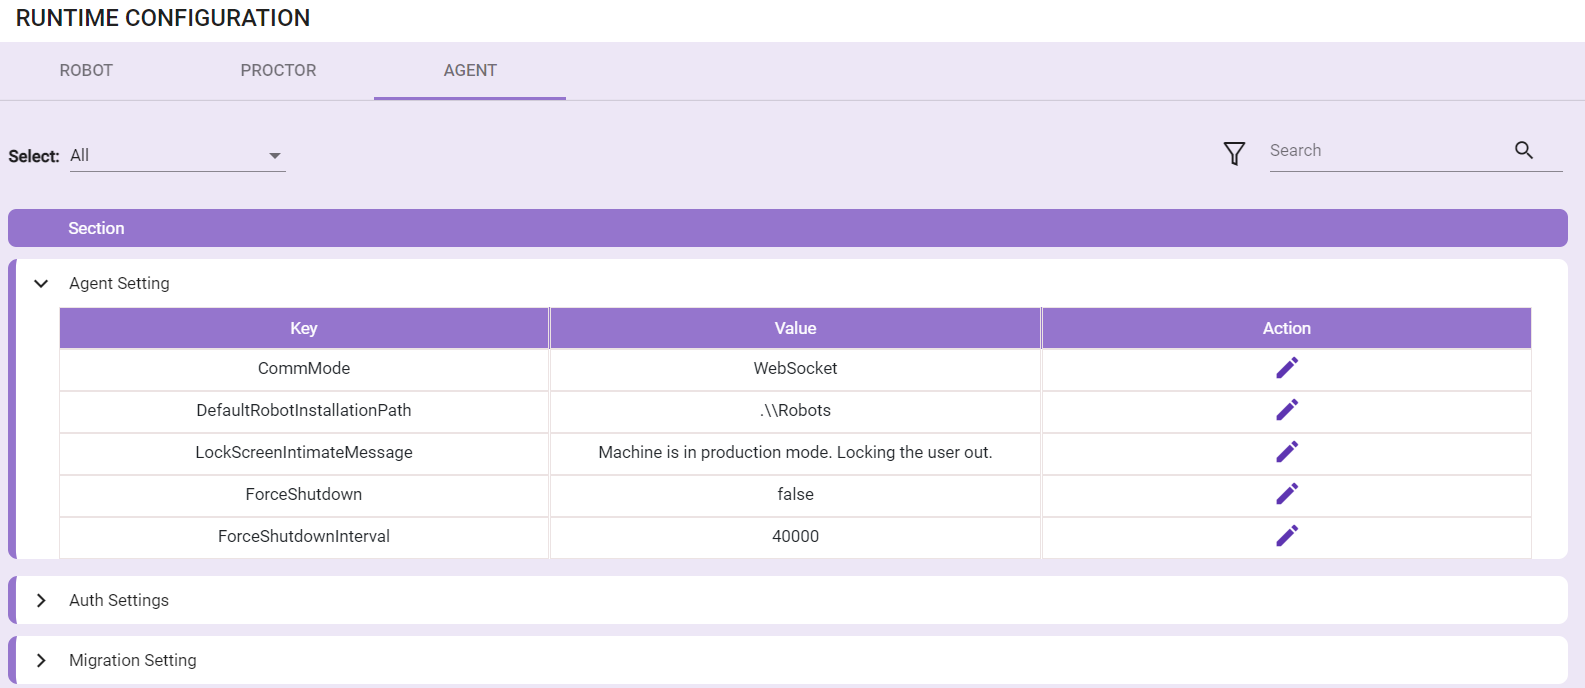
- Click the to expand the required Section. The associated Key and Value fields are displayed. The table below lists the Key description for each settings.
- Click the edit icon of the Key whose value you want to modify.
Key
Description
Agent Settings LockScreenIntimateMessage You specify if the message has to be shown on the Lock Screen when RobotAgent is running in production mode. ForceShutdown You can specify whether or not you want the robot to shutdown forcefully before process execution is completed. ForceShutdownInterval You can specify the time after which robot is shutdown forcefully. DefaultRobotInstallationPath You can specify the path for Robot installation. Robots will be installed inside this folder in their own subfolder. CommMode You can specify the Agent and Robot communication mode. Auth Settings CustomAuthentication You can enable or disable the Custom authentication. EncryptionDllName You can specify the custom encryption Dll name. Credential Manager You can specify configuration of customer credential manager extension. Migration Setting OldRobotAgentExeName You can specify the name of Robot Agent EXE which needs to be upgraded. OldRobotAgentPath You can specify the path of the Robot Agent on the machine which needs to be upgraded. You have to provide full path, for example; D:\AE\RobotAgent
- Make the necessary changes and click Save to save the changes.