Using Windows Mode
Unlike automation of web application, while configuring UI elements of the windows application, systems highlights the intended area and performs the subsequent action rather than just capturing the step of automation process workflow. For example, if you want to capture the X (Close) button of the windows application to automate closing of the application, the system closes the application when you click the area on the UI even before launching the Field Properties pane. To help avoid such scenarios, Windows Mode configuration lets you configure the UI elements in two different ways:
- Default Configuration- Allows to configure the UI elements of the windows application by highlighting the area. It is useful when you only want to capture the area and there is no subsequent action taking place.
- Advance Configuration- Allows to configure the UI elements of the windows application in a hierarchical manner available within an element tree. You can select the intended UI element to open the Field Properties pane without performing the subsequent action.
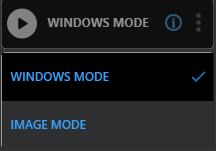
Scenarios where the WINDOWS MODE does not work as expected, you can even switch between WEB MODE and IMAGE MODE to configure the field.
Default Configuration
- Use the
 (Settings) icon of the required Application activity to launch Multimodal Interface. The configured application appears opens in the undocked mode. See Windows Application activity to know how to use the activity.
- Click the
 (Play) button to capture the UI elements within the intended application.
 - Press the Ctrl key, hover over the windows application and simultaneously select the UI element to start capturing the automation steps that you want to perform in the windows application. The UI element that you can capture gets highlighted with a red box.
- Click the highlighted area. The Field Properties panel of the Windows Mode of the Windows application appears. The fields that are mandatory are highlighted with red box.
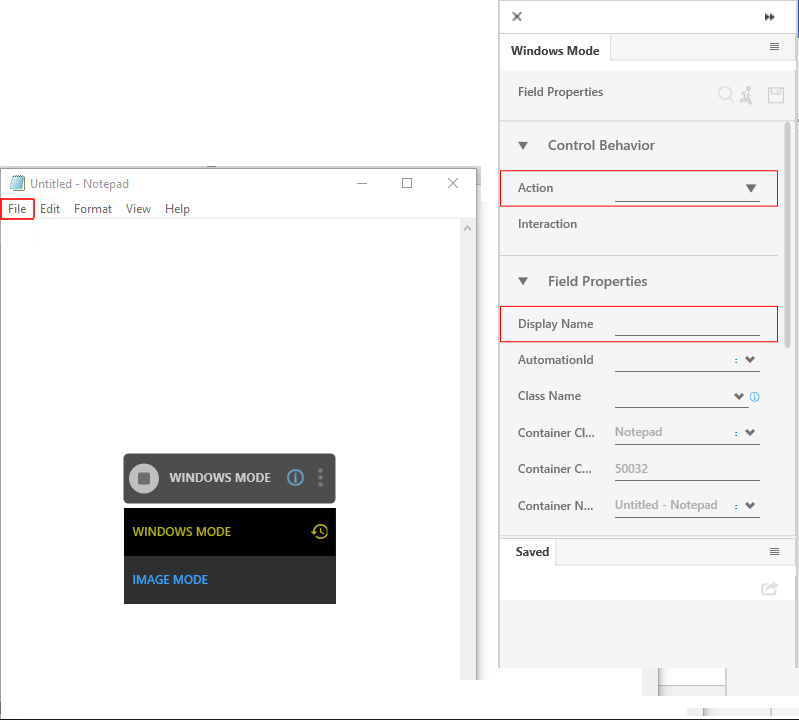
- In the Action list, select the action that you want to perform on the captured area. Other mandatory fields changes depending on the selection from the list. Enter details of all the mandatory fields and other relevant fields as per your requirement. Refer Field Properties table to know more about the available fields and their respective properties.
- Click the
 (Save) icon to configure the fields.
 - Repeat step 2 through 5 to capture all the steps involved in the automation process workflow. The field that you configured and saved appears in the Saved pane of the Field Properties panel. You can edit or delete these steps in the Saved pane.
- Click the
 (Save configured field and return to studio) icon to save the field that you configured and return to the Studio menu.
The fields related to WINDOWS MODE using default configuration are configured.
Advance Configuration
- Use the (Settings) icon of the required Application activity to launch Multimodal Interface. The configured application appears opens in the undocked mode. See Windows Application activity to know how to use the activity.
- Click the (Play) button to capture the UI elements within the intended application. The Advance Configuration window box opens in the Task bar of the system, available behind the Multimodal Interface window.
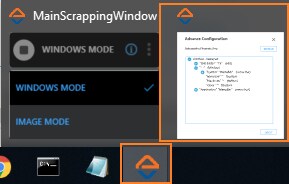
- Click the Advance Configuration window to bring it in focus. It displays all the UI elements of the application under a tree structure.

- Expand and select the element from the Automation Element Tree. The corresponding UI element on the windows applications gets highlighted in red. It helps to identify the required UI element for automation.
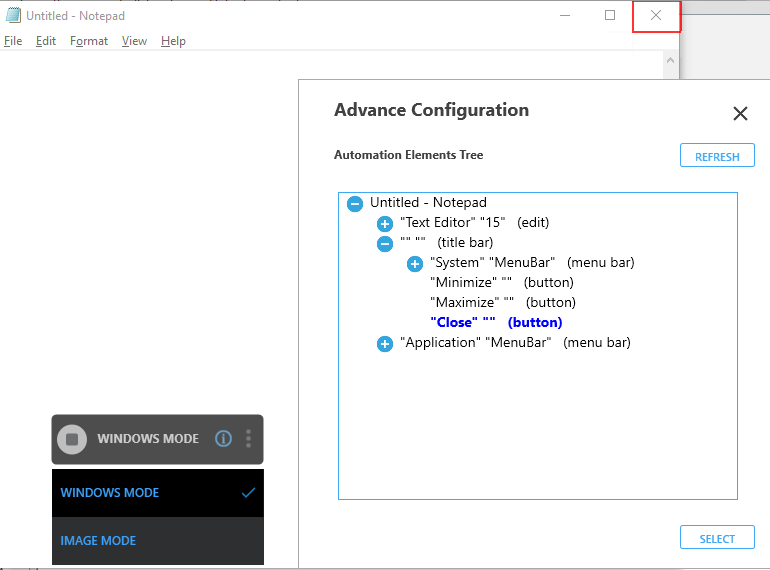
- Click SELECT. The Field Properties panel of the Windows Mode of the Windows application appears. The fields that are mandatory are highlighted with red box.
- In the Action list, select the action that you want to perform on the captured area. Other mandatory fields changes depending on the selection from the list. Enter details of all the mandatory fields and other relevant fields as per your requirement. Refer Field Properties table to know more about the available fields and their respective properties.
- Click the (Save) icon to configure the fields.
- Repeat step 2 through 7 to capture all the steps involved in the automation process workflow. The field that you configured and saved appears in the Saved pane of the Field Properties panel. You can edit or delete these steps in the Saved pane.
- Click the (Save configured field and return to studio) icon to save the field that you configured and return to the Studio menu.
The fields related to WINDOWS MODE using advance configuration are configured.
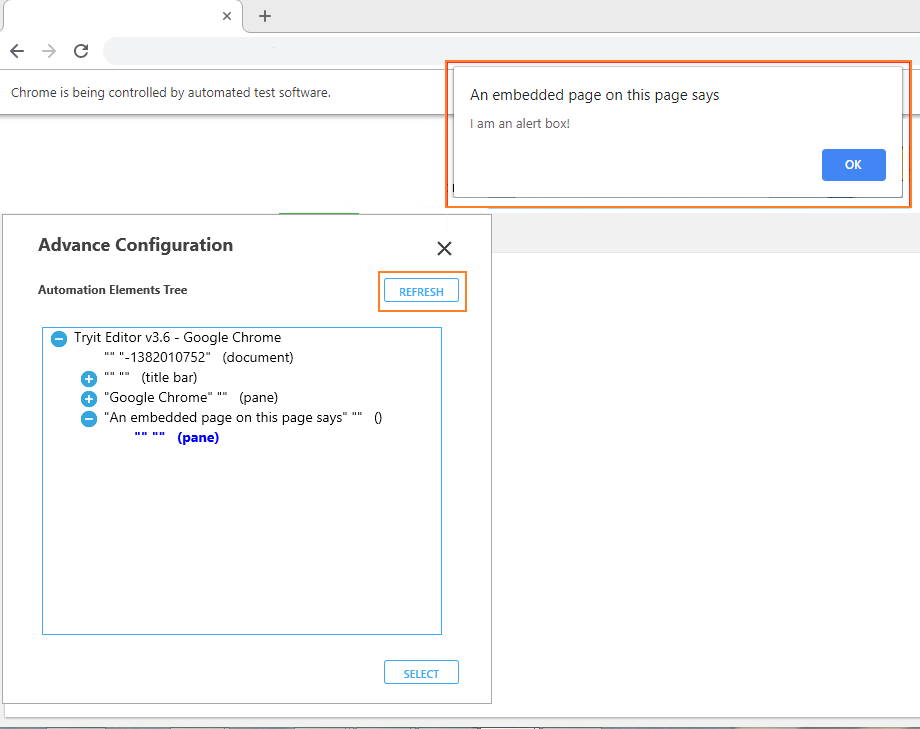
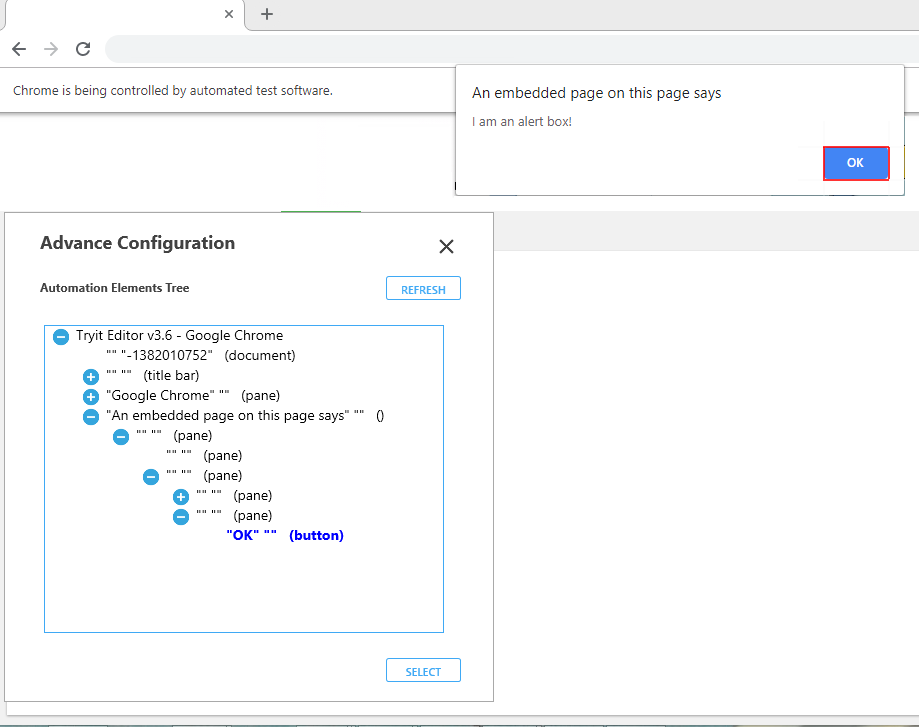
Advance Configuration Special Cases
- In some cases it is observed that while configuring the JavaScript pop-up in Chrome browser, the Advance Configuration tree is not able to highlight some of the inner UI elements of the pop-up box.
- To highlight the intended element, try highlighting the closest element from the target UI element, and then click REFRESH button on the Advance Configuration tree.
- In the below sample screen shot, the OK button does not appear in the Advance Configuration tree. Try highlighting the pane itself, and then click REFRESH.
- The Advance Configuration tree tries to find the target element that must start appearing after refreshing the configuration tree.
Windows Mode Control Properties and Field Descriptions
The properties of Windows Mode fields are listed in the following table:
|
Property Name |
Usage |
||
|
Control Behavior |
|||
|
Action |
The applicable action or interaction that can be performed on the selected UI element. The available options change as per the window application being automated:
|
||
|
Interaction |
The corresponding interaction class name auto populated against the selected action. |
||
|
Interaction |
The interaction or the action type corresponding to the selected interaction. |
||
|
Appears if Action selected is Legacy Interaction. |
|||
|
Action Type |
The interaction or the action type corresponding to the legacy interaction. |
||
|
Key |
Appears if Action selected is Keyboard Input. The single key set as input from the keyboard. |
||
|
Key |
Appears if Action selected is Keyboard Input and Interaction selected is DoubleKeys. The second key which is set as input from the keyboard along with the first key. |
||
|
Key |
Appears if Action selected is Keyboard Input and Interaction selected is TripleKeys. The third key which is set as input from the keyboard along with the first and the second key. |
||
|
Text |
Appears if Action selected is Keyboard Input and Interaction selected is TextEntry. Allows user input as a text. |
||
|
Mouse Action |
Appears if Action selected is Mouse Click. Allows user input using the mouse. Available options are:
|
||
|
Field Properties |
|||
|
Display Name |
User specified display name of the windows element selected. |
||
|
AutomationId |
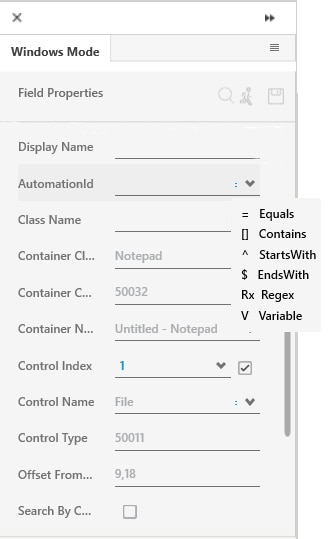
Unique identifier for the automation element in the automation tree. See Handling Dynamic Controls section to know more about the usage of this field. |
||
|
Class Name |
Class name of the UI element as defined by the UI element developer. See Handling Dynamic Controls section to know more about the usage of this field. |
||
|
Container Class Name |
Container class name of the UI element as defined by the developer. See Handling Dynamic Controls section to know more about the usage of this field. |
||
|
Container Control Type |
Control type of the container of the UI element as defined by the UI element developer. |
||
|
Container Name |
Container name of the UI element as defined by the developer. See Handling Dynamic Controls section to know more about the usage of this field. |
||
|
Control Index |
Index of the current UI element within the entire set of elements with the same values of automation Id, class name and UI element name as that of the current element. |
||
|
Control Name |
Control name of the UI element as defined by the UI element developer. See Handling Dynamic Controls section to know more about the usage of this field. |
||
|
Control Type |
Control type of the UI element as defined by the developer. |
||
|
Appears if Action selected is Mouse Click. |
|||
|
Offset From Control |
It is the distance between the UI element and the anchor. |
||
|
Is applicable only for AssistEdge Engage. Appears if Action selected is If Control Exist. |
|||
| Find By Coordinates | Checkbox coordinate property to get the relative coordinate position of the control (internally). By default, Find By Coordinates is not selecte | ||
| Appears if Find By Coordinates is selected. | |||
| Focus Window |
Checkbox to set focus. To bring the control in focus.
|
||
|
Is C-View |
If selected, the field configuration captured in Automation Studio is visible in the C-View tab of Engage application. |
||
|
Search By Control Order No. |
Signifies if the UI element needs to be searched based on the UI element order number. Control order number is the index of the current element within the entire set of elements with the same value of UI element Id as that of the current element. |
||
|
Appears if Action selected is Get Text. |
|||
|
Variable Name |
User defined name of the variable that stores the captured value. |
||
|
Variable Type |
Type of the variable defined. Available options are:
|
||
|
Misc Properties |
|||
|
Max wait for input idle |
The maximum time interval in milliseconds for which the windows plugin waits on launch before it starts executing the configured interactions. |
||
|
Retry Count |
Number of times, the plugin retries to find a UI element, if not found. |
||
|
Retry Interval (ms) |
The time interval in milliseconds for which the plugin waits before it attempts for a retry. |
||
Handling Dynamic Controls
Automation Studio provides different identification criteria and Parametrization of the value of the dynamic field properties of the UI elements. You can reconfigure some of the auto captured field properties of such UI elements to create a more effective way of identifying the indented UI element. For such controls, remove the dynamic part of the string and use an appropriate option for UI element identification. For example, if a Class Name field is recognized as AssistEdge_Studio_20180205083009, the later part of the string, which is a timestamp,is dynamic and can be removed. Retain only the static part and reconfigure the field properties using the suitable option.
Following are the different field properties that can be reconfigured against their respective values:
- AutomationId
- Class Name
- Container Class Name
- Container Name
- Control Name
Use the  (drop down arrow) icon to reconfigure the identification criteria. Available options are:
- Equals- Identifies the UI element based on the exact match with the value of the selected field property.
- Contains- Identifies the UI element based on the string present in the value of the selected field property.
- StartsWith- Identifies the UI element based on the starting string of the value of the selected field property.
- EndsWith- Identifies the UI element based on the ending string of the value of the selected field property.
- Regex- Identifies the UI element with the string matching the value of the selected field property as per the identification pattern defined through the provided regular expression such as a.b, *txt and others.
- Variable- Identifies the UI element as per the parametrization of the value of the selected field property value. Parametrization allows to run the identification process over and over again using different values. With parameterization, windows controls with looping and assignment activities, are used.