Step-By-Step Guide to Use Calendar 365 Activity to Find Meeting Time, Create Event and Send RSVP
Let’s see an example where Admin needs to find a suitable time slot for an upcoming event and then creates the event sending the event invite to the Writers’ team in the organization. The Writer’s team, who is the recipients of the created event, sends the RSVP to the Admin.
Prerequisites:
- Register Admin’s as well as Writer team’s Calendar 365 (Microsoft Office 365 application) in Azure Active Directory.
|
NOTE: |
The Microsoft Office 365 application of both the users must be registered in the Azure Active Directory as one account or user automates finding the meeting time and creating the event invite. While the other account or user automates sending the RSVP to the event invite. |
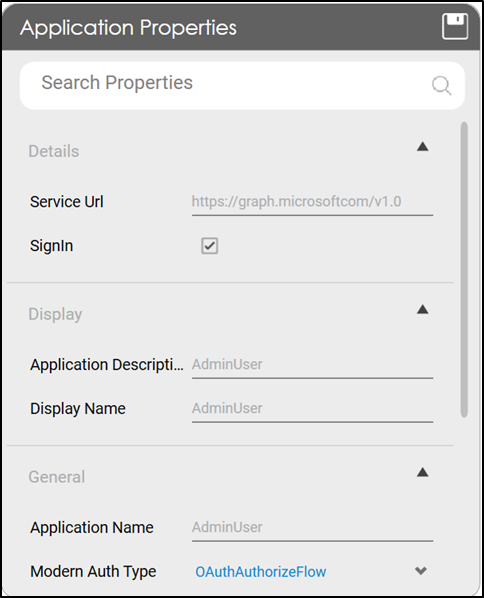
- Configure both Microsoft Office 365 application or account in Automation Studio. You must add the Microsoft Service URL with an option to create a sign-in process. This lets you establish a connection between Office 365 application and Automation Studio to automatically sign in and perform the automation. Here, the user who needs to find the meeting time and create the event has configured the application with the name, AdminUser and the user who send the RSVP has configured the application with the name, WritersTeam.
- Two different access tokens to authorize and login to respective Microsoft Office 365 applications.
The access tokens can be fetched using the Oauth activity. The access tokens for AdminUser application and WritersTeam application are saved in Out arguments, AdminToken and WritersTeam respectively.
To automate the process of finding meeting time and creating new event:
- Continue with the same automation process workflow where you have used Oauth activity to fetch the access token, AdminToken.
Or
Create a new process and use the Reuse Process activity to use the existing Oauth process workflow. Ensure that the Oauth process is published if you want to reuse the workflow.
Here we have continued with the Oauth process workflow itself. - Create the following arguments:
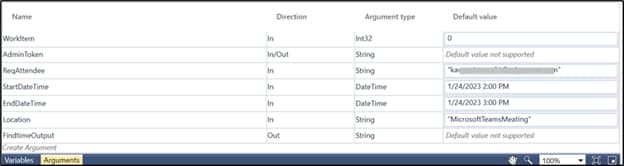
- ReqAttendee- an In argument to save and pass the Emaild Id of the attendees whose meeting time slot you want to find out.
- StartDateTime- an In argument to save and pass the start date and time of the meeting.
- EndDatetime- an In argument to save and pass the end date and time of the meeting.
- Location- an In argument to save and pass the location of the meeting.
- FindtimeOutput- an Out argument to store the result of the FindMeetingTimes feature.
- CreateEventOutput- an Out argument to store the result of the Create Event feature.
|
NOTE: |
In the Oauth activity, ensure to set the Scope to Files.ReadWrite.All Calendars.Read Calendars.ReadWrite permission to enable Automation Studio with the required permission to use Calendar 365 application. |
- From the Canvas Tools panel, add Application activity to the Flowchart designer.
- In the Application Type list, select Office365.
- In the Select an Application list, select the configured Office 365 application, Calendar365.
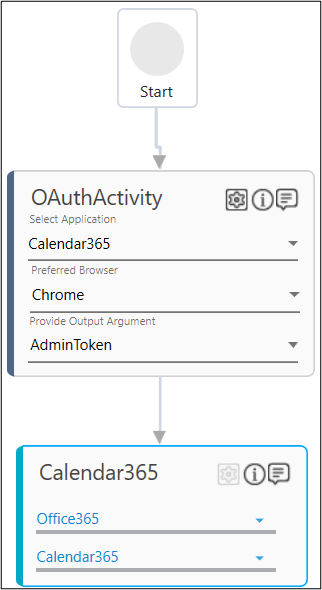
- Drag the Calndar 365 activity and drop inside the Office365 Application block.
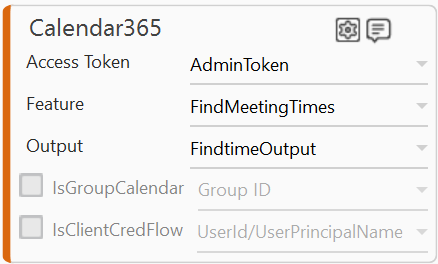
- In the Access Token list, select AdminToken argument.
- In the Feature list, select FindMeetingtimes.
- Click the
 (Setting) icon to configure the input configuration. The Input Configuration screen appears.
 - Define the mandatory options:
- Corrsponding to the RequiredAttendees parameter, select ReqAttendee argument in the Workflow Arguments list to pass the Emaild Id of the attendees whose meeting time slot you want to find out
- Corresponding to the Start Date Time parameter, select StartDateTime argument in the Workflow Arguments list to pass the start date and time of the meeting.
- Corresponding to the End Date Time parameter, select EndDateTime argument in the Workflow Arguments list to pass the end date and time of the meeting.
- Corresponding to the Location parameter, select Location argument in the Workflow Arguments list to pass the location of the meeting.
- Corresponding to the activityDomain parameter, select the required hours of the day when you want to schedule the meeting. Here, we have set the hours within the work domain.
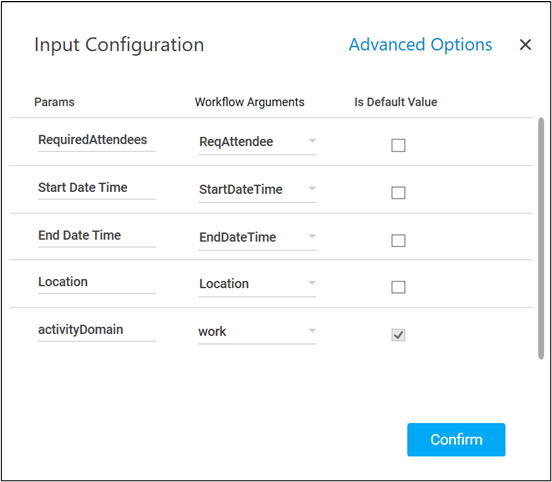
- Click Confirm.
- Click the
-
In the Output list, select FindtimeOutput to store the result of the FindMeetingTimes operation. You can add a JSON activity block and parse the output of the FindtimeOutput operation.
You can use the If activity to create the required event if the attendee is available, else, print a message stating no slots are available.
- Drag the Calendar 365 activity and drop below the FindMeetingTimes activity block.
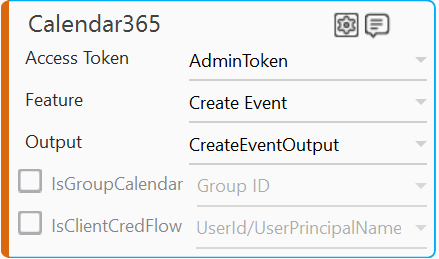
- In the Access Token list, select AdminToken argument.
- In the Feature list, select Create Event.
- Click the (Setting) icon to configure the input configuration. The Input Configuration screen appears.
- Define the mandatory options:
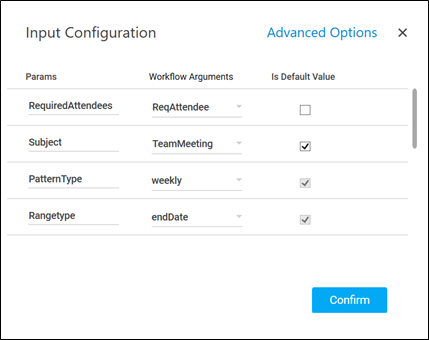
- Corresponding to the RequiredAttendees parameter, select ReqAttendee argument in the Workflow Arguments list to pass the Emaild Id of the attendees who are required for the event that you want to create.
- Corresponding to the Subject parameter, select the Is Default Value checkbox and in the Workflow Arguments field enter the subject of your event. Here, we have entered TeamMeating as the subject.
- Corresponding to the PatternType parameter, select weekly option from the Workflow Arguments dropdown list. This indicated that the event repeats weekly.
- Corresponding to the Rangetype parameter, select endDate option from the Workflow Arguments dropdown list indicating that the event occurs between a specified PatternType.
- Corresponding to the StarTime and EndTime parameters, select the Is Default Value checkbox and in the respective Workflow Arguments field enter the start and end time of the event. Here we entered 04:00:00 as the start time and 04:30:00 as the end time.
- Corresponding to the Interval parameters, select the Is Default Value checkbox and in the Workflow Arguments field enter 2 indicating that the event repeats after every 2 weeks.
- Corresponding to the DaysOf
Week parameters, select the Is Default Value checkbox and in the Workflow Arguments field enter the required day of the week on which you want the event to occur. Here, we have entered Monday. - Corresponding to the StartDate parameters, select the Is Default Value checkbox and in the Workflow Arguments field enter the required date to start the event. Here, we have entered 2023-02-07 indicating that the event start from 7th February 2023 onwards.
- Click Confirm.
- Click the
- In the Output list, select CreateEventOutput to store the result of the Create Event operation.
To view the FindMeetingTimes and CreateEvent outputs in Automation Studio, you can add WriteLine activities for each operation. It prints the result in the Studio Console Output tab after you test run the process. - Save the process.
- Setup the environment and enter the required login details.
- Perform test run.
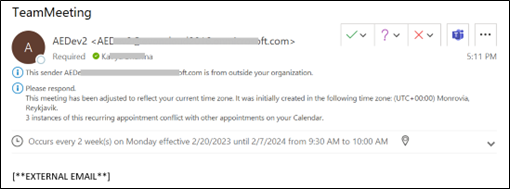
Below are the sample screen shots of the successful automation workflow and the created event:

Now, let’s see the other process workflow to send the RSVP of the above created event.
To automate the process of sending the RSVP as the attendee:
- Continue with the same automation process workflow where you have used Oauth activity to fetch the access token, WriterToken.
Or
Create a new process and use the Reuse Process activity to use the existing Oauth process workflow. Ensure that the Oauth process is published if you want to reuse the workflow.
Here we have continued with the Oauth process workflow itself. - Create the following arguments:
- RSPVOutput- an Out argument to store the result of the RSVP feature.

- RSPVOutput- an Out argument to store the result of the RSVP feature.
|
NOTE: |
In the Oauth activity, ensure to set the Scope to Files.ReadWrite.All Calendars.Read Calendars.ReadWrite permission to enable Automation Studio with the required permission to use Calendar 365 application. |
- From the Canvas Tools panel, add Application activity to the Flowchart designer.
- In the Application Type list, select Office365.
- In the Select an Application list, select the configured Office 365 application, Calendar365.
- Drag the Calndar 365 activity and drop inside the Office365 Application block.
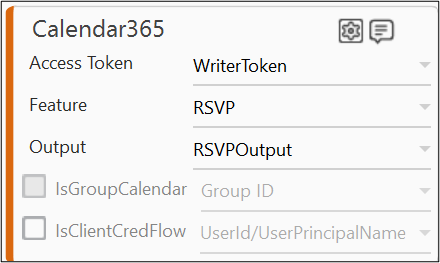
- In the Access Token list, select WriterToken argument.
- In the Feature list, select RSVP.
- Click the (Setting) icon to configure the input configuration. The Input Configuration screen appears.
- Define the mandatory options:
- Corresponding to the EventId parameter, select Is Default Value checkbox and in the Workflow Arguments field enter the event Id of the event for which you want to send the RSVP. You can use the Get Calendar feature to retrieve the required event Id.
- Corresponding to the ReponseType parameter, select accept option to send the RSVP.
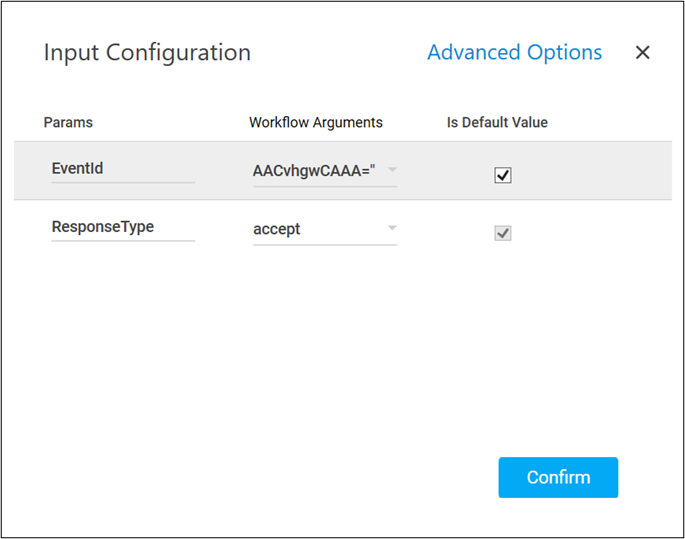
- Click Confirm.
- Click the
- In the Output list, select RSVPOutput to store the result of the RSVP operation.
To view the RSVP output in Automation Studio, you can add WriteLine activities for each operation. It prints the result in the Studio Console Output tab after you test run the process. - Save the process.
- Setup the environment and enter the required login details.
- Perform test run.
Below are the sample screen shots of the successful automation workflow and the created event:
Sample Studio Console Output console:
