Execute ML Model
Execute ML model activity provides a user friendly interface to execute any pre-trained AI-ML model. It also makes it easier for users to quickly obtain the desired output from their data.
The Execute ML Model activity supports the following hosting types:
- Local – the ML model is hosted on the same machine as the Robot.
- Remote - the ML model is hosted on the Remote Linux Machine.
|
NOTE: |
The remote hosting type is supported only for Linux based servers. |
Prerequisite
- Before executing the activity, ensure the following system prerequisites are maintained on the machine:
- Python v3.6 or above.
- ASP.NET Core Runtime 6.0 and .NET Runtime v6.0.
- All the libraries and packages required to execute the ML model are installed on the machine.
- Python and ML expertise are needed.
|
NOTE: |
|
The ML Model that needs to be executed must fulfill the following criteria:
- The ML model has to be synchronous in nature.
- The ML logic must be defined inside a method and method can be either inside or outside a class.
- The method parameter (input and output) data type must be of string datatype, ML model supports only string datatype. The method input parameters must be explicitly casted if other basic datatypes are passed as string using the activity.
Example: In case, a file path needs to be sent as an input, the python script must be updated to read the file from the path sent by the Execute ML model. - For remote hosting type, the Micro AI Bridge service must be running on a Linux machine.
Using Execute ML Model - Local Hosting
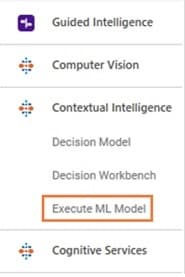
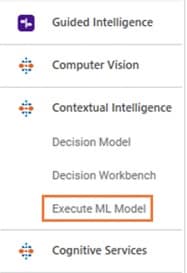
- In the Canvas Tools pane, click Contextual Intelligence to expand the tool and view the associated activities.
- Drag the Execute ML Model activity and drop on to the Flowchart designer on the Canvas.
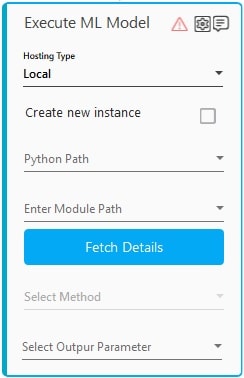
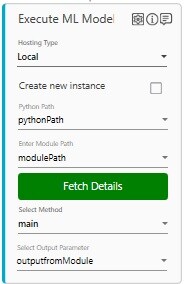
- Under the Hosting Type, select Local to execute the pretrained AI model on the local machine.
- Select the Create new instance checkbox, if you want to create a separate instance for the ML execution process.
Data persistence between methods refers to the ability to retain and access data across multiple methods. If Create new instance is not selected, variables can be shared by methods within the same instance. This allows values to be stored and accessed throughout the lifespan of an instance, enabling data continuity and efficient information exchange. - In the Python Path list, select the parameter containing the python runtime path defined in the parameter bar, for example, C:\Program Files\Python311\python311.dll. You must define the parameter in the Parameter bar to use this option. For more information refer Parameter.
- In the Enter Module Path list, select the parameter that holds the python file to be executed and is defined in the parameter bar, for example, C:\Users\aerpa.user\ImageRedaction.py.

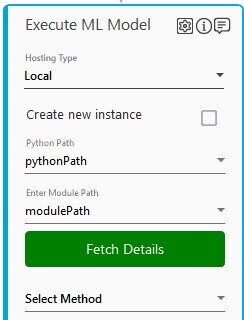
- Click on Fetch Details button, this validates:
- if the Module Path (the python file) and Python Path are present at the specified location.
- If successful, the button turns green and fetches the methods from the ML model.
- If either of the paths are invalid or if there is an error in the specified python file, an error message is displayed as validation error symbol and disappears when a valid path is provided.
The Fetch Details button turns back to blue color in case the Hosting Type changes. And also, if any one of the argument name changes in the following:- Python path
- Module Path
You can click on the Fetch Details button and select the method.
NOTE:
In case the value of a mapped argument changes, the button color remains unchanged.
- if the Module Path (the python file) and Python Path are present at the specified location.
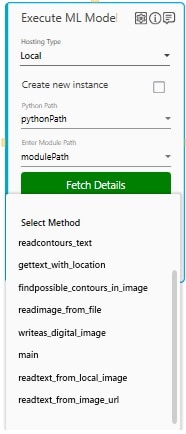
- In the Select Method, choose the method from the available list. This list displays the methods that are defined in the classes and the functions present in the provided python file.
NOTE:
For methods that are present inside a class has the *classname.methodname* naming convention. - In the Select Output Parameter, select the parameter in which you want to store the prediction or the processing output. You must define the output parameter in the Parameter bar to use this option.
NOTE:
The Execute ML Model activity creates a new local environment for every module.
For Example – If there’s a requirement to execute methods in two different python files, then two Execute ML Model Activity will be required. Each activity will create its own separate environment.
Using Execute ML Model – Remote Hosting
- In the Canvas Tools pane, click Contextual Intelligence to expand the tool and view the associated activities.
- Drag the Execute ML Model activity and drop on to the Flowchart designer on the Canvas.
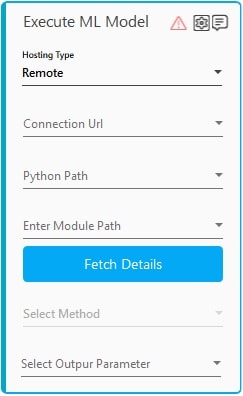
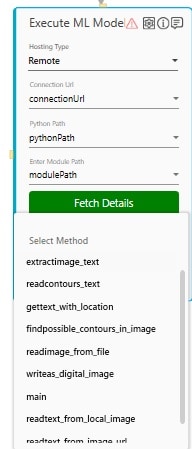
- Under the Hosting Type, select Remote to execute the pretrained AI model on the remote machine.
- In the Connection Url list, select the value of the connection URL to connect with a remote machine. Refer the MicroAI Bridge section to know how to get the connection URL.
- In the Python Path list, select the parameter that holds containing the python runtime path, for example /usr/lib64/libpython3.so. You must define the parameter in the Parameter bar to use this option. For more information, refer Parameter section.
- In the Enter Module Path list, select the parameter that holds the python file to be executed and is defined in the parameter bar, for example:/home/cloud-user/LinearRegression/ImageRedaction.py.

NOTE:
Absolute path must be used while defining Python runtime path and Module path.
For Example:
Windows file path - C:\Users\aerpa.user\ImageRedaction.py
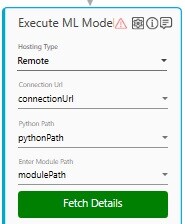
Linux file path - /home/cloud-user/LinearRegression/ImageRedaction.py - Click on Fetch Details button, this validates:
- if the Module Path (the python file) and Python Path are present at the specified location.
- If successful, the button turns green and fetches the methods from the ML model.
- If either of the paths are invalid or if there is an error in the specified python file, an error message is displayed as validation error symbol and disappears when a valid path is provided.
The Fetch Details button turns back to blue color in case the Hosting Type changes. And also, if any one of the argument name changes in the following:- Python path
- Module Path
- Connection URL
You can click on the Fetch Details button and select the method.
NOTE:
In case the value of a mapped argument changes, the button color remains unchanged.
- if the Module Path (the python file) and Python Path are present at the specified location.
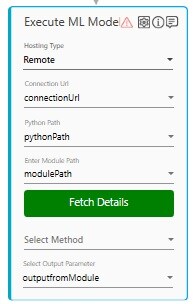
- In the Select Method, choose the method from the available list of methods related to the ML model. This list displays the methods that are defined in the classes and the functions present in the provided python file.
NOTE:
For methods that are present inside a class has the *classname.methodname* naming convention. - In the Select Output Parameter, select the parameter in which you want to store the output. You must define the output parameter in the parameter bar to use this option.
Configure Inputs for Execute ML Model Activity
Input mapping section lets you to configure inputs to the methods selected before. The input column is auto populated with inputs defined in the method, all mandatory inputs are marked with * mark.
- Click the
 (Setting) icon to configure the input parameters. The Input Mapping screen appears.

- Define all the input parameters as in arguments, and select the appropriate input variable from the list.
- Click Confirm to save the configuration.
NOTE:
If required, you can use the output from the execute ML model activity in the Web Engage. For more information refer the Process Outputs section.
When you define the file path for input parameters, make sure you always have the absolute path instead of the relative path.
Execute ML Model Activity Properties
The properties of a Execute ML Model activity are listed in the following table and can be edited in the Properties grid on the right panel.
|
Propert Name |
Usage |
| Control Execution | |
| Ignore Error | When this option is set to Yes, the application ignores any error while executing the activity. If set to NA, it bypasses the exception (if any) to let the automation flow continue; however, it marks the automation status as failure, in case of an exception. By default, this option is set to No. |
| Delay | |
| Wait After | Specify the time delay that must occur after the activity is executed. The value must be in milliseconds. |
| Wait Before | Specify the time delay that must occur before the activity is executed. The value must be in milliseconds. |
| Misc | |
| Activity Timeout(ms) | Specify the execution timeout for the activity. The value must be in milliseconds, the default value is 5 mins. The Activity Timeout value will not over-ride the Automation Studio Search Time. In case the processing takes more time than the time defined for Automation Studio Search Time then the process will be timed out. This value should be ideally less than the Automation Studio Search Time and higher than the approximate time which it may take for model prediction or AI/ML processing. |
| Breakpoint | Select this option to mark this activity as the pause point while debugging the process. At this point, the process freezes during execution allowing you to examine if the process is functioning as expected. In large or complex processes, breakpoints help in identifying the error, if any. |
| Commented | Select this option to mark this activity as inactive in the entire process. When an activity is commented, it is ignored during the process execution. |
| DisplayName | The display name of the activity in the flowchart designer. |
MicroAI Bridge Service
In case of the Remote hosting type you have to manually install a service to run the MicroAI Bridge in the remote machine to execute the ML model.
|
NOTE: |
All the hosted pretrained ML models can be run using a single MicroAI bridge on the specific remote machine. However, you can choose to have a separate MicroAI bridge for each individual ML model. |
Prerequisite
Before installing the MicroAI Bridge Service on the remote machine, ensure the following system hardware and software prerequisites are maintained on the remote machine:
- Python v3.6 or above.
- ASP.NET Core Runtime 6.0 and .NET Runtime v6.0.
- Sudo access for running the MicroAIRemoteInstaller.dll.
|
NOTE: |
In remote hosting type, if https is preferred then you have to create your own proxy server that routes to the MicroAI Bridge service url. |
Installing Automation MicroAI Bridge Service
To Perform the Automation MicroAI Bridge Service installation:
- Connect to the Linux system and copy the Common> AddOns > MicroAIRemoteInstaller folder present in the build.
- Change the directory to the MicroAIRemoteInstaller folder.
- Run the command sudo dotnet MicroAIRemoteInstaller.dll to proceed with the installation.
Select an option:
1. Show status of all services
2. Create a new service
3. Stop a service
4. Start a service
5. Exit
2
Creating a new service...
1 services
Enter a port number for the new service:
1000
Enter the .NET 6.0 Directory (default: /user/bin/dotnet): /root/user/bin/dotnet/MicroAI
Reloading systemd configuration...
Enabling and starting AutomtaionMicroAIBridge service...
Automation MicroAI Bridge service has been successfully added as a service.
MicroAI service started at http://10.62.111.222:1000 , Please note it down. - Type 2 and press enter to Create a new service.
- Enter the port number for the MicroAI service, it is a mandatory input. The port number is the differentiator in the MicroAI service URL, in case you have multiple MicroAI services running on the remote server.
- Enter the .Net directory, it is an optional input if not provided the default .Net directory is used.
The Automation MicroAI Bridge service is added once all the necessary information has been provided. It also displays the url where MicroAI service is started, you have to add this url in the Connection Url field.
NOTE:
The service running on the remote server will automatically start when the server restarts.
When you run the sudo dotnet MicroAIRemoteInstaller.dll command, you can also type an option and decide whether to start a service, stop a service, or view the status of all services that are presently running on the server.