|
Requirements
|
Description
|
| Authentication Details |
Register the required application over Azure portal and note down the below mentioned details:
- Loginid or Username - the email ID required to login to the application.
- Password - the password corresponding to the loginid or username required to login to the application.
- ClientId- the unique identifier for your application that you receive at the time of registering the application. For ex., 6779ef20e75817b79602.
- RedirectUrl/CallbackUrl - the URL to which you must be redirected after the authorization is complete. For ex., https:// authorization-server.com/oauth/nativeclient.
- AccessTokenUrl – the URL that must contain the access token.
- SecretKey – the MFA key using which OTP code gets generated.
- AuthorizeEndpoint - the URL to request authorization. For ex., https://authorization-server.com/oauth/authorize.
- ClientCertificate - a certificate used to authorize the application requesting the access token. This certificate is password protected and typically contains information such as the digital signature, client name, expiration date and so on.
- ClientCertificatePassword - the password of the client certificate.
- ClientSecret - a value used to authorize the application requesting the access token.
- Certificate Expiry Date – the date of expiration of the client certificate or client secret key.
|
NOTE:
|
Client Secret Value expires after a certain period and is visible only for one time. Ensure to copy and keep it handy.
|
- Scope - the grants used to limit different levels of application access. An application can request one or more scopes. For example, User.Read Mail.Send.
Federated credentials are not yet supported.
Based on the authentication flow used, usage of above authentication details may vary. For Example, Client Credential Flow needs only the Client ID, Tenant ID & Client Secret.
It is recommended to use the client certificate over client secret for authentication as certificate authentication is a more secure way of authenticating any application.
|
| MFA Enabled Accounts |
For MFA enabled accounts, the user must have the MFA secret key obtained from the respective application. The secret key can be obtained during the setup of any Authenticator App such as Google Authenticator or Microsoft Authenticator.
|
| Types of Tokens |
- Access token
Access tokens enable users to securely call the Application APIs for performing various application related operations.
Validity – 1 hr.
- Refresh Token
When a user acquires an access token to access a protected resource, the user also receives a refresh token for few authentication flows such as Authorization Code, Authorization Code with PKCE & ROPC Flow. The refresh token is used to obtain new access token when the current access token expires.
Validity (Mobility and Desktop) – 90 days
Validity (Single Page Application) – 1 day
|
| URL Information |
URL Recommended for Redirect URL -
|
| Configure Office 365 application |
To configure a Office365 application:
- In the Admin menu, click the
 (Add Application) icon in the Application pane to add an application. The Add Application dialog box appears. (Add Application) icon in the Application pane to add an application. The Add Application dialog box appears.
- In the Application Type list, select Office365.
- In the Application Name field, enter a desired name for the application you want to add. The name must not contain any special character or space.
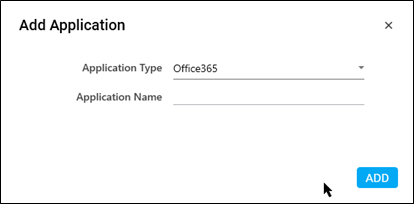
- Click ADD. A message for the successful addition of the application is displayed.
- Close the displayed message and enter the required details in the Application Properties panel.
- In the Service Url, specify the Service URL of the Graph API to be used. For example, https://graph.microsoft.com/v1.0
- Select the SignIn checkbox.
- In the DisplayName, enter the name of application.
- In the Modern Auth Type list, select the preferred auth grant type flow as per the Modern Authentication you want to run.
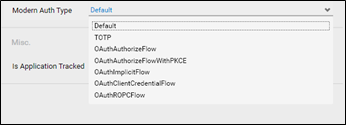
- For example, if you are creating process which uses Authorization Code Authentication flow, then ensure to select OAuthAuthorizeFlow from the available options.
- Select the KnowledgeManagement checkbox to enable the Knowledge Base feature in Engage.
|
NOTE:
|
The KnowledgeManagement checkbox can be selected for any one application configured under the Office 365 application type.
|
- Click Save.
You can see the added Office 365 application in the Application Tab.
|