Proctor Configured Robot Agent
Proctor enables you to create robot agent through Control Tower. Additionally, it enables you to start, stop and update the robot agent from Control Tower itself. It auto starts the Robot Agents and Robots (that were earlier in running or idle mode) whenever the system or proctor restarts
Proctor installation is part of client side installation and runs on the client side machine. Ensure that proctor is in a running state on the client machine. For more information about installation of proctor, see AE-RPA-Engage-Installation Guide.
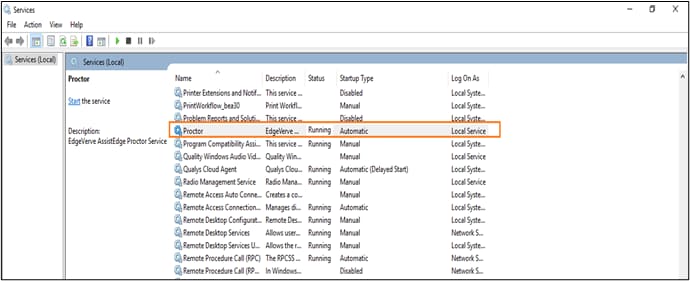
To validate whether proctor is running on the machine, navigate to Start > Administrative Tools > Services >Proctor
|
NOTE: |
|
For the machine on which proctor is installed, you can perform the following actions:
Configuration for Security Prompts
The securityPromptsequence.json configuration file emulates the keystrokes required to bypass the prompt screen. This configuration allows the proctor to establish a successful connection with the remote machine.
There are two types of prompt sequence, which includes:
- Connect Prompt: When you perform fresh login, security prompt appears which must be handled efficiently to login successfully. To handle such prompts, provide proper key sequence in ConnectPrompt object.
- Disconnect Prompt: When the session is disconnected then, security prompt appears which must be handled properly. To handle such prompts, provide proper key sequence in DisconnectPrompt object.
"ConnectPrompt": [
{
"Sequence": [
[ "Enter" ]
]
}
],
"DisconnectPrompt": [
{
"Sequence": [
[ "Enter" ]
]
}
]
}
To configure the security prompt sequence json file:
- Navigate to location- Robot > Proctor > securityPromptSequence.json.
- Edit the securityPromptSequence.json file.
- Single Prompt Screen:
Single Prompt screen may contain single option to select on the screen. For example: OK. You can either click OK or press Enter. For example, in the below screen only OK button is available and, you can press enter from keyboard to continue. In such scenario, the default array sequence will work.
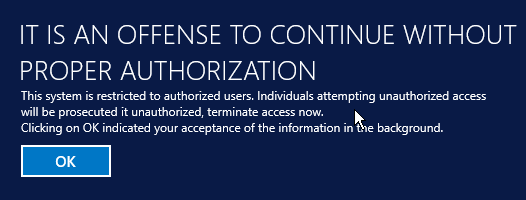
Following is the deafult array sequence:
{
"Sequence": [
[ "Enter" ]
]
} - Multiple Prompt Screen:
Prompt screen may contain multiple options to select, and you can navigate using Tab or Shift+Tab. In order to replicate the keystrokes, you are required to create an array sequence containing the array of keystrokes which will be executed sequentially. Select the appropriate key and enter the key name in the array sequence.
In case, two buttons are pressed simultaneously then, you must enter two key names separated by commas in that particular array.
For example, in the below screen windows security prompt comprises of two options i.e., Yes and No. You can navigate through these button by pressing Tab or Shift +Tab. By default, cursor appears on No button, hence you can press Shift+Tab to move to previous Yes button. To replicate the keystrokes, you are required to add the required keystrokes in array sequence.
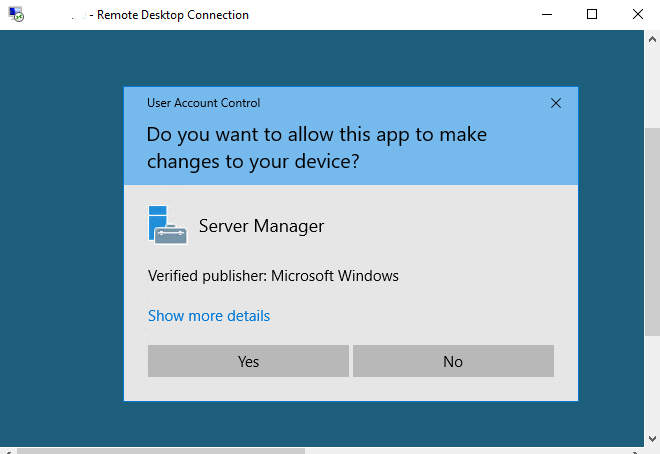
Following is the array sequence:
{
"Sequence": [
[ "Shift", "Tab" ],
[ "Enter" ]
]
} - Alternatively, you can also press tab twice in order to navigate to the Yes button. This sequence differs for different pop-ups. In a sequence, wherein you will have to press tab twice then, the array sequence should be as follows:
{
"Sequence": [
[ "Tab" ],
[ "Tab" ],
[ "Enter" ]
]
} - Refer the sequence value from en.US.Json at the location- Robot > Proctor > en.US.Json. For more information, see AE-RPA-Engage-Installation Guide.
- Single Prompt Screen:
- Save the changes.
Machine Level Actions - Adding Proctor Configured Robot Agent
To perform machine level actions on which the proctor configured robot agent is installed:
- Navigate to Machines View page.
- Click the
 (Add Agent) icon to add a new agent on a machine where proctor is installed and running.
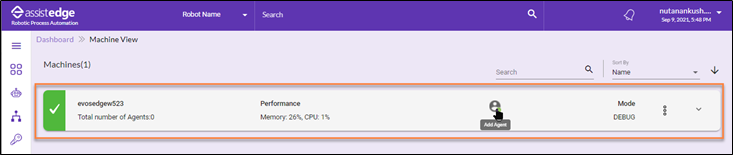
The Add Agent page is displayed. The green tick mark corresponding to any machine resembles that the machine is active and proctor is running.
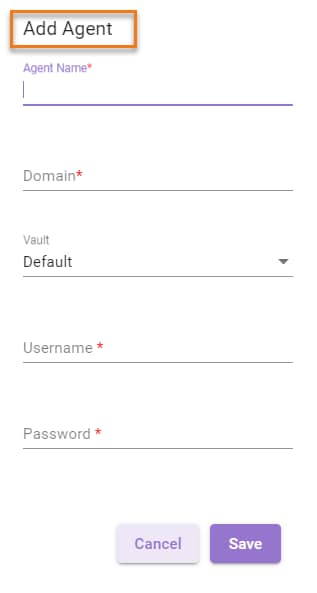
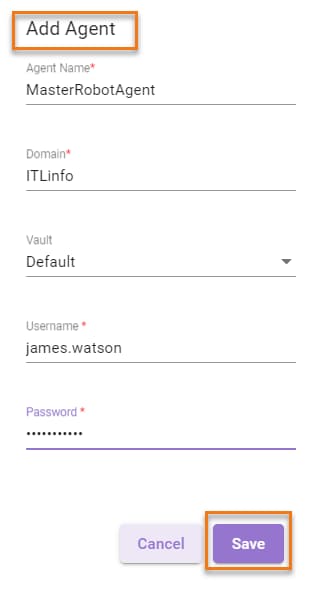
- In the Add Agent page, enter the following details:
- In the Agent Name field, enter the name of the Agent Name.
- In the Domain field, enter the domain path.
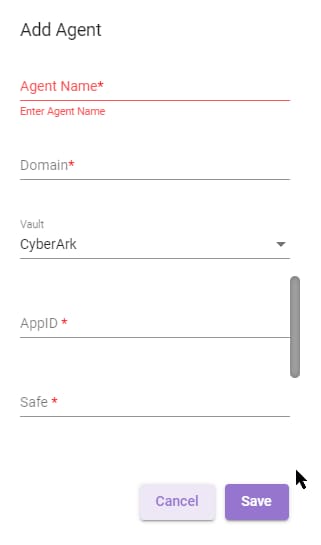
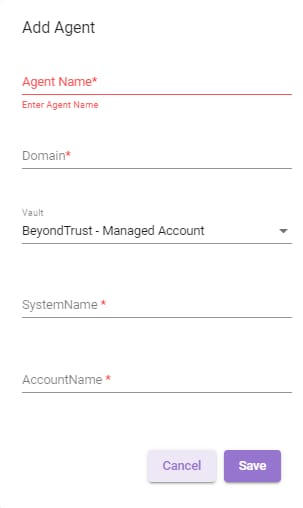
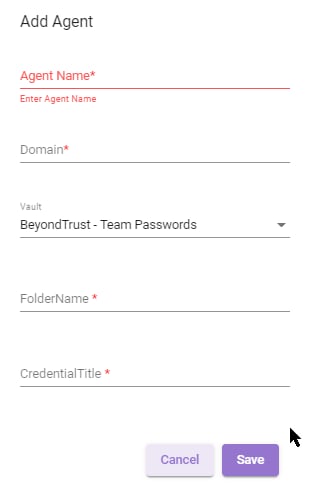
- In the Vault list, select the preferred vault option and specify the required values in the fields.
- Before proceeding, ensure that you have performed the required vault configuration for CyberArk, BeyondTrust - Managed Account or BeyondTrust - Team Passwords. For more information about configuring the CyberArk vault, see Configuration Vault type – CyberArk. Additionally, for more information about configuring BeyondTrust - Managed Account and BeyondTrust - Team Passwords, see Configuration Vault type – BeyondTrust.
- Default Vault: In case, you select Default Vault type then, you are required to enter the username and password details. For more information about Vault details, see Default (LDAP).

NOTE:
You must have a remote login access to this machine. Ensure that the number of allowed user sessions on the machine are not exceeded.
- CyberArk Vault: In case, you select CyberArk Vault type then, you are required to enter the details such as AppID, Safe, Folder and Object. For more information about CyberArk Vault details, see CyberArk.
- BeyondTrust - Managed Account – Vault: In case, you select BeyondTrust - Managed Account – Vault type then, you are required to enter details such as systemname and accountname. For more information about BeyondTrust-Managed Account vault details, see BeyondTrust.
- BeyondTrust - Team Passwords – Vault: In case, you select BeyondTrust - Team Passwords Vault type then, you are required to enter the details such as Folder name and Credential Title. For more information about BeyondTrust - Team Passwords vault details, see BeyondTrust – Team Passwords.
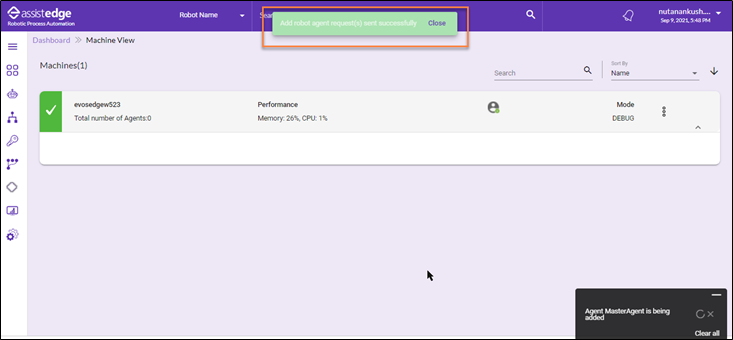
- Once done, Click SAVE to add the agent.
When the request is sent, a message appears as Add robot request(s) sent successfully.
|
NOTE: |
|
- Once the request is successful, proctor configured robot agent is added to machine.
 icon appears corresponding to the machine. Click the icon to expand and view the newly added robot agent.
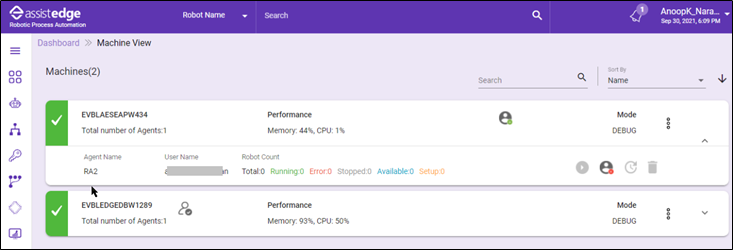
- If you have enabled the machine specific attributes then, update the values accordingly. For more information about configuring the machine related attributes, see Machine Specific Attributes section.
- Click the
 (Update Location) icon to update the location for the particular machine.
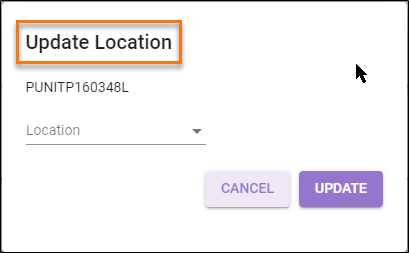
- Once done, click YES. The location of robot agent is updated accordingly.
- You can view the live snapshot for CPU utilization and Memory usage.
- Click the
Agent Level Actions - Proctor Configured Robot Agent
On the proctor configured robot agent, you can perform the following agent level actions:
Starting Agent
To start an agent:
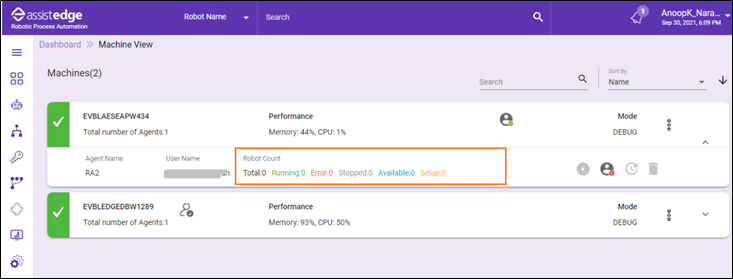
- Navigate to Machines View page.
- Click the icon to expand the machine view.
|
NOTE: |
|
 icon corresponding to robot agent indicates that the particular robot agent is down.
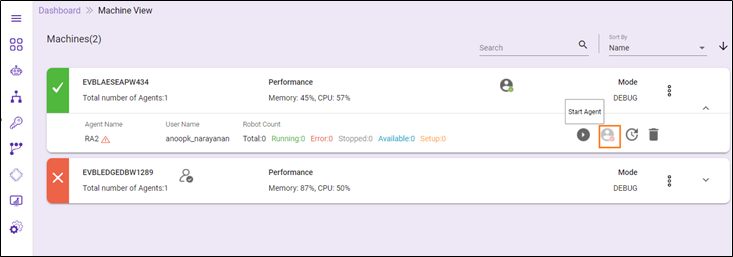
- Click the
 (Start Agent) icon to start an agent on the machine.
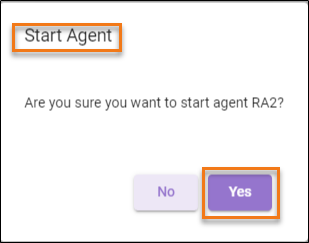
 - The Start Agent window is displayed and message as Are you sure you want to start agent <Robotname>? appears on the page. Click YES, if you want to start the agent.
-
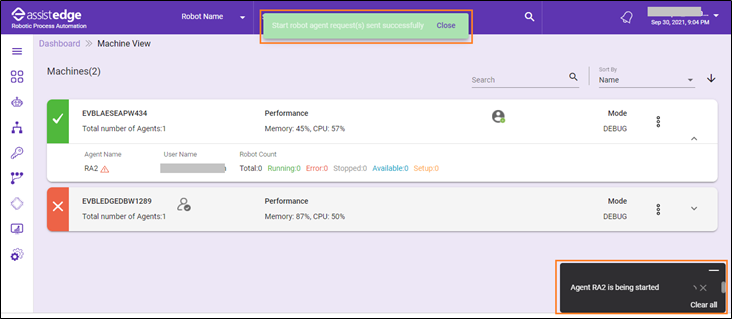
Click Yes, a request is sent, and message appears as Start robot agent request (s) sent successfully.
- Once the robot agent starts successfully, a message appears as Started Robot Agent <Robot Name> on the page.

Stopping Robot Agent
To stop the robot agent:
- Click the
 (Stop Agent) icon to stop the running agent. Ensure that, all robots running under the agent are stopped, before stopping the agent.
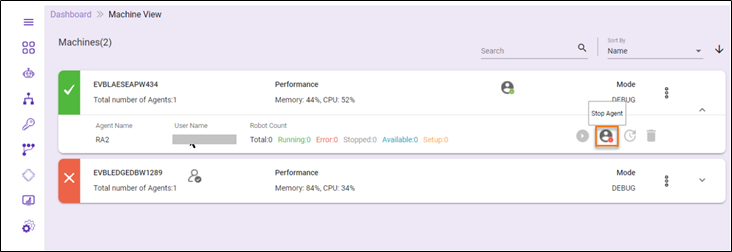
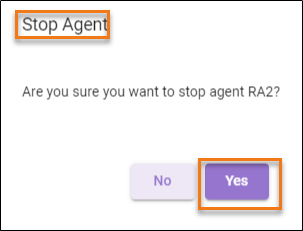
- The Stop Agent window is displayed and message as Are you sure you want to stop agent <Robotname>? appears on the page. Click YES, if you want to stop the agent.
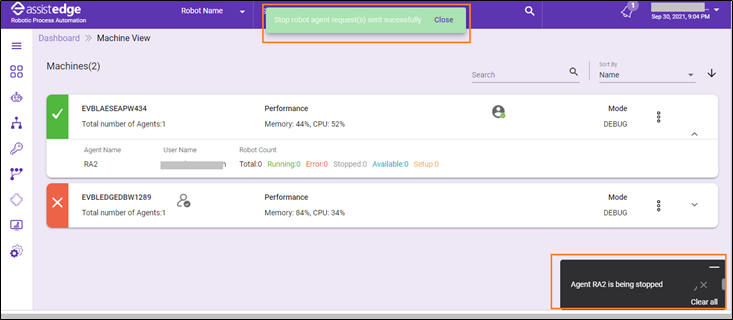
- Then, a request is sent and message appears as Stop robot agent request (s) sent successfully.
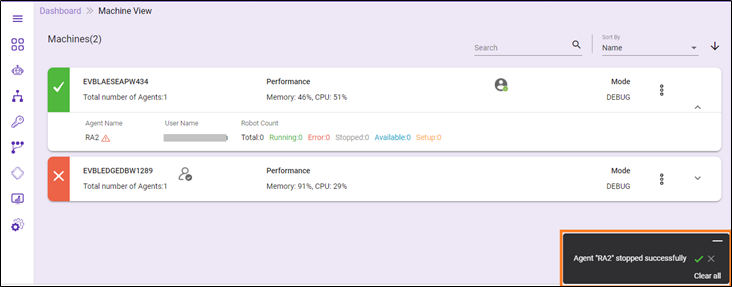
- Once the robot agent is stopped, message appears as Agent <Robot name> Stopped successfully.
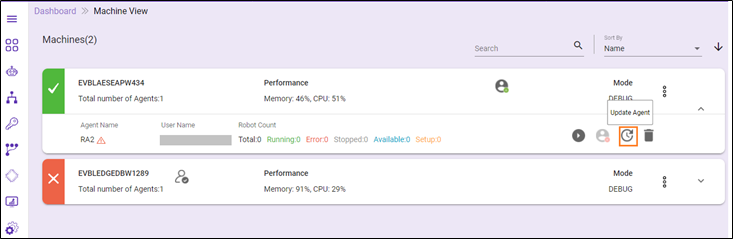
Updating Robot Agent
To update the robot agent:
- Click the
 (Update Agent) icon to update the user credentials under which the agent is running. Ensure that you stop the agent and all robots running under it, before updating the agent.
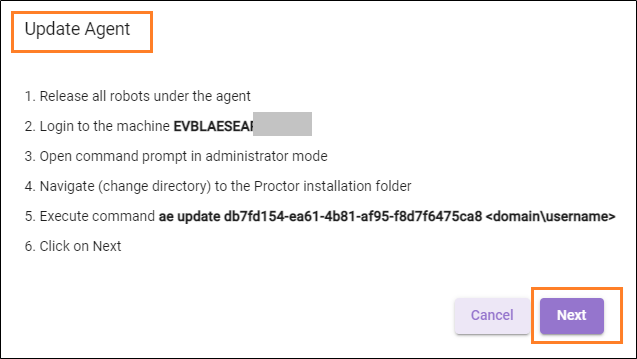
- The Update Agent window is displayed and prompts to perform certain actions on the machine where the proctor is installed. After performing these activities, click NEXT.
- Then, Update Agent - user detail page appears, update the user details such as Domain, Vault, Username, and Password. Click SAVE. For more information about the vault such as Deafult, CyberArk, BeyondTrust - Managed Account - Vault, and BeyondTrust - Team passwords, see Machine Level Actions.
NOTE:
From 19.1 release, you can also update the vault type as per your requirement upon adding an agent. For example, initially an Agent created via default vault and can be updated to use CyberArk or any another Vault Type as per requirement. 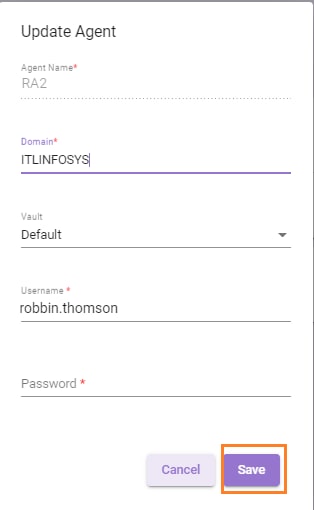
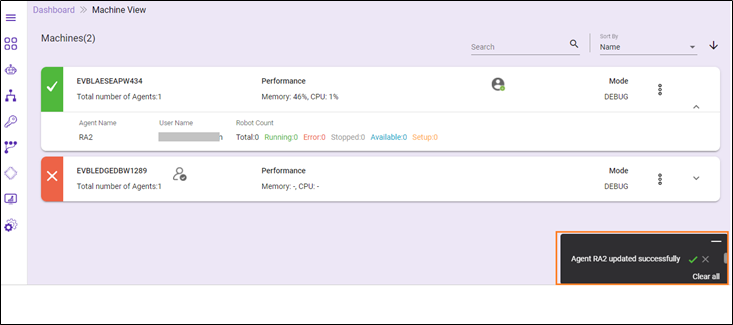
- Then, a request is sent and message appears as Update robot agent request (s) sent successfully.

- The robot agent is updated, and message appears as Robot Agent <Name of robot agent> updated successfully on the page. Once the request is successful, robot agent's username is updated and it starts running under the different (newly updated) user.
Delete Robot Agent
To delete the robot agent:
- Click the
 (Delete Agent) icon to delete the agent from the machine. Ensure that you have stopped the agent and deleted all the robots running under it, before deleting the agent.
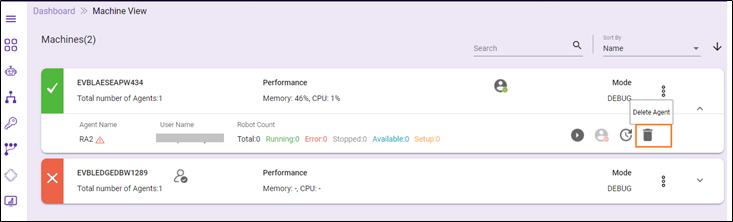
- The Delete Agent window is displayed and message as Are you sure you want to delete agent <Robotname>? appears on the page. Click YES, if you want to delete the agent.
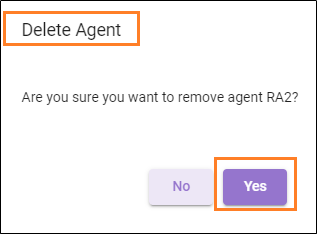
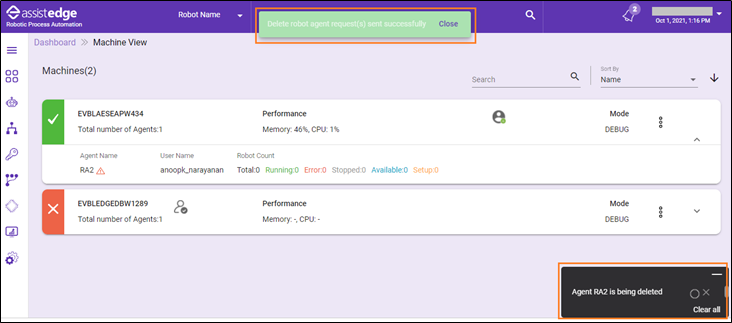
- Then, a request is sent ,and message appears as Delete robot agent request (s) sent successfully.
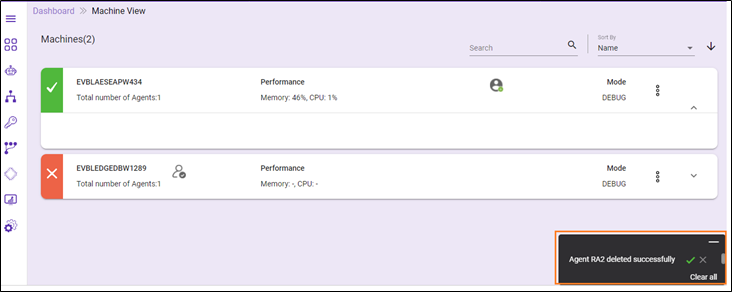
- Once the robot agent is deleted, a message appears as Robot Agent <Robot name> deleted successfully .
For more information about changing the robot machine mode, see Change Mode section in the Machine View.