FTP Activity
This activity allows you to automate the actions that can be performed on FTP or SFTP site like upload, download, rename or delete the required file.
|
NOTE: |
This activity must be used inside an Application activity or the system displays an error. This lets you establish a connection between Automation Studio and the configured FTP or SFTP server. |
Prerequisites
|
Requirement |
Description |
|
FTP or SFTP Server Details |
Server details of the FTP or SFTP such as IP address of the server, port number must be available. |
|
Access to FTP or SFTP server |
You must have access and login credentials of the FTP/SFTP server where you want to perform the automation. |
|
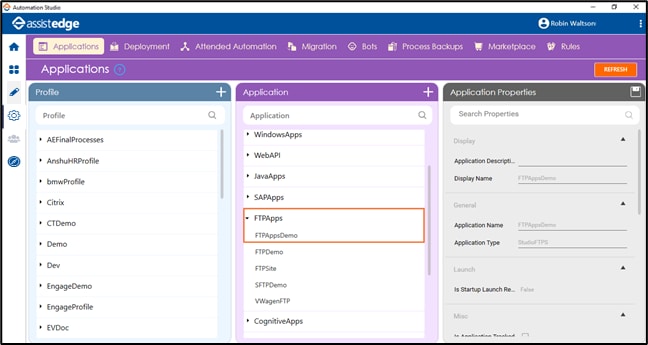
Configure FTP or SFTP server in Automation Studio |
Before you start creating the process, configure the FTP or SFTP server in Automation Studio where you want to perform the automation. Below are the minimum required properties for configuring the intended server. Remaining fields are auto populated with the default values already configured in Automation Studio . If you want to change the default values, refer FTPApps in the Admin Capabilities section.
|
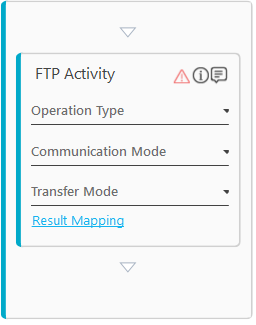
Using FTP Activity
The FTP Activity supports following operations:
- Push- uploades the file in the FTP or SFTP site.
- Pull- downloads the file from the FTP or SFTP site.
- List Directory- lists all the files and folders available at the FTP or SFTP site location in an excel file.
- Delete- deletes the files from the the FTP or SFTP site.
- Rename- renames the files present in the FTP or SFTP site
Push
- In the Canvas Tools pane, click Process Components to expand the tool and view the associated activities.
- Drag the Application activity and drop on to the Flowchart designer on the Canvas.
- In the Application Type list, select FTPApps.
- In the Select An Application list, select the configured FTP server.
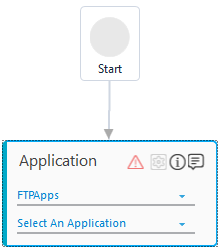
- Double click the Application activity, drag the FTP Activity and drop inside the Application activity.
- In the Operation Type list, select Push.
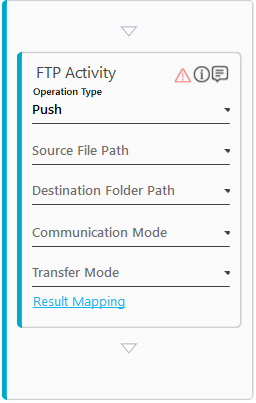
- In the Source File Path list, select the parameter containing the path of the file to be uploaded ( along with the file name, for example- "D:\Data\PDFOutput.pdf"). You must pre-define the parameter with the file path to make it appear for the selection.
- In the Destination Folder Path list, select the parameter containing the path of the FTP or SFTP site location where you want to upload the file, for example- "\Output"). You must pre-define the parameter with the folder path to make it appear for the selection.
- In the Communication Mode list, select Active or Passive depending on how the data connection is established between the client and the server.
- In the Transfer Mode list, select Binary or ASCII (Text) depending on the file type to be transferred. You can not transfer images file type using ASCII (Text) mode.
- Click Result Mapping link, the Output Mapping list appears. Select the available parameter to map the status of the operation performed. Both Boolean and String type is supported. You must pre-define the parameter to make it available for the selection. If the upload is successful, it returns true and if the operations fails it returns false. It can be used as an input for the next action that you want to perform depending upon the success or failure of the operation.
|
NOTE: |
Once you setup the environment, you need to provide the FTP or SFTP login credentials. |
The file gets uploaded in the FTP folder once you run the process. You can test run the process post setting up the environment to verify if the file is uploaded to the required FTP or SFTP site location.
Pull
- In the Canvas Tools pane, click Process Components to expand the tool and view the associated activities.
- Drag the Application activity and drop on to the Flowchart designer on the Canvas.
- Double click the Application activity, drag the FTP Activity and drop inside the Application activity.
- In the Operation Type list, select Pull.
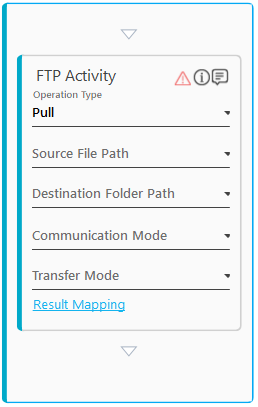
- In the Source File Path list, select the parameter containing the path of the file to be downloaded from the FTP or the SFTP site loaction for example-\Output\PDFOutput.pdf (if document is present at the root location itself, mention only the file name like \PDFOutput.pdf).
- In the Destination Folder Path list, select the parameter containing the path of the folder where you want to save the downloaded file, for example- "D:\Data\"). You must define the parameter in the Parameter bar with the folder path to let it appear for the selection.
- In the Communication Mode list, select Active or Passive depending on how the data connection is established between the client and the server.
- In the Transfer Mode list, select Binary or ASCII (Text) depending on the file type to be transferred. You can not transfer images file type using ASCII (Text) mode.
- Click Result Mapping link, Output Mapping list appears. Select the available parameter to map the status of the operation performed. Both Boolean and String type is supported. You must define the parameter in the Parameter bar to let it appear for the selection. If the download is successful, it returns true and if the operations fails it returns false. It can be used as an input for the next action that you want to perform depending upon the success or failure of the operation.
|
NOTE: |
Once you setup the environment, you need to provide the FTP or SFTP login credentials. |
The file gets downloaded from the FTP folder once you run the process. You can test run the process post setting up the environment to verify if the file is downloaded from the required FTP or SFTP site location.
List Directory
The list of files and folders is saved inside the excel file that gets created while performing this operation. If an excel file is already present at the location with same name, this operations overrides the file.
|
NOTE: |
|
- In the Canvas Tools pane, click Process Components to expand the tool and view the associated activities.
- Drag the Application activity and drop on to the Flowchart designer on the Canvas.
- Double click the Application activity, drag the FTP Activity and drop inside the Application activity.
- In the Operation Type list, select List Directory.
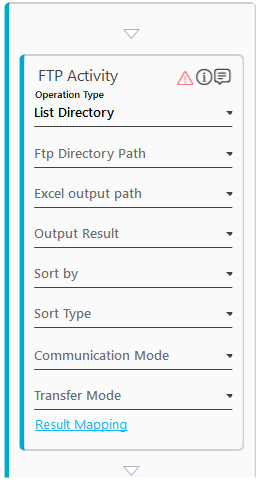
- In the Ftp Directory Path list, select the parameter containing the FTP or SFTP directory path from where you want to list the files. , for example- "\FTP\". You must pre-define the parameter with the directory path to make it appear for the selection.
- In the Excel output path list, select the parameter containing the path of the excel file (along with the file name, for example- "D:\DataTransfer\ExcelOutput.xlsx"). You must define the parameter in the Parameter bar to let it appear for the selection.
- In the Output Result list, select the parameter where the output of the sorted file list is saved.
- In the Sort by list, select the criteria based on which you want to sort the files. Available options are- Name, DateModified, Size and Type.
- In the Sort Type list, select the order by which you to apply the sorting criteria. Available options are- ASC and DESC. ASC signifies ascending order while DESC signifies descending order.
- In the Communication Mode list, select Active or Passive depending on how the data connection is established between the client and the server.
- In the Transfer Mode list, select Binary or ASCII (Text) depending on the content of the file to be transferred. You can not transfer images file type using ASCII (Text) mode.
- Click Result Mapping link, Output Mapping list appears. Select the available parameter to map the status of the operation performed. Both Boolean and String type is supported. You must define the parameter in the Parameter bar to let it appear for the selection. If the operation is successful, it returns true and if the operations fails it returns false. It can be used as an input for the next action that you want to perform depending upon the success or failure of the operation.
|
NOTE: |
Once you setup the environment, you need to provide the FTP or SFTP login credentials. |
Once you run the process, the list of files is available in the mentioned excel file. You can test run the process post setting up the environment to verify if the list of files and folders is available.
Delete
- In the Canvas Tools pane, click Process Components to expand the tool and view the associated activities.
- Drag the Application activity and drop on to the Flowchart designer on the Canvas.
- Double click the Application activity, drag the FTP Activity and drop inside the Application activity.
- In the Operation Type list, select Delete.
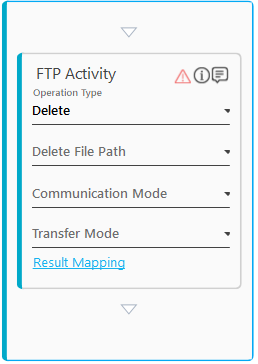
- In the Delete File Path list, select the parameter containing the path of the file to be deleted from the FTP or SFTP site location ( along with the file name, for example- "\Output\PDFOutput.pdf" (if document is present at the root location itself, mention only the file name like "\PDFOutput.pdf"). YYou must define the parameter in the Parameter bar to let it appear for the selection.
- In the Communication Mode list, select Active or Passive depending on how the data connection is established between the client and the server.
- In the Transfer Mode list, select Binary or ASCII (Text) depending on the file type to be transferred. You can not transfer images file type using ASCII (Text) mode.
- Click Result Mapping link, Output Mapping list appears. Select the available parameter to map the status of the operation performed. Both Boolean and String type is supported. You must define the parameter in the Parameter bar to let it appear for the selection. If the rename is successful, it returns true and if the operations fails it returns false. It can be used as an input for the next action that you want to perform depending upon the success or failure of the operation.
|
NOTE: |
Once you setup the environment, you need to provide the FTP/SFTP login credentials. |
The file gets deleted from the FTP folder once you run the process. You can test run the process post setting up the environment to verify if the file is deleted from the specified location.
Rename
- In the Canvas Tools pane, click Process Components to expand the tool and view the associated activities.
- Drag the Application activity and drop on to the Flowchart designer on the Canvas.
- Double click the Application activity, drag the FTP Activity and drop inside the Application activity.
- In the Operation Type list, select Rename.
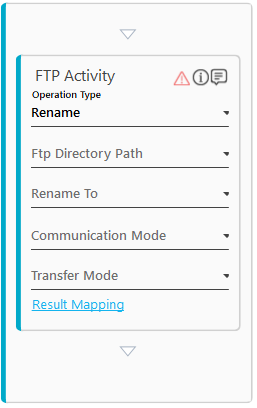
- In the Ftp Directory Path list, select the parameter containing the path of the file to be renamed in the FTP folder( along with the file name, for example- " \Output\PDFOutput.pdf"). You must pre-define the parameter with the file path to make it appear for the selection.
- In the Rename to list, select the parameter containing the name with which you want to rename the file. You must pre-define the parameter with the new name to make it appear for the selection.
- In the Communication Mode list, select Active or Passive depending on how the data connection is established between the client and the server.
- In the Transfer Mode list, select Binary or ASCII (Text) depending on the file type to be transferred. You can not transfer images file type using ASCII (Text) mode.
- Click Result Mapping link, Output Mapping list appears. Select the available parameter to map the status of the operation performed. Both Boolean and String type is supported. You must define the parameter in the Parameter bar to let it appear for the selection. If the delete is successful, it returns true and if the operations fails it returns false. It can be used as an input for the next action that you want to perform depending upon the success or failure of the operation.
|
NOTE: |
Once you setup the environment, you need to provide the FTP or SFTP login credentials. |
The file gets renamed in the FTP folder once you run the process. You can test run the process post setting up the environment to verify if the file is renamed at the specified location.
FTP Activity Properties
The properties of a FTP Activity are listed in the following table and can be edited in the Properties grid on the right panel.
|
Property Name |
Usage |
|
Control Execution |
|
|
Ignore Error |
When this option is set to Yes, the application ignores any error while executing the activity. If set to NA, it bypasses the exception (if any) to let the automation flow continue; however, it marks the automation status as failure, in case of an exception. By default, this option is set to No. |
|
Delay |
|
|
Wait After |
Specify the time delay that must occur after the activity is executed. The value must be in milliseconds. |
|
Wait Before |
Specify the time delay that must occur before the activity is executed. The value must be in milliseconds. |
|
Misc |
|
|
Breakpoint |
Select this option to mark this activity as the pause point while debugging the process. At this point, the process freezes during execution allowing you to examine if the process is functioning as expected. In large or complex processes, breakpoints help in identifying the error, if any. |
|
Commented |
Select this option to mark this activity as inactive in the entire process. When an activity is commented, it is ignored during the process execution. |
|
DisplayName |
The display name of the activity in the flowchart designer. By default, the name is set as FTP Activity. You can change the name as required. |
|
IsSftp |
Signifies if SFTP server is used for the automation. |